Assembling an IKEA desk (a complex job aid, part 1)

(Part 1 of 2; here’s Part 2.)

With most of the job aids I’ve discussed on the Ensampler, I’ve focused on a main purpose–the job aid as primarily a reference or primarily a decision-guiding flowchart, for instance.

ikea-galant-frame-cover
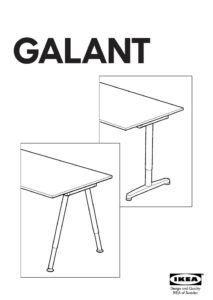
Here, I’m analyzing a familiar type of job aid: IKEA instructions. I’ve chosen the guide for IKEA’s Galant desk. The goal of this guide is to help someone attach legs to a metal frame, and then attach the frame to a desktop.

Many people think of IKEA instructions as mainly procedural (step-by-step guides). The Galant instructions are more complex—they cover forty pages, so a single guide can help a consumer assemble any of the thirty-two different Galant configurations, based on size, shape, optional extensions, and so on. (You buy the frame, top, extensions, and legs separately; the instructions come with the frame.)

Beyond number of pages, though, what’s significant is how the Galant instructions support several types of accomplishment. I’ve split the discussion into two similar-sized chunks:

Part 1 (this post)

  • Background on the Galant desk
  • The decision guide section of the instructions, to help you find steps for the specific configuration of Galant desk you have,
  • The concise, detailed checklist that shows the quantity and type of each part needed for each combination of frame, top, extension, and legs

Part 2 (the next post)

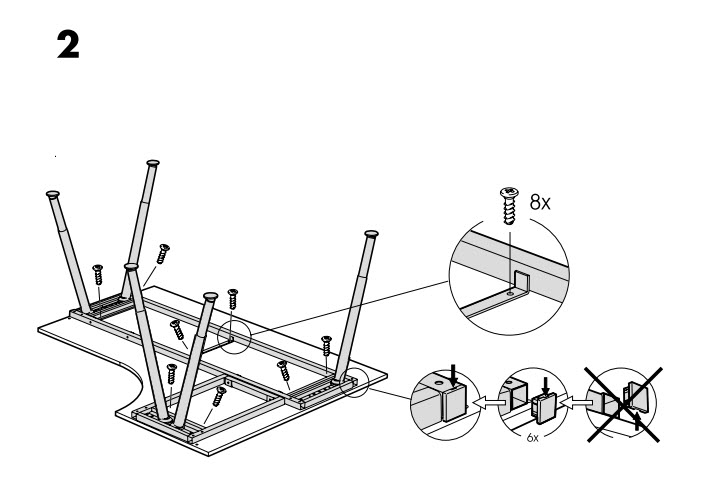
  • The detailed procedural steps for your specific assembly.

Galant: the Background

While IKEA’s Galant series of office furniture has been replaced by the similar Bekant series, I’m deeply familiar with the Galant; I had the corner desk in my office for years.

Galant corner desk (160 x 120 cm) with side table (80 x 60 cm) to the left

That’s my old desk in the photo. IKEA calls it a left-hand desktop: one piece whose main, rectangular form curves  into a smaller section on the left.

I didn’t join any extensions to mine, but as you’ll see, all the tops were designed to match up with various extensions.

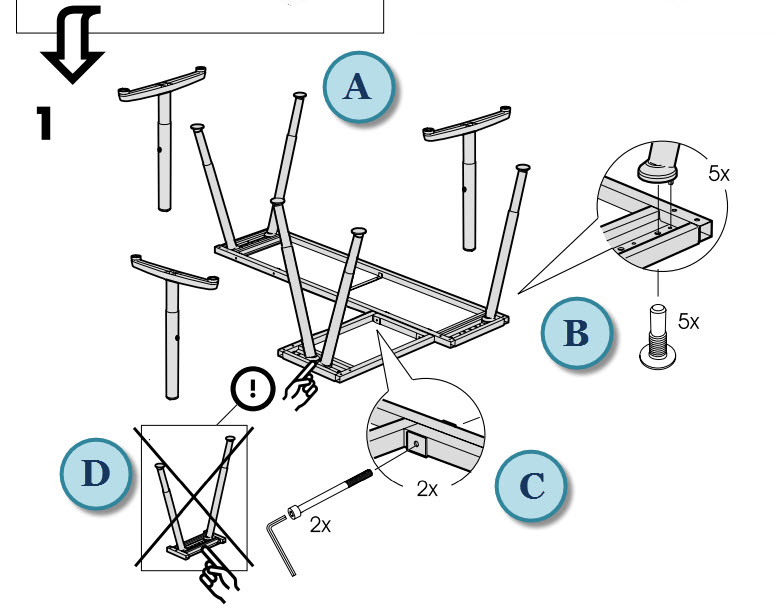
The tops and extensions attach to a metal frame whose components depend on the configuration.  And two types of legs — angled or T-shape — attach to the frame. For a clearer picture of how things come together, here’s a short video of two Galants being assembled. Both of these include a rectangular extension, so each desk is larger than mine was.)

Decisions, decisions

As near as you configure
For the desk you have, see the page indicated.

Page 3 of the instructions is a wordless decision guide: based on the configuration you’ve chosen, turn to page X.

This page shows thirty-two different combinations of desk elements. Like a good reference, though, it organizes and categorizes.

Each row set off by a line contains combinations that follow the same basic assembly steps. The third row down, for example, shows ten different combinations of desk that all follow the steps on page 10.

ikea-galant-row-3

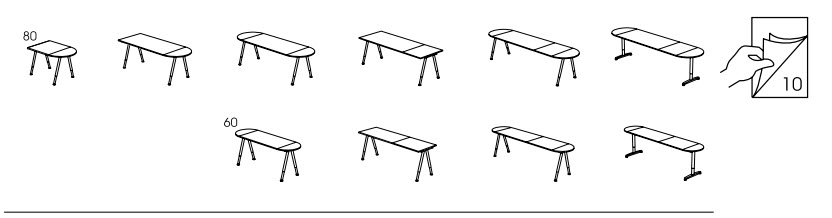
You could find many approaches to organizing this decision. It’s not hard to imagine an product-centric one that started with the part number for each size of frame. What IKEA has done well here is to focus on the customer’s goal: a particular desk.

The customer likely compared several configurations and so is likely to recognize the one he chose. What’s especially helpful here is that IKEA relies on generalization: each row is a set of distinct  items (the configurations) that leads to the same response (steps for assembly).

Checklist: which, where, and how many

Page 4 of the Galant guide has this chart:

ikea-galant-page-4

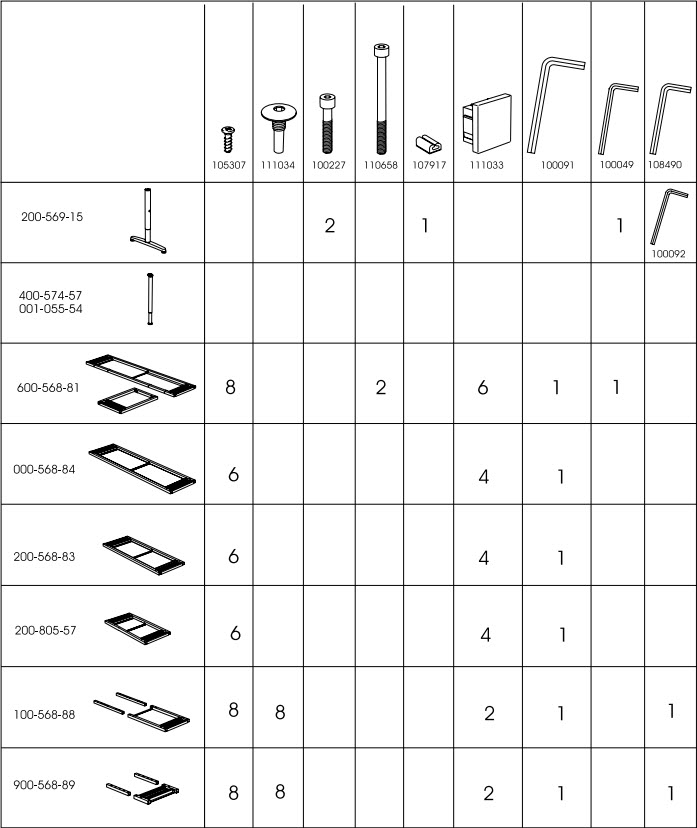
It’s a checklist, dressed up like a reference.

A checklist, because you choose the type of leg, frame, or extension you’re working with, and then read across to see how many parts of each type you need. The focus of a checklist is coverage or completion: make sure you have all these parts.

Here too there’s an assumption that the consumer knows what’s going on.  The last two rows of the page 4 chart are for different types of desk extensions. You wouldn’t have those if you didn’t have the main desk, and so IKEA is relying on you to chunk your part-identification:

  • Parts for the type of leg your desk will have (the first two rows)
  • Parts for the main portion of the frame you’re using (rows three through six)
  • Parts for the extension

In addition, IKEA steps outside strict rules when it comes to parts for the T-leg. There’s a special size of hex wrench for these legs; it’s used to adjust their height. That size isn’t used for any other part in the Galant family, and so that specific wrench (100092) appears in the right-hand column, where you’d expect either a blank or a 1 (which would indicate you needed wrench 108490.

ikea-galant-page-4-detail-2

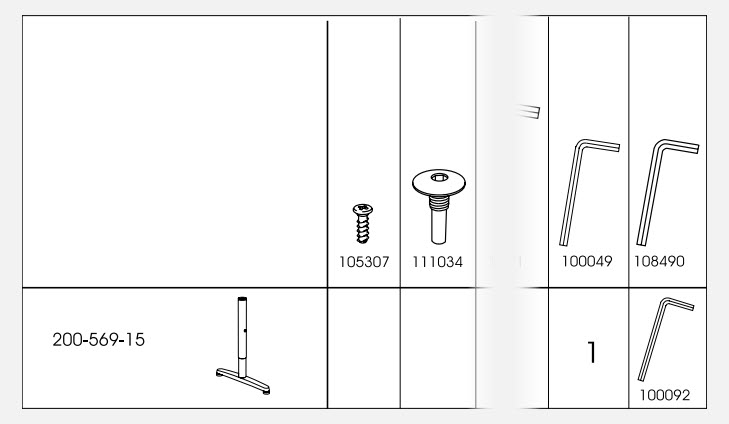
I’m not sure I would have designed this chart that way, but I think it’s effective. Even if you hadn’t started assembling your desk, you’d be likely to say “I should have this particular wrench,” and it would have come in the package with the T-leg.

As I said, the parts chart is a checklist–but if you keep your IKEA instructions, as I do, it’s also a reference. Eight years after purchasing another piece of IKEA office furniture, I was able to get a replacement part because the original instructions told me what the part number was.

(This was Part 1 of 2; here’s Part 2.)

Assembling an IKEA desk (part 2)

(Part 2 of 2; here’s Part 1.)

Procedure: so let’s build a desk

…there’s one foolproof method for turning IKEA rage into grudging respect: assembling almost any other brand of furniture…

To adapt Winston Churchill’s famous quip, IKEA may be the worst form of ready-to-assemble product design we have—except for all the others.

John Pavlus

As noted above, page 3 of the Galant instructions is a decision guide — it directs you to one of seven different sets of procedural steps, depending on the type of desk you’re putting together.

I had a left-handed desk with no extensions; that’s the fourth set of instructions, on pages 16 and 17.

You can see those are typical IKEA instructions. They demonstrate a careful, specialized approach to guiding performance:

  • No text (a single sentence would have to appear in dozens of languages)
  • Minimalist images (what detail you see matters)
  • Customer focus (the desk, the frame, the legs appear in standard positions and as the assembler would see the actual parts)
  • Call-outs, close-ups, and warnings

Implicit in IKEA instructions are two messages: “You can assemble this item,” and “Here are the details.” Those messages are related: if you don’t attend to the details, you’ll have trouble assembling the item.

You are here.

Here’s the top of page 16:

If you’re building one of these, you’re on the right page.

The diagram is meant to confirm that you want the instructions for a right-hand desk (top row) or a left-hand one (bottom row), whether you’re using five angled legs (left column) or three T-legs (right column).

Each configuration appears both upright (because that’s your goal) and upside down (because that’s how it’ll look as you work on it).

A complex two-step

If you study pages 16 and 17, you’ll see that there are two main steps: attach the legs to the frame, and attach the frame to the desk. IKEA marks those with a big 1 and 2.

The biggest drawback to IKEA’s wordless style is that there can be a lot of detail in a step. Here’s the main part of step 1 (page 16) to which I’ve added some callouts for commentary.

A: attaching legs to the frame

The diagram shows both kinds of legs so you’ll see how to position them: for the angle legs, one in the corner of the desk and two at each of the remaining ends.  For the T-legs, orientation matters, with the two on the long side of the desk parallel to teach other.

B: details for attaching angle legs

A bolt goes through the frame into the angle leg. Note the closeup: there’s a small tab on the top of the leg that fits onto a hole on the frame. Also, the 5X is a reminder that you have five angle legs to attach.

(I’ll get to the details for T-legs later in this post.)

C: attaching the extension to the frame

Some Galant desks are ordinary rectangles, but the right- and left-handed desks need support for their extensions. The closeup at C shows where two hex-head bolts attach the frame extension to the main frame.

Details matter: if you look closely, you’ll see that the end of the extension that the legs attach to looks different from the end that attached to the main frame. (If you don’t look closely, eventually you’ll discover that the leg end doesn’t have any holes for you to attach it to the main frame.)

D: attaching angle legs to the extension

A pointing hand draws attention to the closeness of the legs for the extension. (Compare them with the two legs at the far end of the main section.) There’s even an X-ed out “not this way” diagram to reinforce the point.

The short version:

  • Position each angle leg and bolt it to the frame.
  • Position the frame extension and bolt it to the main frame.

At the bottom of page 16, you find two boxed items; each directs you elsewhere for a specific sub-procedure.

The left-hand diagram sends you to page 40 to see how to adjust the height of your desk, regardless of type of leg. Personally, I might have put this particular procedure on page 17, after you’ve attached the frame to the desk.

The right-hand diagram sends you to page 5. That has the steps for assembling the T-legs and for attaching them to the frame.

Attaching the frame

Attaching the frame to the desk is straightforward: eight screws, as indicated on the diagram.

The less-obvious part of this step involves putting plastic caps over the open ends of the metal frames: four on the main frame, two on the extension.

Here, too, callouts and a don’t-do-this diagram to show there’s a right way to attach the caps. (The small arrow, in the middle of the three circles, shows a little notch you can slip a screwdriver into to easily remove the cap.)


Desk work

Why spend so much time analyzing a set of IKEA instructions?

I think the Galant guide is a highly effective approach to supporting detailed accomplishments. IKEA’s worldwide market necessitates a wordless approach to such support. That has its drawbacks–I know I’ve misread IKEA instructions more than once. Almost always, though, I can back up, undo the error, and get things right.

What’s more, the IKEA format is kind of do-it-yourself cultural artifact, and once you’ve put together a couple of IKEA items, you’ve learned through experience to pay attention to details like hole size, spacing, and position of part.

By the way, there’s also a thriving culture of IKEA hacks–people going far beyond the instruction guide. Here are over a dozen hacks just for the Galant, including someone’s megadesk that’s 25 feet long, not including 12 extra feet of shelving made from yet more Galant parts.

(This was Part 2 of 2; here’s Part 1.)

Airbus Quick Reference: Engine Dual Failure

About the QRH for Engine Dual Failure

On January 15, 2009, US Airways flight 1549, an Airbus 320, lost thrust shortly after takeoff and ditched in the Hudson River. The following year, the National Transportation Safety Board (NTSB) issued its report on the incident (summary, full report).

Thirteen seconds after the plane struck birds, captain Chesley Sullenberger told first officer Jeff Skiles, “Get the QRH [Quick Reference Handbook] loss of thrust on both engines.” (Skiles had recently been to recurrent training, and so Sullenberger believed the first officer could find the QRH more quickly.)

In everyday speech and in news reports, such tools are often called checklists, but because the Engine Dual Failure quick reference involves a sequence of actions, as a job aid I consider it a procedure. It’s a guide through a number of steps to follow when both engines of an Airbus fail.

Accomplishment

At one level, the accomplishment here is to safely land the aircraft following the failure of both engines. Looking deeper, you can see that there are decision paths build into the quick reference.

Step 1 has to do with fuel.

  • “If no fuel remaining…” has eight substeps to complete before going on to Step 2.
  • “If fuel remaining…”  is even more complicated, with internal decisions based on type of aircraft, ability to reach Air Traffic Control, result of trying to relight (restart) the engines; the longest path has fifteen substeps.

Step 2 (on the second of the three pages) hinges on whether the attempt to restart the engines was successful.

Step 3 deals with whether the aircraft will have a forced landing (that is, on the ground) or a ditching (an emergency landing in water).

Performer

This is a highly specialized job aid, intended for use by the flight crew of particular Airbus aircraft. It’s full of technical shorthand (FAC 1, OFF then ON; ENG MODE Selector, IGN) and directions aimed at skilled people (“Add 1° of nose up for each 22,000 lbs above 111,000 lbs…”).

Coping with emergencies: a performance dilemma

In an emergency, one risk is tunnel vision: becoming so engrossed with certain aspects of the situation that routine ones get overlooked. Job aids are one way to address this–if the performers are trained to rely on the job and, and the work culture emphatically supports their use, then it makes sense to store information and guidance in the job aid.

Skills that are time-critical, like the actual flight maneuvers, are the ones that you spend time learning (storing in memory).

The NTSB report acknowledges this, and notes a performance dilemma:

Accidents and incidents have shown that pilots can become so fixated on an emergency or abnormal situation that routine items (for example, configuring for landing) are overlooked. For this reason, emergency and abnormal checklists often include reminders to pilots of items that may be forgotten. Additionally, pilots can lose their place in a checklist if they are required to alternate between various checklists or are distracted by other cockpit duties; however, as shown with the Engine Dual Failure checklist, combining checklists can result in lengthy procedures. [NTSB report, p. 92]

Comments

I’ve written about Flight 1549 on my other blog. Some aspects are relevant to the example of this quick reference. For example, the reference assumed a higher air speed and a higher altitude than Flight 1549 had.

Sullenberger said later that although there was an additional reference for ditching the aircraft, the crew never got to use it. “The higher priority procedure to follow was for the loss of both engines,” he said in an interview. In other words, in their professional judgment, it was much more important to try and restart the engines.

So: on the one hand, you can’t infallibly job-aid your way through every possible situation. But neither can you infallibly train (work at storing in memory) through them all, either.

Side note: passengers and safety

Talking isn’t training, and listening isn’t learning. Despite the inescapable safety briefing on every U.S. commercial flight, only half the passengers evacuated with their “can be used as a flotation device” seat cushions. 19 passengers also tried to retrieve life vests from under their seats; only 3 succeeded.

And of the 30 who tried to put on a vest once outside the plan, only 4 said they could do so properly.

Nevertheless, without taking anything away from the safe ditching of the aircraft, the evacuation training that the cabin crew regularly underwent (so as to be able to perform from memory) had a great impact, though one much less widely acknowledged, on the survival of every passenger from Flight 1549.

WHO: How to Do the Rapid Test for Malaria

About this job aid

Malaria is transmitted to humans through the bites of infected mosquitos. WHO (the World Health Organization) estimates 219 million cases of malaria, and 660,000 deaths, in 2010 alone (last page in this summary).

Rapid diagnostic tests (RDTs) provide a quick alternative to clinical-based diagnosis, testing for specific proteins produced by malaria parasites. Different tests have different capabilities; some can detect only only species of parasite, such as Plasmodium falciparum (hence “Pf test”). These tests are often conducted by local-community health workers.

A key reason for the RDT is to shorten the time between the onset of symptoms and the beginning of treatment. This WHO job aid is a guide to performing such tests.

rtm entire big

Click the image to view in a separate window.
Based on training materials at the
Malaria Rapid Diagnostic Tests website.

What’s the accomplishment?

Correctly performing the generic Pf test for malaria.  This involves using the materials in a medically correct and safe manner, as well as correctly interpreting the results to determine whether the test is positive (indicates malaria), negative (no malaria), or invalid (need to repeat the test).

Who’s the performer?

Health workers, often “in rural areas with limited access to health and laboratory facilities.” These workers may have low literacy and little formal training in the use of the RDT. They may also have minimal supervision in the field.

Comments / critique

  • Note that this job aid is a model; it would be modified to fit the local language, culture, and the specific RDT test. Thus in step 11, a callout reads “count correct number of drops” (of a buffer solution). In the field, location-specific job aids would presumably give the actual number of drops.

I haven’t seen other examples, though. It may be that the buffer bottle spells out the number of drops clearly, and that the training stresses checking that number.

  • Size: this is a large job aid. It wouldn’t fit on a typical letter-size or A4 sheet of paper. Instead, it seems intended as a poster, and could be mounted on a wall where the health worker conducts the testing.

You’ll often see arguments that a job aid should be brief. That’s a relative term and often misleading. The essential characteristic of a job aid is that it successfully guides performance by specific kinds of performers. If they can’t succeed with a five-step job aid, maybe you need more steps.  If you can’t fit the steps into a given size, then maybe that’s not the right size for that bunch of steps.

Consider: two pages, a larger page, a reframing of a big job aid into three smaller ones (How to Set Up the Widget Modifier; How to Modify a Widget; How to Check Modified Widgets).

  • A combination job aid: How to Do the RDT is mainly a procedure. Step 14, however, takes up 20% of the space, and supports the key accomplishment: a decision in the form of a diagnosis. That’s why, for the Ensampler, I’ve tagged this job aid under both categories.
  • Step 14 provides specific examples for the two kinds of positive results (the line near T can be strong or can be faint), and for the two kinds of invalid results (no line at C and no line at T; no line at C and a line at T). Showing these examples is more useful in the context of this job aid than relying solely on “and / or” language in the text. 
  • One quibble about terminology: step 3 of the job aid refers to the test, not the cassette or the test cassette. The only place cassette appears is in step 16.

(Note: with the following point, I’m musing about job aid design in general. I am not trying to second-guess the developers of this particular job aid.)

I might have made different choices for steps 15 and 16.

rtd step 15 16

Those steps seem to involve three chunks of behavior:

  • Discard the gloves, swab, desiccant, and packaging (step 15).
  • Record the test results (first part of step 16).
  • After recording, discard the cassette (second part of step 16).

I assume that good practice says “write down the results before you discard the test cassette.” If that’s the case, it might make sense to underscore discard-write-discard with a new step 17. It would look like step 15 but with an image of the cassette.

Other resources

  • The home page for the Malaria Rapid Diagnostic Tests.
  • A field report on developing and testing a job aid for RDTs, prepared by the Quality Assurance Project in collaboration with the World Health Organization (2004).

Screencast.com’s Getting Started Guide

About this job aid

Screencast is an online service that lets people “manage and share videos, images, documents, or anything else online.” In its Help Center, Screencast has more than a dozen how-to guides, including  a succinct Getting Started Guide.

(You don’t need an account to access this PDF, which is nine pages long–including the cover and the table of contents.)

What’s the accomplishment?

The Getting Started Guide helps you do two things:

  • Create a Screencast account (which you need in order to put your content on Screencast)
  • Upload content to a folder so you can share that content online

Who’s the performer?

Anyone who has video. images, documents, PowerPoint presentations, and similar material that they want to share online.

A job aid strategy: letting people decide what help they need

The Guide takes a useful approach to the task of uploading and sharing content on Screencast: two versions of the same job aid. For people who don’t need a lot of explanation, there’s the short version. (You can click the examples below to enlarge the images, which are taken from the downloadable PDF.)

In a hurry? Four steps to sharing.

That’s it–the basics, on a single page.

For people who prefer more detail, there’s a four-page version for the same task. Here’s how it begins:

The first of four pages in the “more detailed” job aid

One aspect of the detailed how-to is the way it handles screen shots. That example you just saw of the first page includes an image of the full-screen library on the left, then a closeup of the Edit Folder window. In other words, they’ve cropped unnecessary detail out of that second image.

They continue in this leave-things-out mode. For example, to help you decide how you’ll share, they crop to only the Privacy section of the Edit Folder. My take is that they’re focusing your attention on just that section, and omitting anything you don’t need to see while you’re deciding on the level of privacy for the content in this folder.

Some people might find this a bit harder to follow than full-screen images, but I think such images are often hard to follow in themselves. They’re small (in order to fit on the page), and typically they’re needlessly cluttered with detail that doesn’t directly relate to the step I’m performing.

Careful weeding of detail is a way to rely on the performer’s intelligence and his interest in accomplishing the task.

Other features of the Guide

The Guide is really a collection of several job aids, and the way it’s laid out is useful for the newcomer. Here’s the overview at the top of page 1, for example:

Screencast.com is a TechSmith solution for business and academic professionals looking to manage and share  videos, images, documents, or anything else online. Whether you have a Free Account or a Pro Account, this Getting  Started Guide will help you get up to speed fast. In this guide, you will find the following topics: Create a Screencast.com Account on page 3. Give Me the Short “How To” on page 4. Give Me the More Detailed “How To” on page 5

A two-sentence overview followed by a three-line summary, and you can figure out what’s in the Guide. The bullet points of that summary do double duty; you can see them as a miniature decision table, helping you decide which part of the Guide you need to use.

The page has a table of nine “terms you should know” — content, embed, library, and so on — that relate directly to uploading and sharing via Screencast.

As a job aid, that table falls into the reference category; you’d use it to learn or remind yourself what “breadcrumb” or “RSS” means in the context of Screencast. Overall, though, I’d put the Getting Started Guide into the procedure category of job aids.

Finally, still one page 1, there’s a box listing other resources, like the Help Center, two other guides (one with “end-to-end workflow” for using Screencast, and an “example case study“).

More about Screencast

Screencast is a TechSmith product, as are SnagIt [for screen captures] and Camtasia [for screen recording and video editing). Screencast comes in two flavors: you can get a free account (2 GB of storage space and 2 GB of monthly uploads), or a pro account with much more space and several additional features.

I’m grateful to TechSmith and to Natalie Ebig Scott, their Global Public Relations Manager, for agreeing to have the Getting Started Guide appear here in the Ensampler.

Installing WordPress

If you go to WordPress.org, you’ll see this explanation:

WordPress is web software you can use to create a beautiful website or blog.

And so it is. If you don’t have your own domain, you can set up a blog at the companion site, WordPress.com, but many people use a hosting service (a third party on whose computers you store the files for your website) to establish or host their blog. Part of that process involves installing the WordPress software.

The online guide to that installation is an example of a complex but mainly procedural job aid. Given its length, I haven’t put the entire guide into this post. I do have links to the original, along with a couple of close-ups

What’s the accomplishment? WordPress is set up and ready to run on your website.

Who’s the performer? Someone with some technical knowledge about websites–or someone with  technical curiosity and a lot of patience.

What are the prerequisites? You need to have a domain (like daveswhiteboard.com). You need a web hosting service. You need access to that service (e.g., via FTP or the service’s control panel). Here’s the preview from WordPress.com:

WordPress installation preview

If you click the download link in item 2, here’s part of the message you’ll see:

wp install download message

The one-click install mentioned in that message is yet another way to accomplish the task: several web hosting companies have a wizard-like feature to install the WordPress software for you.

For the purpose of this job aid ensample, though, let’s look at the do-it-yourself support from WordPress.com. This is the next paragraph:

wp install myself

I’ve linked that “what’s next” box to the page on Installing WordPress.

wp install page table of contents
(Click to view the “Installing WordPress” page in a new window)

As you can see from the table of contents, that’s one highly detailed page.

In terms of a job aid for a procedure, notice that prerequisites come first: Section 1 of the page tells you things you need to know before installing.

For example, you need access to your web server (the computer at the hosting service where your files are). And you need an FTP client, software to help transfer files between your computer and the server.

The installation guide uses hyperlinks to take you to another level of detail. If you’re not sure what an FTP client is, clicking a link takes you to a page explaining what they are, suggesting one to use (like FileZilla for Windows computers or Cyberduck for Macs), and guiding you through setting it up.

Next there’s an explanation of what you need to do in order to install WordPress (item 1.1 in the contents)–like download and unzip the software, and the all-important “print this page out so you have it handy during the installation.”

Item 2 in the contents is the “Famous 5-Minute Install.” It’s a minimal job aid intended “for those that are already comfortable with performing such installations.”

When I set up my first blog, nearly 7 years ago, I was totally confused. I’d actually used an FTP client before, but I had never had my own website. I wasn’t a good candidate for the 5-minute install at the time.

Now that I’m familiar with WordPress, the 5-minute guide is all I need. I use it, even though I’m pretty sure what it says, because I don’t want to overlook an important step like renaming a particular file or entering the database details.

The details on those details are another example of good job aid layout. Here’s a section with a few of my comments:

wp config file details
(Click image to enlarge.)

Among the points to notice:

  • Warnings are very clear; they’re separated from the rest of the text, and have emphasis elements like bold text and boxes.
  • The use of white space helps makes individual elements clear.  In the actual file being discussed, there’s no need to have blank lines, but in this image the extra space helps to focus your attention.
  • The actual page with this information in the WordPress Codex works like a wiki page, which means that anyone in the WordPress community could edit it. Thus the final box: don’t change the details here by editing the page in the Codex–edit the corresponding page on your own server.

There are many small conditions and decisions included in the WordPress installation guide, like those for creating the WordPress database using the control panel called cPanel.

If your hosting provider supplies the cPanel hosting control panel [as mine does], you may follow these simple instructions to create your WordPress username and database. A more complete set of instructions for using cPanel to create the database and user can be found in Using cPanel., for the most part it’s a straightforward series of steps.

[This is followed by six short steps.]

For the most part, though, installing WordPress is a straightforward if lengthy sequence of steps, which is why I’ve tagged it as a procedure-style job aid.