(Part 1 of 2; here’s Part 2.)
With most of the job aids I’ve discussed on the Ensampler, I’ve focused on a main purpose–the job aid as primarily a reference or primarily a decision-guiding flowchart, for instance.
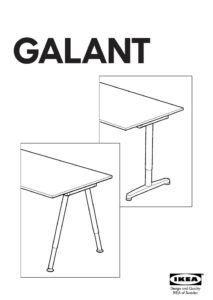
 Here, I’m analyzing a familiar type of job aid: IKEA instructions. I’ve chosen the guide for IKEA’s Galant desk. The goal of this guide is to help someone attach legs to a metal frame, and then attach the frame to a desktop.
Many people think of IKEA instructions as mainly procedural (step-by-step guides). The Galant instructions are more complex—they cover forty pages, so a single guide can help a consumer assemble any of the thirty-two different Galant configurations, based on size, shape, optional extensions, and so on. (You buy the frame, top, extensions, and legs separately; the instructions come with the frame.)
Beyond number of pages, though, what’s significant is how the Galant instructions support several types of accomplishment. I’ve split the discussion into two similar-sized chunks:
Part 1 (this post)
- Background on the Galant desk
- The decision guide section of the instructions, to help you find steps for the specific configuration of Galant desk you have,
- The concise, detailed checklist that shows the quantity and type of each part needed for each combination of frame, top, extension, and legs
Part 2 (the next post)
- The detailed procedural steps for your specific assembly.
Galant: the Background
While IKEA’s Galant series of office furniture has been replaced by the similar Bekant series, I’m deeply familiar with the Galant; I had the corner desk in my office for years.

That’s my old desk in the photo. IKEA calls it a left-hand desktop: one piece whose main, rectangular form curves into a smaller section on the left.
I didn’t join any extensions to mine, but as you’ll see, all the tops were designed to match up with various extensions.
The tops and extensions attach to a metal frame whose components depend on the configuration. And two types of legs — angled or T-shape — attach to the frame. For a clearer picture of how things come together, here’s a short video of two Galants being assembled. Both of these include a rectangular extension, so each desk is larger than mine was.)
Decisions, decisions

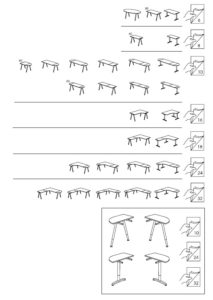
Page 3 of the instructions is a wordless decision guide: based on the configuration you’ve chosen, turn to page X.
This page shows thirty-two different combinations of desk elements. Like a good reference, though, it organizes and categorizes.
Each row set off by a line contains combinations that follow the same basic assembly steps. The third row down, for example, shows ten different combinations of desk that all follow the steps on page 10.
You could find many approaches to organizing this decision. It’s not hard to imagine an product-centric one that started with the part number for each size of frame. What IKEA has done well here is to focus on the customer’s goal: a particular desk.
The customer likely compared several configurations and so is likely to recognize the one he chose. What’s especially helpful here is that IKEA relies on generalization: each row is a set of distinct items (the configurations) that leads to the same response (steps for assembly).
Checklist: which, where, and how many
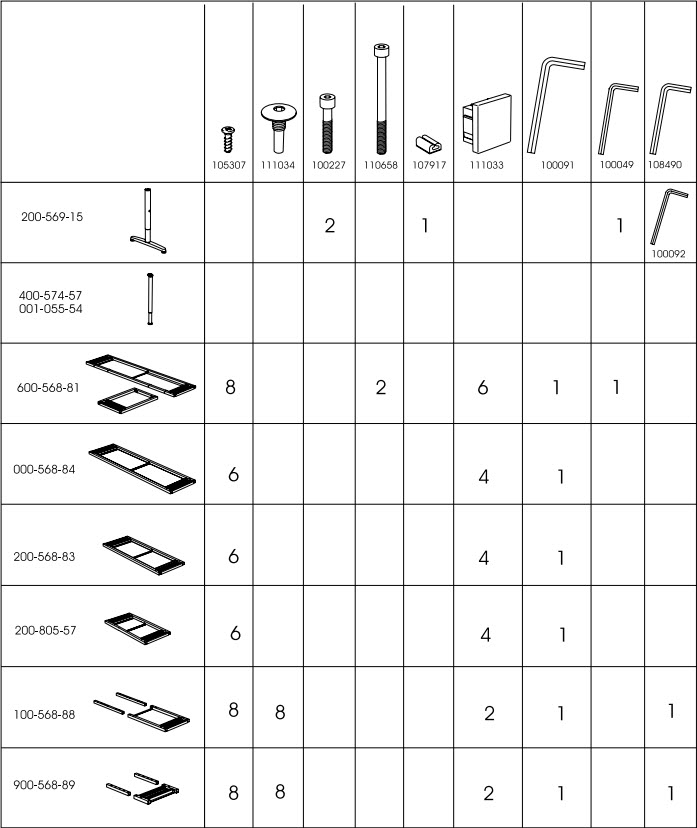
Page 4 of the Galant guide has this chart:
It’s a checklist, dressed up like a reference.
A checklist, because you choose the type of leg, frame, or extension you’re working with, and then read across to see how many parts of each type you need. The focus of a checklist is coverage or completion: make sure you have all these parts.
Here too there’s an assumption that the consumer knows what’s going on. The last two rows of the page 4 chart are for different types of desk extensions. You wouldn’t have those if you didn’t have the main desk, and so IKEA is relying on you to chunk your part-identification:
- Parts for the type of leg your desk will have (the first two rows)
- Parts for the main portion of the frame you’re using (rows three through six)
- Parts for the extension
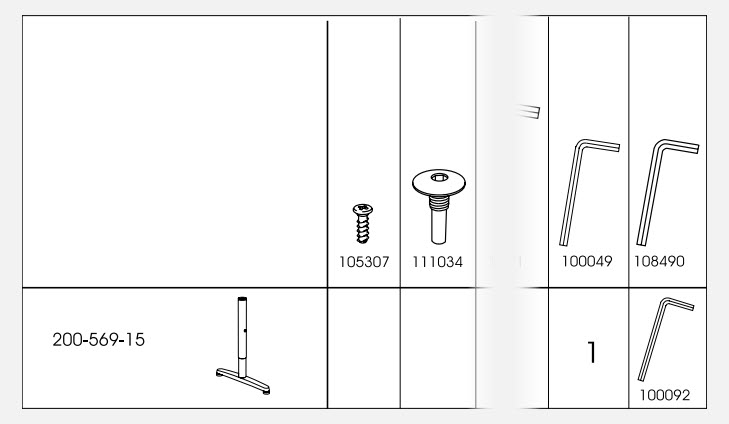
In addition, IKEA steps outside strict rules when it comes to parts for the T-leg. There’s a special size of hex wrench for these legs; it’s used to adjust their height. That size isn’t used for any other part in the Galant family, and so that specific wrench (100092) appears in the right-hand column, where you’d expect either a blank or a 1 (which would indicate you needed wrench 108490.
I’m not sure I would have designed this chart that way, but I think it’s effective. Even if you hadn’t started assembling your desk, you’d be likely to say “I should have this particular wrench,” and it would have come in the package with the T-leg.
As I said, the parts chart is a checklist–but if you keep your IKEA instructions, as I do, it’s also a reference. Eight years after purchasing another piece of IKEA office furniture, I was able to get a replacement part because the original instructions told me what the part number was.
(This was Part 1 of 2; here’s Part 2.)


I am so thankful that I came across your site! My boss gifted me (right-hand)Galant desk w/adjustable legs. I wasn’t able to find the part numbers or instructions anywhere. I just put my request in with Ikea to order the parts needed to assemble the desk (boss was unable to remember where he put the parts). Anyway, thank you again for taking the time to share everything needed to get the desk assembled…I will be returning to this article once I receive the parts…I’m sure I’ll need the extra help!
Leslie:
I’m glad you’ve found this helpful. The only reason I don’t still have my desk — which I had for probably ten years — is because I’d be moving to a place where I wouldn’t have a dedicated office.
This is the link for the Galant assembly guide: https://www.ikea.com/ms/en_US/customer_service/assembly/G/G60056881.pdf. I just checked; it still opens. You can print out just the pages you need.
With luck, IKEA will still stock the parts. I had lost a crucial piece from a file cabinet when I last moved. I contacted them with the part number, and they sent a replacement. From Sweden.
Bit random, but do you have the part number for the bolt that goes into the top of the Galant leg?
It’s not 111034 that is needed for the extension as I have the same PDF that you have, if you notice, all the PDF says is take the bolt out the top of the Galant leg.. But it doesn’t name the bolt with a number, and it is not one of the numbers in the top parts list.
Hi, Colin —
I’m speculating a bit, since I sold the desk 7 years ago and IKEA no longer sells it, but here goes:
The assembly guide I used (AA-97089-10) is from 2006 and was for the frame that mounts under the desk top — in my case, part 600-568-81 (third row down on the parts page), for the right- or left-hand desks. You bought the legs separately, depending on the configuration you wanted. I have a PDF of the frame-assembly guide but not for the T-legs.
In that guide, the details for T-legs (page 5) and A-legs (page 6) suggest to me that the bolt to fasten the leg to the frame was part of the leg package, purchased separately. That bolt may even have been inserted in the leg–hence the counter-clockwise close-up on page 5 (T-leg) and page 6 (A-leg) of the frame guide.
My theory of the numbers shown for the T-leg (page 4, the parts list) is that the 100277 bolt is the one that fastens the base to the leg. (Part 107917 is gets stuck to the side of the leg and holds wrench 100092, which you used to adjust the leg’s height,as shown on page 40. There is no corresponding wrench for the A-leg since you adjust its height by adjusting the lower section by hand.)
I had no luck finding assembly instructions for the legs as opposed to the frame. Not what you were looking for, I’m afraid.
I am searching for the assembly instructions for the older version of this desk. The new version has a frame that supports it, while the older one is a single channel system …
Christine: even the newer version is no long sold by IKEA. You might try contacting their customer service department to see if they have copies of older manuals.