Installing WordPress

If you go to WordPress.org, you’ll see this explanation:

WordPress is web software you can use to create a beautiful website or blog.

And so it is. If you don’t have your own domain, you can set up a blog at the companion site, WordPress.com, but many people use a hosting service (a third party on whose computers you store the files for your website) to establish or host their blog. Part of that process involves installing the WordPress software.

The online guide to that installation is an example of a complex but mainly procedural job aid. Given its length, I haven’t put the entire guide into this post. I do have links to the original, along with a couple of close-ups

What’s the accomplishment? WordPress is set up and ready to run on your website.

Who’s the performer? Someone with some technical knowledge about websites–or someone with  technical curiosity and a lot of patience.

What are the prerequisites? You need to have a domain (like daveswhiteboard.com). You need a web hosting service. You need access to that service (e.g., via FTP or the service’s control panel). Here’s the preview from WordPress.com:

WordPress installation preview

If you click the download link in item 2, here’s part of the message you’ll see:

wp install download message

The one-click install mentioned in that message is yet another way to accomplish the task: several web hosting companies have a wizard-like feature to install the WordPress software for you.

For the purpose of this job aid ensample, though, let’s look at the do-it-yourself support from WordPress.com. This is the next paragraph:

wp install myself

I’ve linked that “what’s next” box to the page on Installing WordPress.
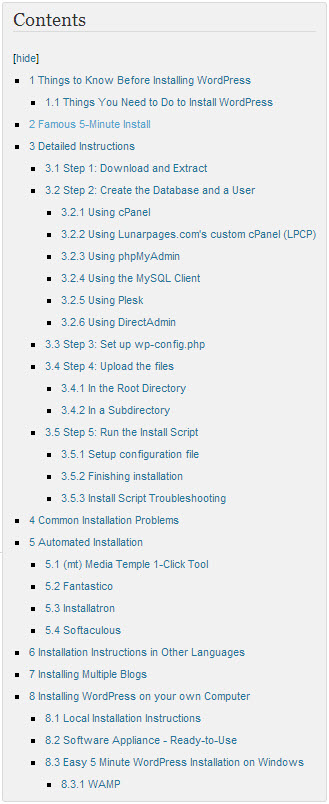
wp install page table of contents
(Click to view the “Installing WordPress” page in a new window)

As you can see from the table of contents, that’s one highly detailed page.

In terms of a job aid for a procedure, notice that prerequisites come first: Section 1 of the page tells you things you need to know before installing.

For example, you need access to your web server (the computer at the hosting service where your files are). And you need an FTP client, software to help transfer files between your computer and the server.

The installation guide uses hyperlinks to take you to another level of detail. If you’re not sure what an FTP client is, clicking a link takes you to a page explaining what they are, suggesting one to use (like FileZilla for Windows computers or Cyberduck for Macs), and guiding you through setting it up.

Next there’s an explanation of what you need to do in order to install WordPress (item 1.1 in the contents)–like download and unzip the software, and the all-important “print this page out so you have it handy during the installation.”

Item 2 in the contents is the “Famous 5-Minute Install.” It’s a minimal job aid intended “for those that are already comfortable with performing such installations.”

When I set up my first blog, nearly 7 years ago, I was totally confused. I’d actually used an FTP client before, but I had never had my own website. I wasn’t a good candidate for the 5-minute install at the time.

Now that I’m familiar with WordPress, the 5-minute guide is all I need. I use it, even though I’m pretty sure what it says, because I don’t want to overlook an important step like renaming a particular file or entering the database details.

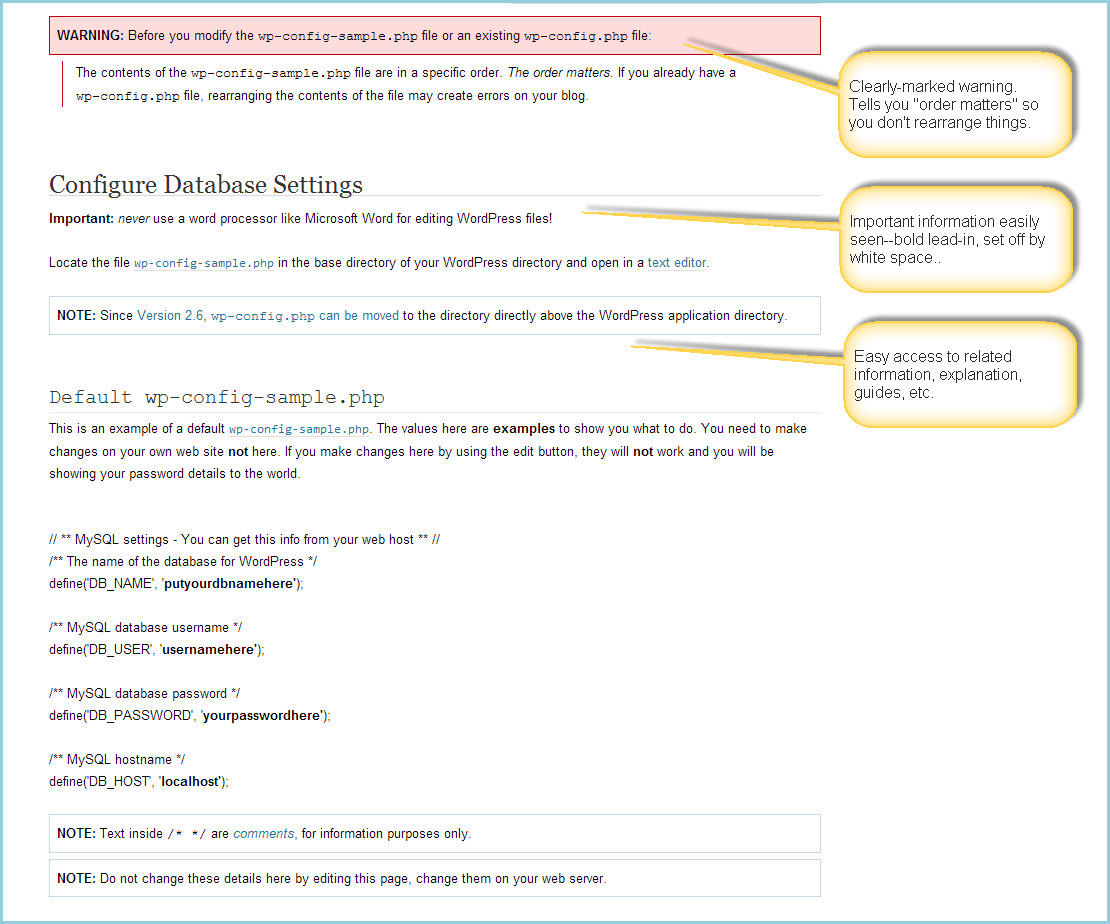
The details on those details are another example of good job aid layout. Here’s a section with a few of my comments:
wp config file details
(Click image to enlarge.)

Among the points to notice:

  • Warnings are very clear; they’re separated from the rest of the text, and have emphasis elements like bold text and boxes.
  • The use of white space helps makes individual elements clear.  In the actual file being discussed, there’s no need to have blank lines, but in this image the extra space helps to focus your attention.
  • The actual page with this information in the WordPress Codex works like a wiki page, which means that anyone in the WordPress community could edit it. Thus the final box: don’t change the details here by editing the page in the Codex–edit the corresponding page on your own server.

There are many small conditions and decisions included in the WordPress installation guide, like those for creating the WordPress database using the control panel called cPanel.

If your hosting provider supplies the cPanel hosting control panel [as mine does], you may follow these simple instructions to create your WordPress username and database. A more complete set of instructions for using cPanel to create the database and user can be found in Using cPanel., for the most part it’s a straightforward series of steps.

[This is followed by six short steps.]

For the most part, though, installing WordPress is a straightforward if lengthy sequence of steps, which is why I’ve tagged it as a procedure-style job aid.

Determining flood-insurance premiums

Background: I created this decision table based on information from FEMA’s National Flood Insurance Program. The purpose of my table was to demonstrate, in a presentation on using job aids, how this arrangement can guide people through a series of decisions and have them arrive at an appropriate answer.

Rating (figuring out premiums) is chapter 5 of the NFIP Flood Insurance Manual  and comes to more than 60 pages in the most recent edition. Even so, an insurance agent who wants to calculate the correct premium can make use of tables to determine (a) the property’s flood zone, (b) the specific type of property, (c) the coverage [desired amount of insurance], and finally (d) the premium based on the actual coverage.

I’m pointing this out to emphasize that you shouldn’t use my table to figure out what your flood insurance might cost. You can use it as a simplified example of a decision table, though.

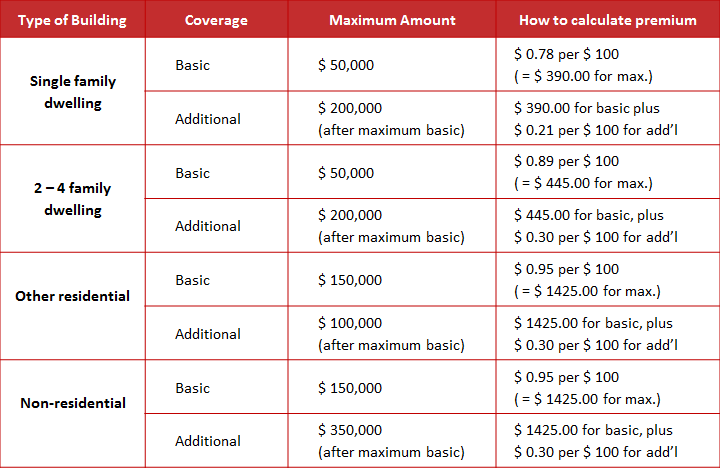
Decision table for flood insurance coverage
Just an example, not an actual rate quote.

What’s the accomplishment?  A quotation for the annual premium for flood insurance, accurate based on the type of property, the desired amount of coverage, and the overall limits for coverage.

Who’s the performer?  An insurance agent writing a flood insurance policy under the National Flood Insurance Program.

More about this job aid:

  • As noted above, this is a simplified example used in a discussion about types of job aids. It’s not meant as an exhaustive guide to determining flood insurance premiums.
  • The decision regarding premium involves three main sets of conditions, represented by the first three columns on the left:
    • What type of property is this?
    • What level of coverage is the client seeking?  (The NFIP has two levels: basic coverage, up to a given amount, and additional coverage beyond that. Additional coverage requires you to have the maximum amount under basic coverage.)
    • Given the type of coverage, what’s the maximum amount sought? (Both basic and additional coverage have upper limits. The total possible coverage for a given type of property would be the maximum amount under basic coverage plus the maximum amount under additional.)

During my recent presentation at the CSTD conference in Toronto, a volunteer using this job aid was able to describe correctly how she’d calculate the insurance premium for $150,000 of coverage on two-family duplex ($445 for the first $50,000, according to the table, and $0.30 per $100 for the additional $100,000).

Even if she’d been incorrect, just a little feedback on how to compute the premium would have been sufficient for her and for all the other participants to calculate any amount covered by the chart. In fact, when I asked if I could get $750,000 in coverage for an office building, several participants immediately said no, because the maximum coverage for commercial property is $500,000.

That’s a pretty good example of how a job aid improves the effectiveness of training.

Baby-feeding checklist

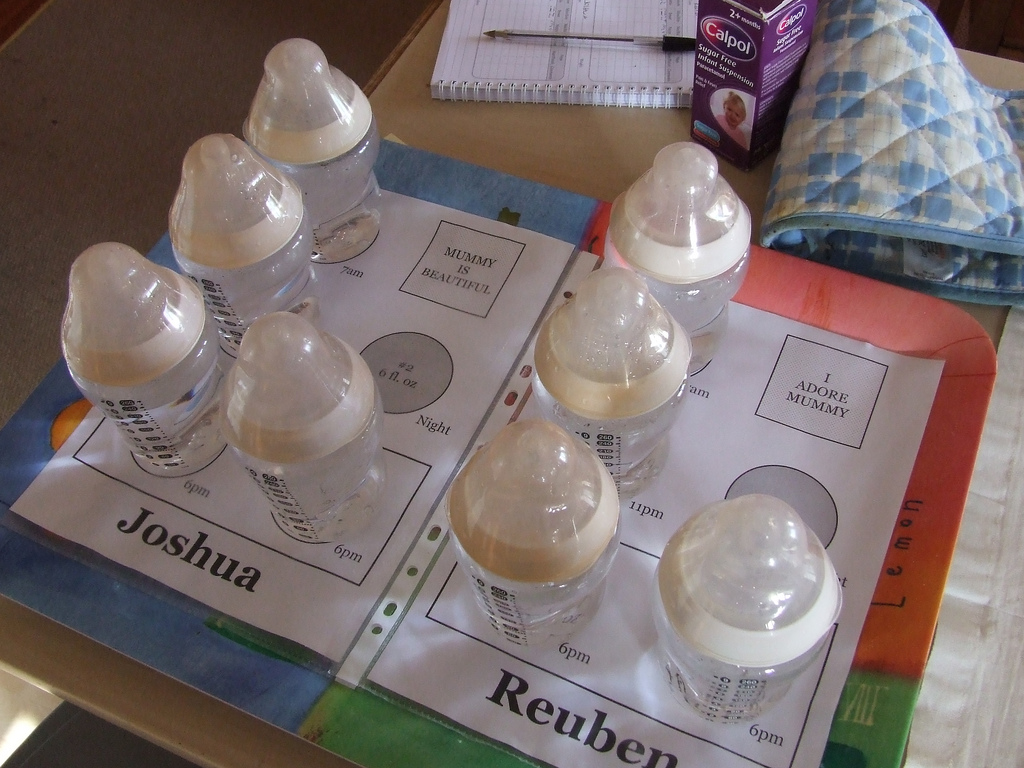
Gareth Saunders and his wife Jane had a challenge. Two of them, named Reuben and Joshua. As Gareth described things in an email, when the twins were born, the couple used Double Duty, a “care diary” where parents can track feedings, medication, and so on.

We got into a daily rhythm of creating feeding bottles for the day, and laying them out on a tray… For the first couple of weeks of doing this we’d get muddled. How much do I fill the bottles? (They sometimes took different amounts depending on the time of the feed.) Which bottles have been used already?…

Looking at this as a job aid:

What’s the accomplishment?  Twins who are fed on schedule with the desired amount of formula.

Who are the performers? Mainly Gareth and Jane, the parents, though sometimes the task was delegated to, let’s say, temporary staff.

Sometimes you need more than one job aid. The parents were trying to accomplish a number of different tasks, and some, like the feedings, occur many times a day. High frequency is usually an argument against using a job aid. In this circumstance, though, the on-the-job environment, with its conflicting demands, divided attention, and fatigue, hindered success.  Which means a checklist, a job aid to support accuracy and completeness, made a lot of sense.

A fulfilling checklist

You can see the care diary at the top of the photo. Gareth and Jane already had this type of job aid–a worksheet–to guide their child care. Worksheets help you collect pertinent information to support a subsequent action or to provide a record of what you’d been doing.

The baby-feeding cycle and its “performance requirements,” however, meant that sometimes the worksheet just didn’t get completed. The couple began using the ready-to-fill bottles, arranged on Gareth’s homemade forms, as a three-dimensional checklist.

The rule was that you returned the bottle to the space you took it from [so that you knew from the used bottle that a feeding had occurred]… The tray just sat outside their room on a bookcase until the morning when all the bottles were washed…

This method was really great, particularly when folks came in to help…

In other words, the checklist made it possible for “untrained workers” to produce the accomplishment (babies fed proper amounts according to schedule)  while maintaining the used-bottle audit trail.

Some of the reasons I find this such a useful example:

  • The parents were already using a job aid but found they weren’t always accomplishing their goal. In other words, they saw the need for improvement and set out to achieve that.
  • Gareth experimented with the format, using pen-and-ink versions and “adjusting the info on the sheets until we were happy with it.”
  • On-the-job testing led to further changes, like indicators for the amounts for each bottle, a space for an extra feeding, and an area with a different shape for medication.
  • Over eight months, the couple produced six versions of the checklist to match job requirements (the amounts and the number of feedings changes as the twins got older).

I’m especially grateful to Gareth, who is an information architect at the University of St. Andrews, for permission to share his photo and the background information he so cheerfully provided.

CC licensed photo by Gareth J. M. Saunders