When you’re building a job aid, pay attention to how you present and structure the information. Job aids don’t usually explain why to do something; they guide the performer about when and how to do something.
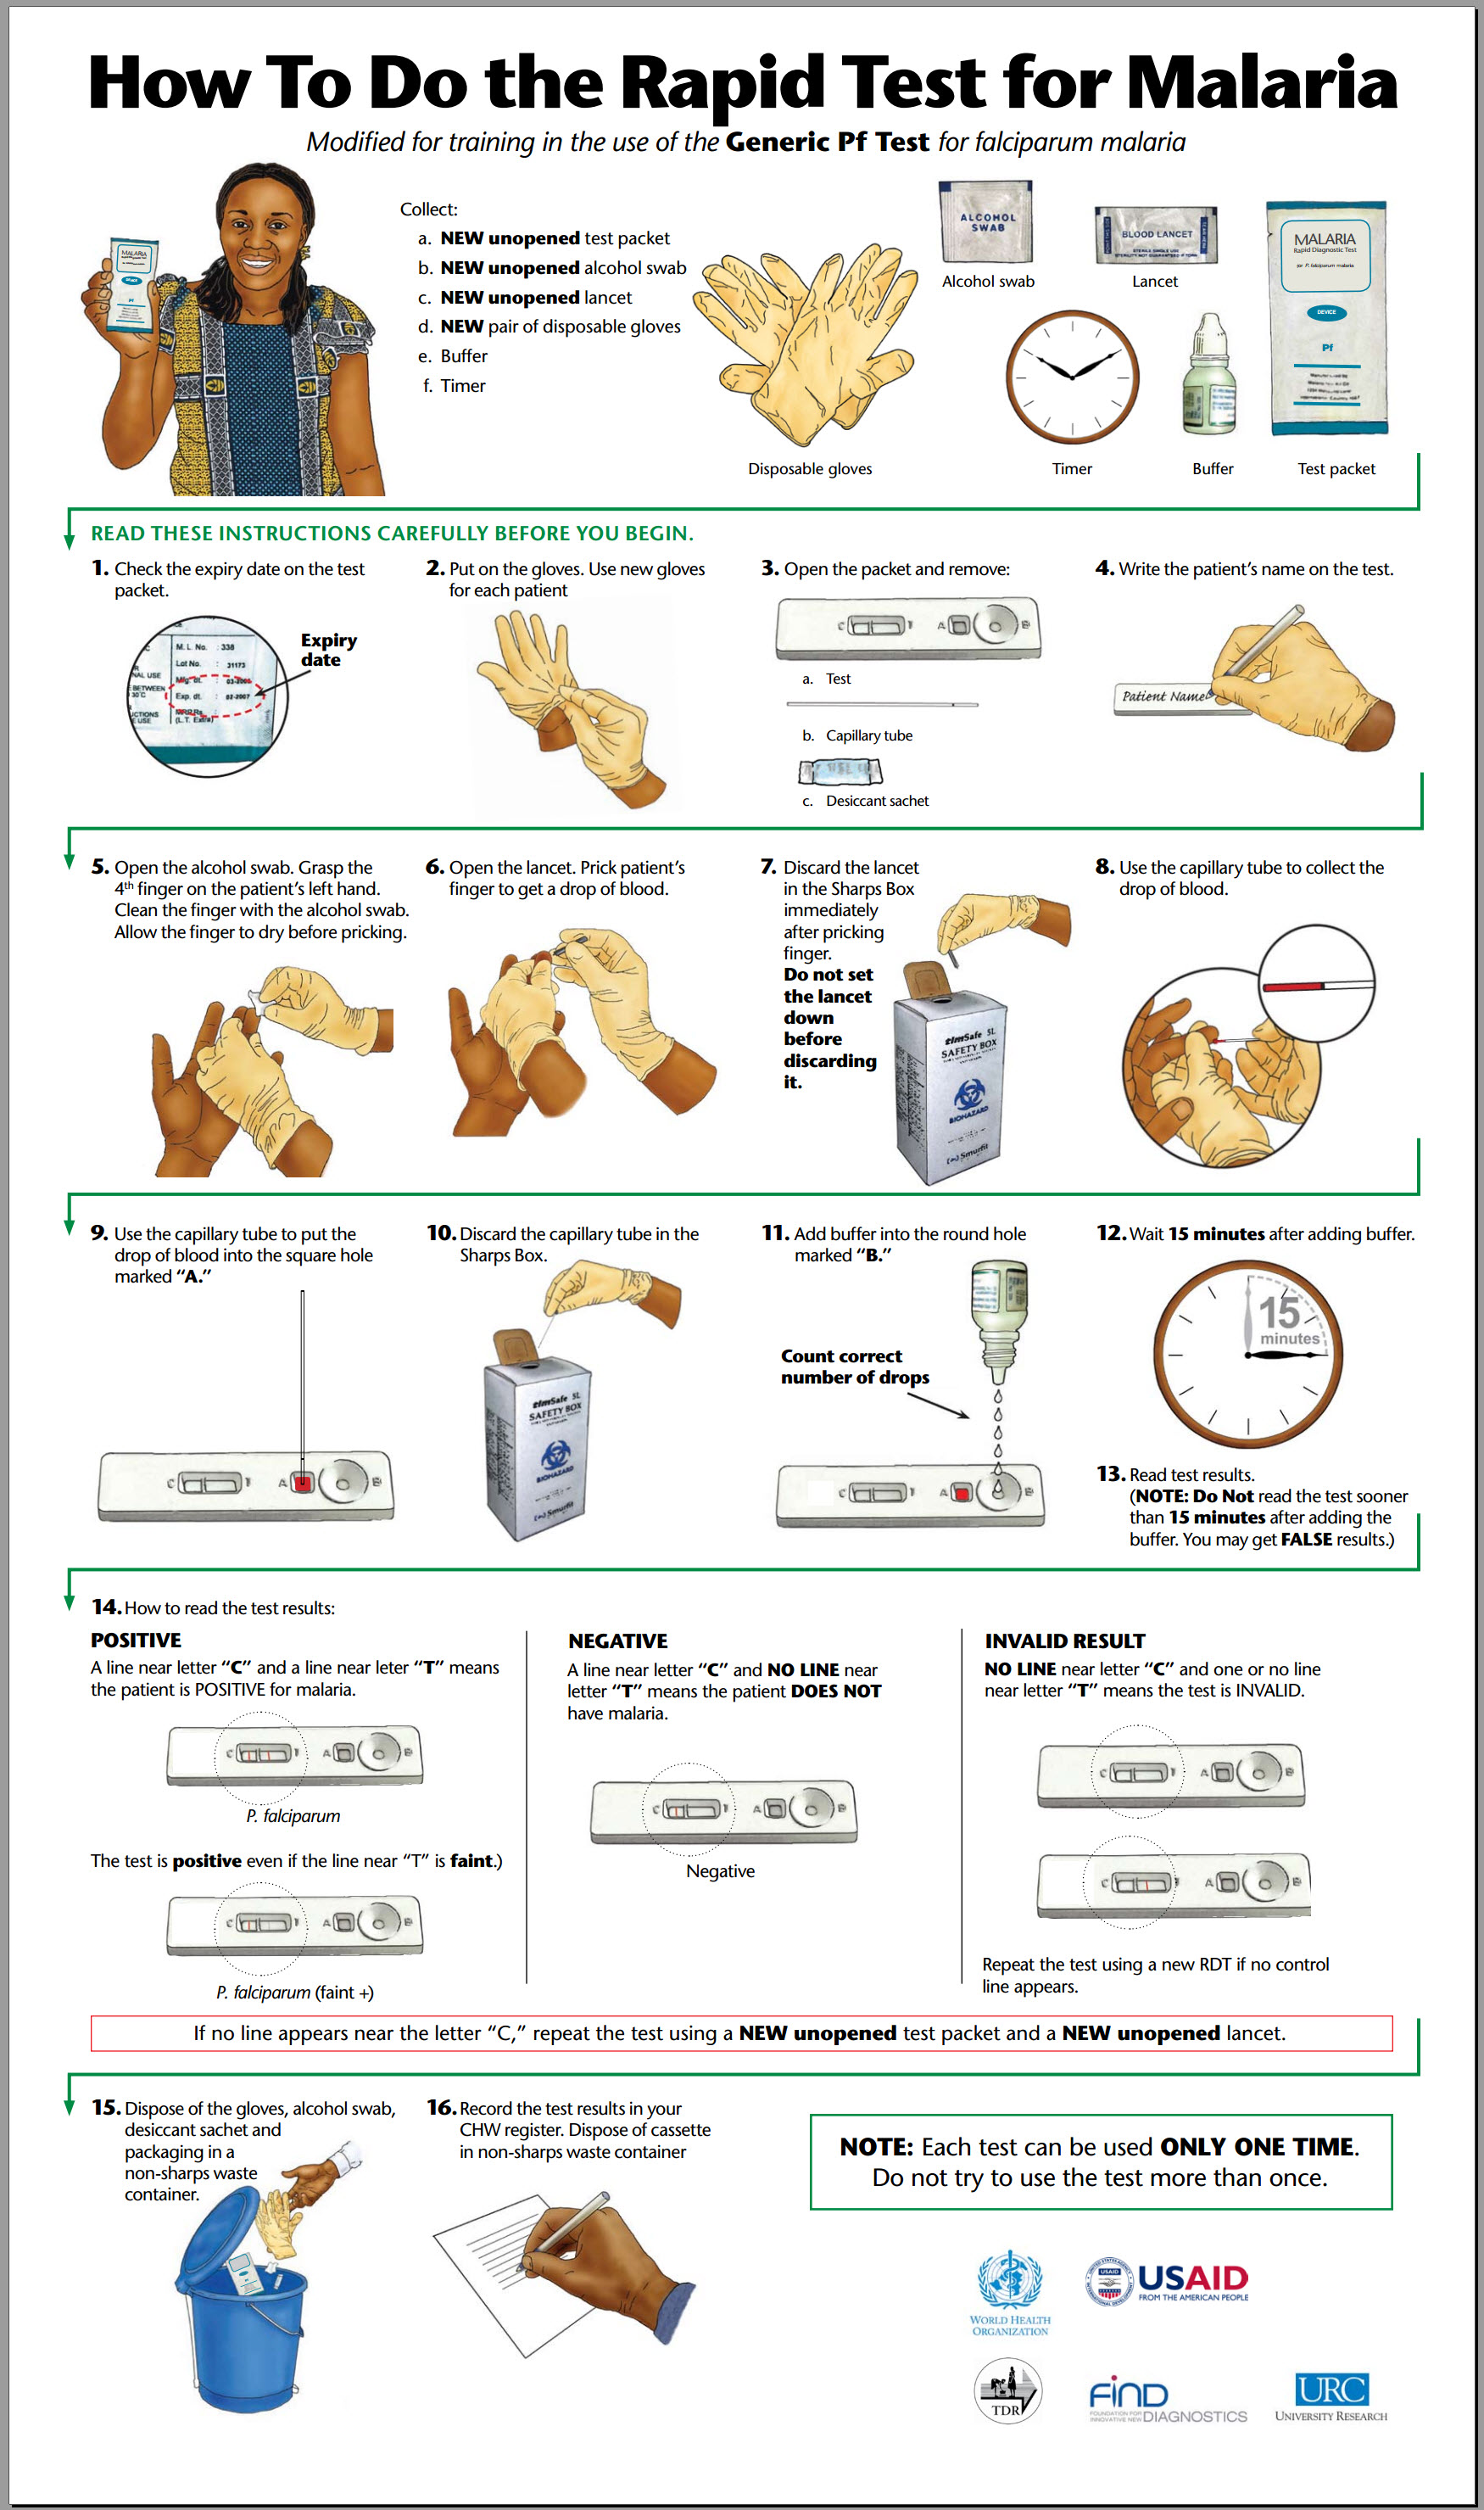
I want to highlight features that nearly every job aid out to have. I’ll use some closeups from a job aid I’ve featured on the Ensampler: How to Do the Rapid Test for Malaria. It guides people as they conduct rapid-diagnostic tests for malaria.
(Although I’m discussing features in general, you can click here to open a copy of the entire job aid in a new window.)
By the way, this is a fairly large job aid; it’s meant to avoid page-turning and could easily be a poster mounted so that the tester can view it while conducting the test. Notice that “avoid page-turning” doesn’t mean “keep to a single 8.5 x 11 page.” Not every job aid has to fit into a 3-ring binder.
♦ ♦ ♦
A clear, task-focused title
 What makes this title good? For one thing, it passes the “hey, Dad” test:
Hey, Dad — watch me while I do the rapid test for malaria.
In other words, the title explains the job aid in terms of what the person using it will do. This approach is essential in a job aid guiding some task. Consider alternatives like:
- Using the Rapid Test
- Basics of the Rapid Test
- Steps in the Rapid Test
None of these has the directness of “how to.”
♦ ♦ ♦
First things first • Consistent emphasis • Graphic cues
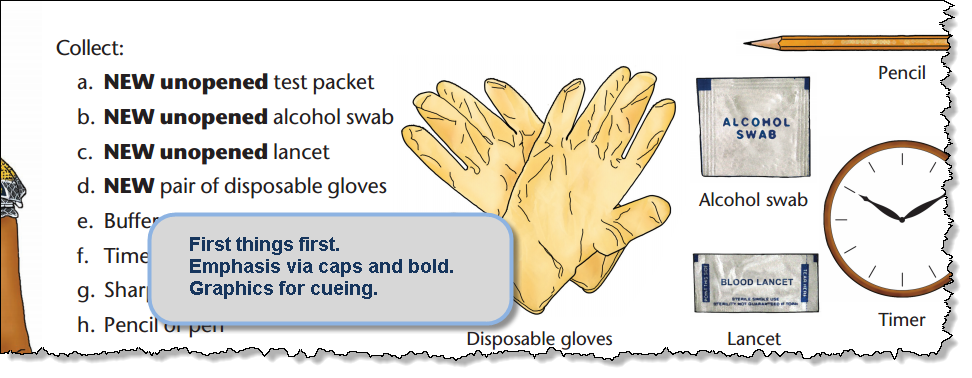
Directly under the title of the job aid, you find a list of supplies needed for the test. This is the equivalent of the list of ingredients at the start of a cooking recipe.
Because the rapid-test job aid deals with a medical topic, it consistently calls attention to words like “new” and “unopened.” “New” is always in bold capitals here; “unopened” is always in bold.
The job aid does not depend on color alone to convey meaning in the text; if you reproduced these steps in black and while, the capitalization and bolding would still convey emphasis.
In addition, the job aid includes graphic illustrations of the materials, in part as a reminder for the community workers who will be conducting the tests. Some may have limited skill in reading, and so the illustrations and labels support their ability to recognize what the test packet is.
Often a drawing rather than a photograph is more effective; line art can retain essential information without bringing in unnecessary detail. It’s much more important for the community worker to recognize an unopened lancet than to be able to read on the job aid the printing on the lancet package.
♦ ♦ ♦
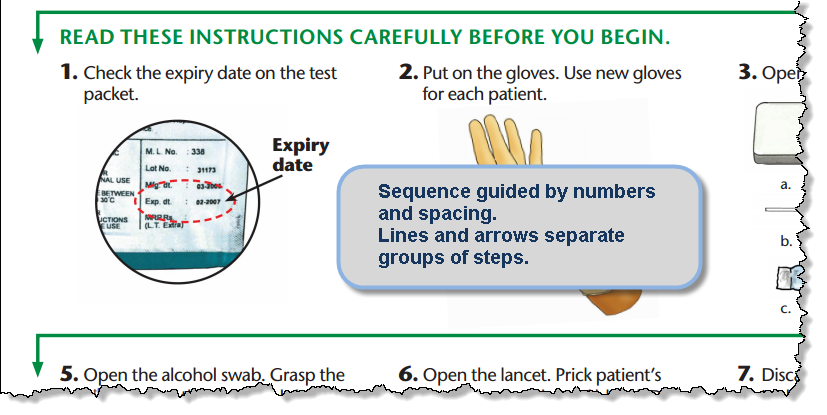
Numbered steps • Separation between steps
If you need to perform steps in a particular order, you have a sequence. Use numbering for the sequence. In general, a numbered sequence is easier to keep track of than one with letters.
♦ ♦ ♦
Performer’s point of view • Callouts
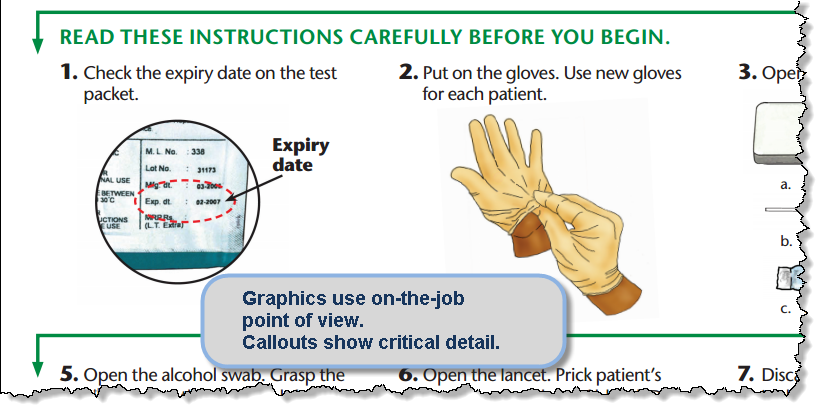
Because the purpose of a job aid is to guide performance on the job, graphics need to show examples or technique from the point of view of someone doing the job. Note the hands under step 2 in the illustration above: they look the way your hands would if you were putting gloves on.
This job aid makes careful use of callouts — they appear only when they’re important for a particular step. At the beginning of the job aid, for instance, there’s an image of the test packet but no callout for the expiry date. It makes more sense to check the date right before you’re ready to start.
♦ ♦ ♦
Step size: can be done without rechecking
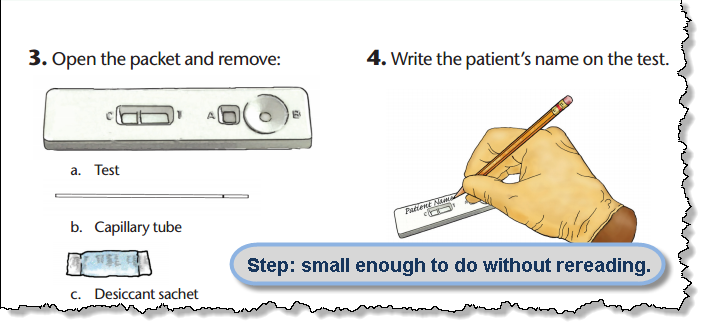
If you’re building a job aid to guide steps in a procedure, a good rule of thumb for any one step is that the performer should be able to complete it without having to refer to the job aid again.
It’s not that he shouldn’t refer to it. The point is to avoid overburdening him.
In this example, step 3 spells out what you’re removing from the test packet. That’s all that it contains. If the instruction read, “Remove everything from the packet,” though, the performer has no idea what the packet should contain.
What if there were no desiccant (say, due to a packaging error)? Because step 3 tells me I need to remove the test cassette, the capillary tube, and the desiccant, if I don’t find those things, I’m pretty sure something’s wrong.
♦ ♦ ♦
Special emphasis for safety / hazard / high-risk information.
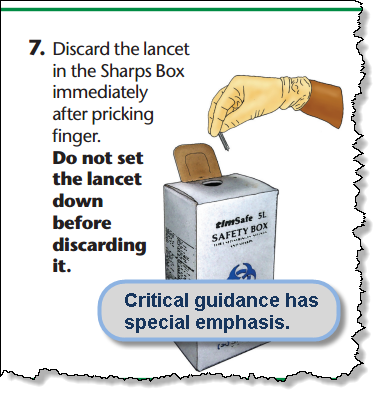
This is a special case for the consistent emphasis mentioned earlier. Some procedures have steps that are highly important in the context of carrying them out. In this example, the entire sentence for “don’t set the lancet down” appears in bold.
By the way, preparing community workers to conduct the rapid diagnostic test involves more than the job aid. The training includes actual practice, including use of the lancet. The training would reinforce the importance of proper procedure and correct handling of the lancet and the capillary tube (which also goes into the sharps box).
♦ ♦ ♦
The features mentioned here are not a complete list, and not every one is essential for every job aid. On the whole, though, if a job aid doesn’t include most of these features, it’s likely to be less effective in supporting performance.

