Assembling an IKEA desk (a complex job aid, part 1)

(Part 1 of 2; here’s Part 2.)

With most of the job aids I’ve discussed on the Ensampler, I’ve focused on a main purpose–the job aid as primarily a reference or primarily a decision-guiding flowchart, for instance.
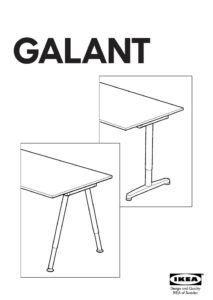
ikea-galant-frame-coverHere, I’m analyzing a familiar type of job aid: IKEA instructions. I’ve chosen the guide for IKEA’s Galant desk. The goal of this guide is to help someone attach legs to a metal frame, and then attach the frame to a desktop.

Many people think of IKEA instructions as mainly procedural (step-by-step guides). The Galant instructions are more complex—they cover forty pages, so a single guide can help a consumer assemble any of the thirty-two different Galant configurations, based on size, shape, optional extensions, and so on. (You buy the frame, top, extensions, and legs separately; the instructions come with the frame.)

Beyond number of pages, though, what’s significant is how the Galant instructions support several types of accomplishment. I’ve split the discussion into two similar-sized chunks:

Part 1 (this post)

  • Background on the Galant desk
  • The decision guide section of the instructions, to help you find steps for the specific configuration of Galant desk you have,
  • The concise, detailed checklist that shows the quantity and type of each part needed for each combination of frame, top, extension, and legs

Part 2 (the next post)

  • The detailed procedural steps for your specific assembly.

Galant: the Background

While IKEA’s Galant series of office furniture has been replaced by the similar Bekant series, I’m deeply familiar with the Galant; I had the corner desk in my office for years.

Galant corner desk (160 x 120 cm) with side table (80 x 60 cm) to the left

That’s my old desk in the photo. IKEA calls it a left-hand desktop: one piece whose main, rectangular form curves  into a smaller section on the left.

I didn’t join any extensions to mine, but as you’ll see, all the tops were designed to match up with various extensions.

The tops and extensions attach to a metal frame whose components depend on the configuration.  And two types of legs — angled or T-shape — attach to the frame. For a clearer picture of how things come together, here’s a short video of two Galants being assembled. Both of these include a rectangular extension, so each desk is larger than mine was.)

Decisions, decisions
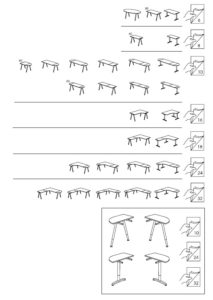
As near as you configure
For the desk you have, see the page indicated.

Page 3 of the instructions is a wordless decision guide: based on the configuration you’ve chosen, turn to page X.

This page shows thirty-two different combinations of desk elements. Like a good reference, though, it organizes and categorizes.

Each row set off by a line contains combinations that follow the same basic assembly steps. The third row down, for example, shows ten different combinations of desk that all follow the steps on page 10.

ikea-galant-row-3

You could find many approaches to organizing this decision. It’s not hard to imagine an product-centric one that started with the part number for each size of frame. What IKEA has done well here is to focus on the customer’s goal: a particular desk.

The customer likely compared several configurations and so is likely to recognize the one he chose. What’s especially helpful here is that IKEA relies on generalization: each row is a set of distinct  items (the configurations) that leads to the same response (steps for assembly).

Checklist: which, where, and how many

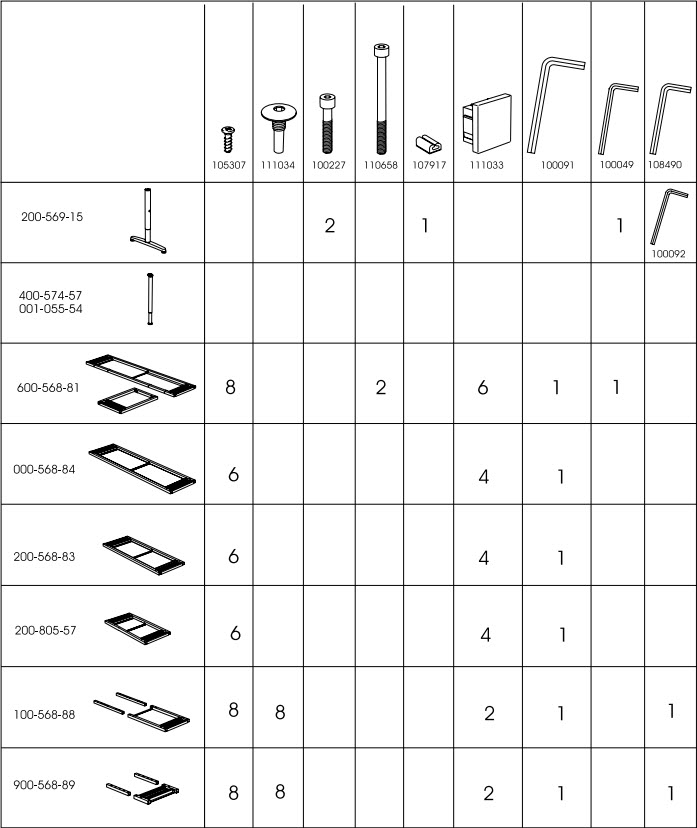
Page 4 of the Galant guide has this chart:

ikea-galant-page-4

It’s a checklist, dressed up like a reference.

A checklist, because you choose the type of leg, frame, or extension you’re working with, and then read across to see how many parts of each type you need. The focus of a checklist is coverage or completion: make sure you have all these parts.

Here too there’s an assumption that the consumer knows what’s going on.  The last two rows of the page 4 chart are for different types of desk extensions. You wouldn’t have those if you didn’t have the main desk, and so IKEA is relying on you to chunk your part-identification:

  • Parts for the type of leg your desk will have (the first two rows)
  • Parts for the main portion of the frame you’re using (rows three through six)
  • Parts for the extension

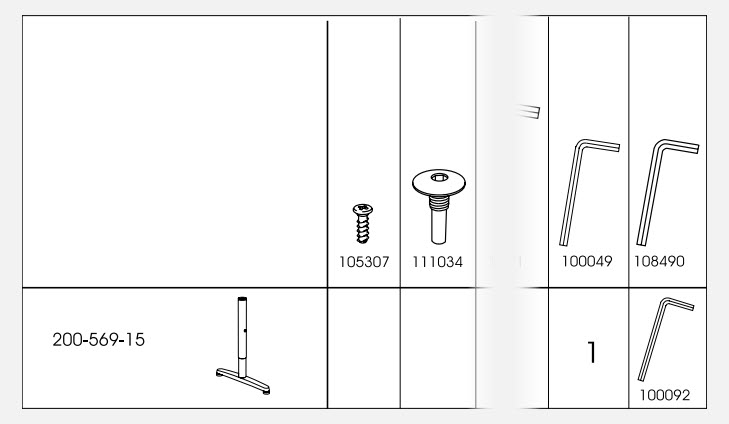
In addition, IKEA steps outside strict rules when it comes to parts for the T-leg. There’s a special size of hex wrench for these legs; it’s used to adjust their height. That size isn’t used for any other part in the Galant family, and so that specific wrench (100092) appears in the right-hand column, where you’d expect either a blank or a 1 (which would indicate you needed wrench 108490.

ikea-galant-page-4-detail-2

I’m not sure I would have designed this chart that way, but I think it’s effective. Even if you hadn’t started assembling your desk, you’d be likely to say “I should have this particular wrench,” and it would have come in the package with the T-leg.

As I said, the parts chart is a checklist–but if you keep your IKEA instructions, as I do, it’s also a reference. Eight years after purchasing another piece of IKEA office furniture, I was able to get a replacement part because the original instructions told me what the part number was.

(This was Part 1 of 2; here’s Part 2.)

Assembling an IKEA desk (part 2)

(Part 2 of 2; here’s Part 1.)

Procedure: so let’s build a desk

…there’s one foolproof method for turning IKEA rage into grudging respect: assembling almost any other brand of furniture…

To adapt Winston Churchill’s famous quip, IKEA may be the worst form of ready-to-assemble product design we have—except for all the others.

John Pavlus

As noted above, page 3 of the Galant instructions is a decision guide — it directs you to one of seven different sets of procedural steps, depending on the type of desk you’re putting together.

I had a left-handed desk with no extensions; that’s the fourth set of instructions, on pages 16 and 17.

You can see those are typical IKEA instructions. They demonstrate a careful, specialized approach to guiding performance:

  • No text (a single sentence would have to appear in dozens of languages)
  • Minimalist images (what detail you see matters)
  • Customer focus (the desk, the frame, the legs appear in standard positions and as the assembler would see the actual parts)
  • Call-outs, close-ups, and warnings

Implicit in IKEA instructions are two messages: “You can assemble this item,” and “Here are the details.” Those messages are related: if you don’t attend to the details, you’ll have trouble assembling the item.

You are here.

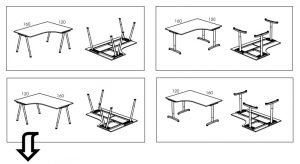
Here’s the top of page 16:

If you’re building one of these, you’re on the right page.

The diagram is meant to confirm that you want the instructions for a right-hand desk (top row) or a left-hand one (bottom row), whether you’re using five angled legs (left column) or three T-legs (right column).

Each configuration appears both upright (because that’s your goal) and upside down (because that’s how it’ll look as you work on it).

A complex two-step

If you study pages 16 and 17, you’ll see that there are two main steps: attach the legs to the frame, and attach the frame to the desk. IKEA marks those with a big 1 and 2.

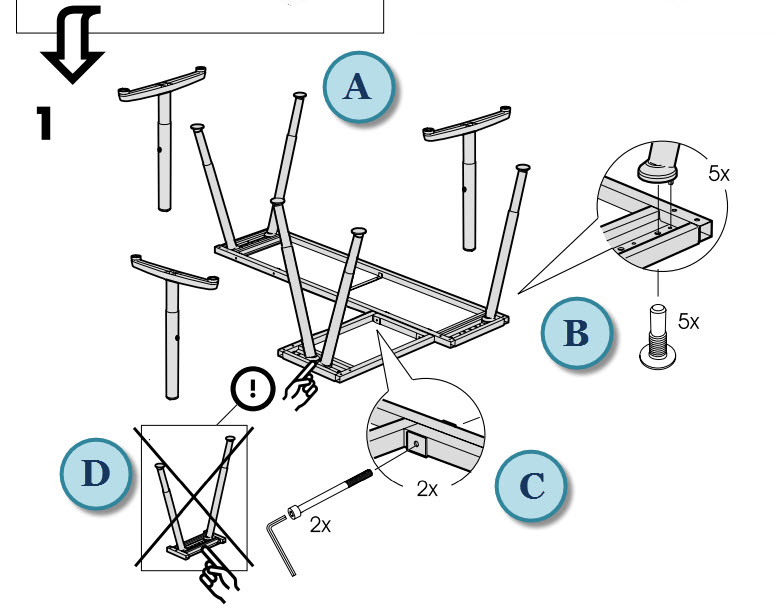
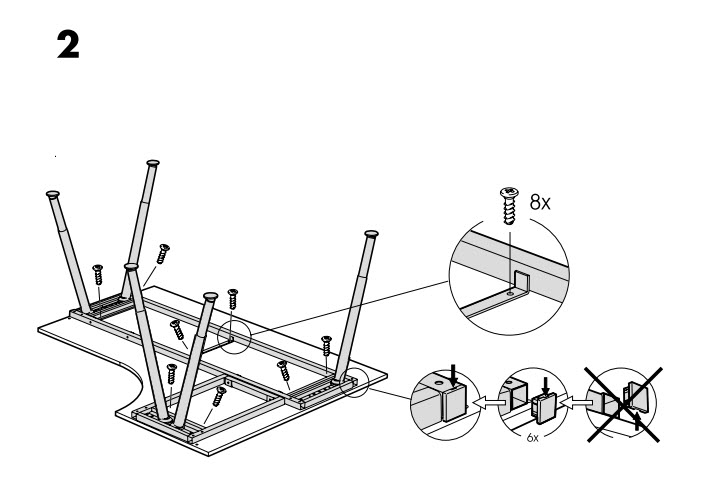
The biggest drawback to IKEA’s wordless style is that there can be a lot of detail in a step. Here’s the main part of step 1 (page 16) to which I’ve added some callouts for commentary.

A: attaching legs to the frame

The diagram shows both kinds of legs so you’ll see how to position them: for the angle legs, one in the corner of the desk and two at each of the remaining ends.  For the T-legs, orientation matters, with the two on the long side of the desk parallel to teach other.

B: details for attaching angle legs

A bolt goes through the frame into the angle leg. Note the closeup: there’s a small tab on the top of the leg that fits onto a hole on the frame. Also, the 5X is a reminder that you have five angle legs to attach.

(I’ll get to the details for T-legs later in this post.)

C: attaching the extension to the frame

Some Galant desks are ordinary rectangles, but the right- and left-handed desks need support for their extensions. The closeup at C shows where two hex-head bolts attach the frame extension to the main frame.

Details matter: if you look closely, you’ll see that the end of the extension that the legs attach to looks different from the end that attached to the main frame. (If you don’t look closely, eventually you’ll discover that the leg end doesn’t have any holes for you to attach it to the main frame.)

D: attaching angle legs to the extension

A pointing hand draws attention to the closeness of the legs for the extension. (Compare them with the two legs at the far end of the main section.) There’s even an X-ed out “not this way” diagram to reinforce the point.

The short version:

  • Position each angle leg and bolt it to the frame.
  • Position the frame extension and bolt it to the main frame.

At the bottom of page 16, you find two boxed items; each directs you elsewhere for a specific sub-procedure.

The left-hand diagram sends you to page 40 to see how to adjust the height of your desk, regardless of type of leg. Personally, I might have put this particular procedure on page 17, after you’ve attached the frame to the desk.

The right-hand diagram sends you to page 5. That has the steps for assembling the T-legs and for attaching them to the frame.

Attaching the frame

Attaching the frame to the desk is straightforward: eight screws, as indicated on the diagram.

The less-obvious part of this step involves putting plastic caps over the open ends of the metal frames: four on the main frame, two on the extension.

Here, too, callouts and a don’t-do-this diagram to show there’s a right way to attach the caps. (The small arrow, in the middle of the three circles, shows a little notch you can slip a screwdriver into to easily remove the cap.)


Desk work

Why spend so much time analyzing a set of IKEA instructions?

I think the Galant guide is a highly effective approach to supporting detailed accomplishments. IKEA’s worldwide market necessitates a wordless approach to such support. That has its drawbacks–I know I’ve misread IKEA instructions more than once. Almost always, though, I can back up, undo the error, and get things right.

What’s more, the IKEA format is kind of do-it-yourself cultural artifact, and once you’ve put together a couple of IKEA items, you’ve learned through experience to pay attention to details like hole size, spacing, and position of part.

By the way, there’s also a thriving culture of IKEA hacks–people going far beyond the instruction guide. Here are over a dozen hacks just for the Galant, including someone’s megadesk that’s 25 feet long, not including 12 extra feet of shelving made from yet more Galant parts.

(This was Part 2 of 2; here’s Part 1.)

Rahul Samuel’s Tech Rider

About the Tech Rider

A tech rider is an equipment-related checklist used by musicians and the venues in which they play. It’s a rider or addition to the performance contract.

 A tech rider is a one-page document that gives the venue and/or soundman an understanding of what your technical requirements are and how to set up the stage before you arrive. It also gives them an opportunity to let you know if they can’t accommodate any of your needs.

From the SonicBids blog

Recently I came across the website of Rahul Samuel, an acoustic consultant and live sound engineer in Karnataka, India. He has a post on how to make the perfect tech rider for your band. Rahul was kind enough to allow his rider to be featured here at the Ensampler.

There are eight main parts–which is to say, the checklist has specialized sections based on a particular focus or concern.

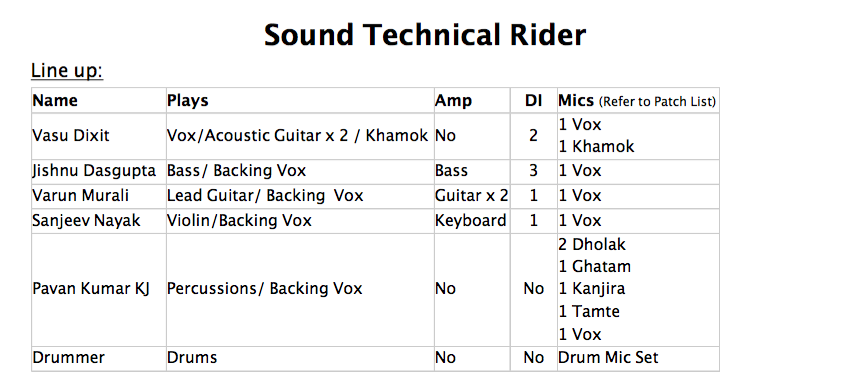
  • The line up (band members, instruments, and tech requirements

rahul tech rider 1

  • Equipment / backline (the latter seems to mean the onstage amplifiers, which I understand are sometimes arranged in a line at the back of the stage)
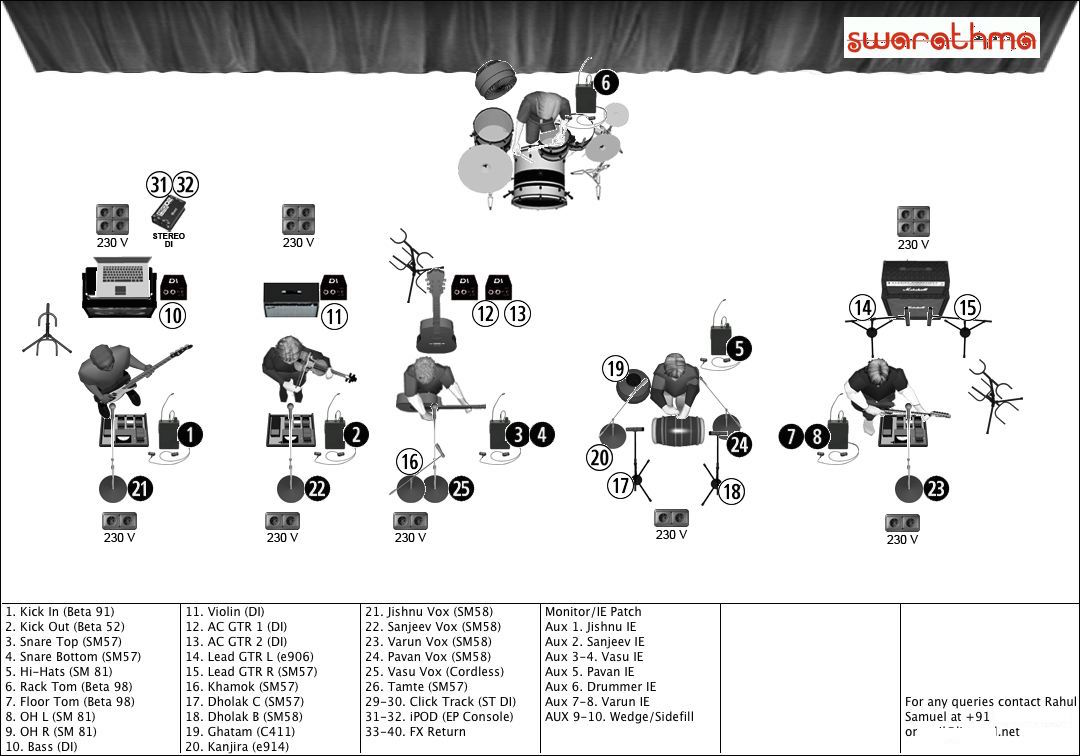
  • Stage plot (a technical floorplan for the performance)

tech rider stage plot

  • Input patch list (list of channels, instruments, and microphones, used by the sound engineer)
  • Monitor requirements (for the onstage speakers used by the band)
  • Special needs or requests
  • Band engineer’s requirements

Performers (not the musicians; the people using the checklist)

A number of people can make use of the tech rider. First, the person responsible for collecting the band’s requirements. A brand-new band can work with a sound engineer to learn about equipment and work up their own tech rider.

The other party in the performance is the venue, and probably a specialist like the venue’s sound engineer (on staff, or contracted).

Accomplishment

Checklists, in whatever form they take, focus on completion, coverage, and verification. As Rahul says, “Tech riders are great, they not only bring the sound vendor and sound engineer up to speed, but also work as a brilliant check list for the band.”

So: the tech rider lets the venue know what the band’s needs are, how the stage should be set up, and so forth. If the venue can’t accommodate those things, both parties can deal with that situation ahead of time.

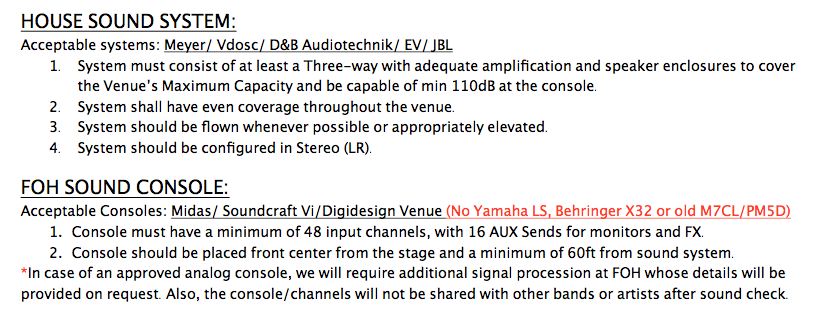
Rahul’s post includes requirements for the venue’s sound system and the FOH (front-of-house) console (sound mixer). There’s a great deal of technical information compressed into twelve lines; the goal is clarity and completeness.

rahul foh

Other comments

Rahul’s post on the tech rider includes some tips that could easily be built into the form a band uses for its rider. Two of them are practical for form-type job aids in general:

Put the band’s name and tech contact information in the header, on every page.

Rahul mentions that when working at a festival, he’s received a patch list with no idea which band it was for.

Use “Page 1 of 4” numbering.

Far easier for someone to know if he’s missing part of the document.


FEMA Family Disaster Supplies Kit

About this job aid

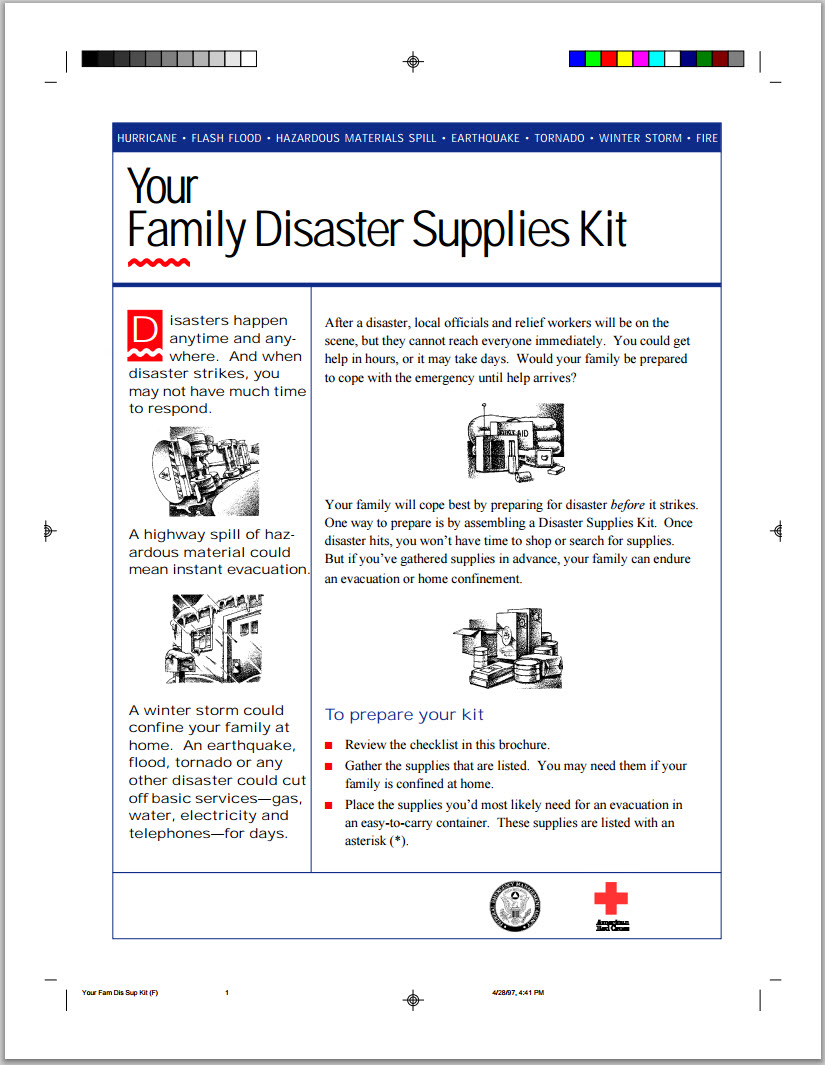
FEMA and the American Red Cross produce a wealth of safety- and hazard-related documents. I’ve found Your Family Disaster Supplies Kit in multiple locations; the one here is from the University of North Carolina Wilmington’s emergency and safety information page.

fema L189 p1
This is page one of four, each about 5 x 7 (click to view at full size). The idea seems to be to print them on both sides of an 8.5 x 11 sheet, then cut and fold into a brochure.

The brochure’s purpose is to organize information to help with advance planning (“…one way to prepare is by assembling a Disaster Supplies Kit…”). There are two main parts:

  • A supplies checklist covering items like food, water, clothing, and tools (pages 2 and 3).
  • A guide to creating a family disaster plan (page 4).

Who’s the performer?

An individual would use this checklist to choose and organize supplies for a disaster such as a storm, an earthquake, or a spill of hazardous material. While the information is useful in many situations, the job aid is concerned with individuals and their personal safety, rather than with, say, a company’s employees at the workplace.

What’s the accomplishment?

Unlike procedures or decision tables, checklists don’t have a specific outcome. However, a good checklist helps a person to assess whether his planning or preparation is complete compared with the checklist’s elements.

Checks and chunks

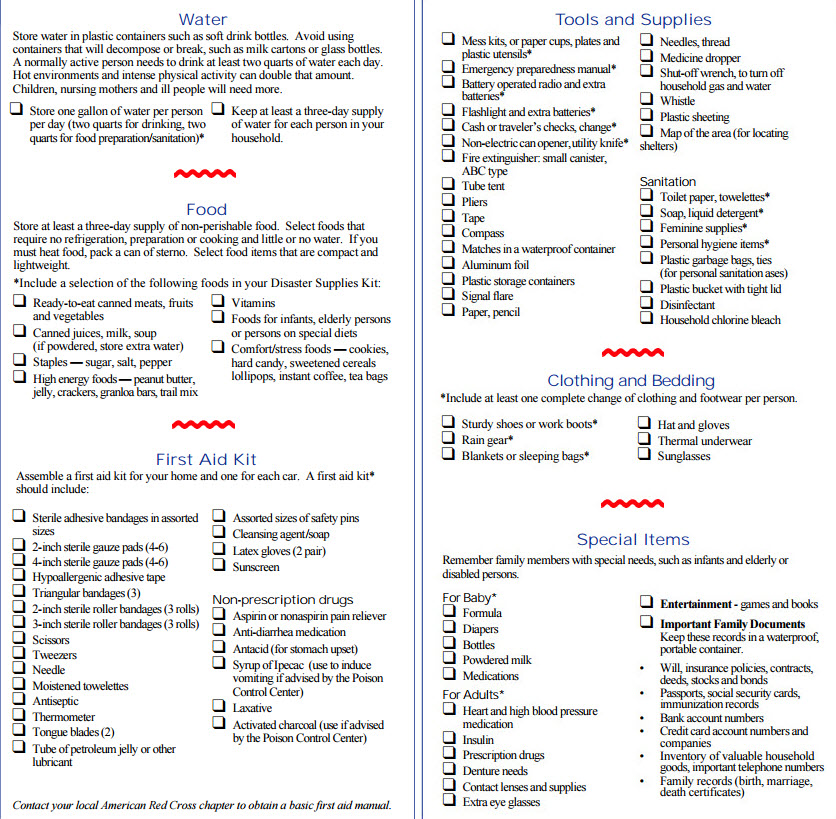
Pages 2 and 3 of the brochure provide a checklist of possible supplies to stock. In all, there are more than 80 items set off with squares. I can hardly resist calling them checkboxes, and particularly for a planning guide like this, I think blank boxes are a better choice than, say, filled-in circles.

At the same time, the checklist is not particularly cluttered, as you can see from this cropped image. (I’ve removed the gutter space between the two pages. You can click to enlarge the image.)

Disaster supplies arranged in six categories

The designers have chunked information into six categories: water, food, first aid, tools and supplies, clothing and bedding, and special items. Some sections begin with general advice (“Water: avoid containers that will decompose or break”); there are a few logical subsections, like the four under special items.

In addition to the chunking, the checklist is remarkably detailed for something that measures 6 by 7 inches. For example, I’ve lived in areas with severe weather, and so I always have a radio and a flashlight that I can charge with a hand crank. Not until I moved to an earthquake zone, though, had I considered the value of a whistle. (If you’re trapped by debris, you can signal your presence with much less effort and over a greater distance with a whistle than with your voice.)

One size – fits most?

I found many different forms of disaster-preparation guides, even when I limited my search to earthquake preparation. The topic is so big that you could fill dozens of pager with detailed information.

To me, that’s a reminder: there’s no one right way to create this sort of guide. FEMA and the American Red Cross have done well to label it a disaster supplies kit. Page 4, Create a family disaster plan, is pretty sketchy — but FEMA has many other resources for planning.

Baby-feeding checklist

Gareth Saunders and his wife Jane had a challenge. Two of them, named Reuben and Joshua. As Gareth described things in an email, when the twins were born, the couple used Double Duty, a “care diary” where parents can track feedings, medication, and so on.

We got into a daily rhythm of creating feeding bottles for the day, and laying them out on a tray… For the first couple of weeks of doing this we’d get muddled. How much do I fill the bottles? (They sometimes took different amounts depending on the time of the feed.) Which bottles have been used already?…

Looking at this as a job aid:

What’s the accomplishment?  Twins who are fed on schedule with the desired amount of formula.

Who are the performers? Mainly Gareth and Jane, the parents, though sometimes the task was delegated to, let’s say, temporary staff.

Sometimes you need more than one job aid. The parents were trying to accomplish a number of different tasks, and some, like the feedings, occur many times a day. High frequency is usually an argument against using a job aid. In this circumstance, though, the on-the-job environment, with its conflicting demands, divided attention, and fatigue, hindered success.  Which means a checklist, a job aid to support accuracy and completeness, made a lot of sense.

A fulfilling checklist

You can see the care diary at the top of the photo. Gareth and Jane already had this type of job aid–a worksheet–to guide their child care. Worksheets help you collect pertinent information to support a subsequent action or to provide a record of what you’d been doing.

The baby-feeding cycle and its “performance requirements,” however, meant that sometimes the worksheet just didn’t get completed. The couple began using the ready-to-fill bottles, arranged on Gareth’s homemade forms, as a three-dimensional checklist.

The rule was that you returned the bottle to the space you took it from [so that you knew from the used bottle that a feeding had occurred]… The tray just sat outside their room on a bookcase until the morning when all the bottles were washed…

This method was really great, particularly when folks came in to help…

In other words, the checklist made it possible for “untrained workers” to produce the accomplishment (babies fed proper amounts according to schedule)  while maintaining the used-bottle audit trail.

Some of the reasons I find this such a useful example:

  • The parents were already using a job aid but found they weren’t always accomplishing their goal. In other words, they saw the need for improvement and set out to achieve that.
  • Gareth experimented with the format, using pen-and-ink versions and “adjusting the info on the sheets until we were happy with it.”
  • On-the-job testing led to further changes, like indicators for the amounts for each bottle, a space for an extra feeding, and an area with a different shape for medication.
  • Over eight months, the couple produced six versions of the checklist to match job requirements (the amounts and the number of feedings changes as the twins got older).

I’m especially grateful to Gareth, who is an information architect at the University of St. Andrews, for permission to share his photo and the background information he so cheerfully provided.

CC licensed photo by Gareth J. M. Saunders

Conveyance-of-property checklist

Often people think of checklists as short, uncomplicated forms. I found a lengthy exception in the field of real estate law in Canada.

The Western Conveyancing Protocol created a standard form for solicitor opinions related to certain real estate transactions in Manitoba, Saskatchewan, Alberta, and British Columbia. The law society in each provide developed a guide for lawyers in that province that would among other things:

  • Provide lenders with a standardize form for the solicitor’s opinion
  • Allow the release of mortgage funds on the date of closing
  • Encourage due diligence by purchasers 

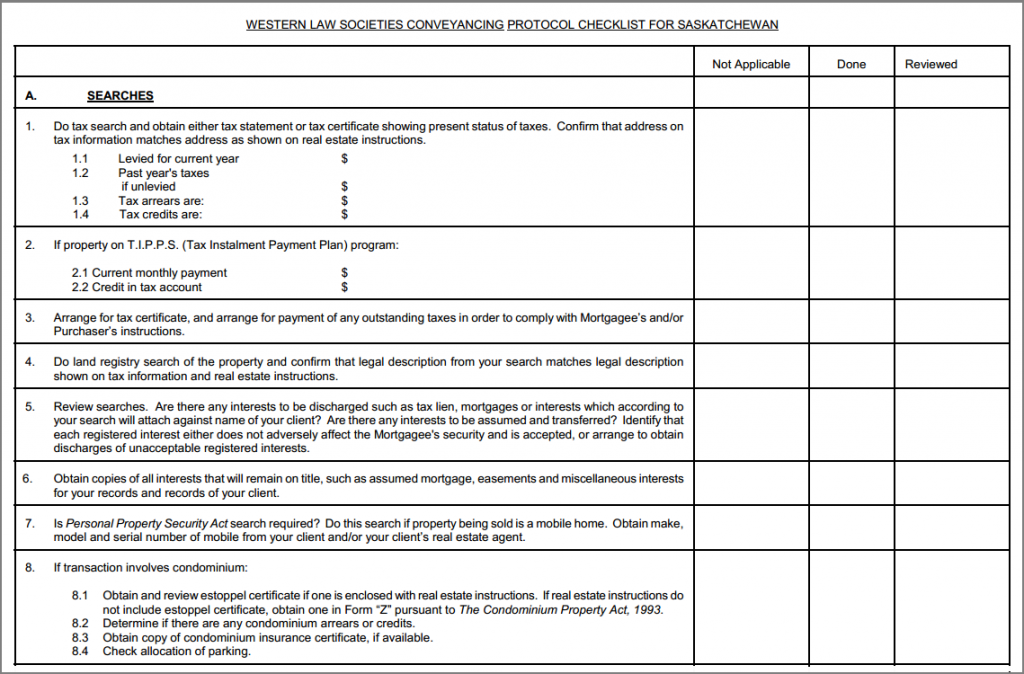
As part of its work, the Law Society of Saskatchewan developed a protocol checklist (2-page PDF) based on the requirements of the protocol. The image below is a portion of that check list; click the image to view the entire checklist (a PDF on the Law Society’s website).

A portion of the Saskatchewan conveyancing protocol

Who uses this job aid?

Solicitors (lawyers) working on certain real estate transactions (mainly transfers or refinancings for existing residential properties).

What’s this job aid for?

As the Law Society of Manitoba says, each society’s protocol is a “practice guide” to help produce a solicitor’s opinion. To greatly oversimplify (I am not a solicitor, I don’t live in either Saskatchewan or Manitoba), the opinion is formal notice to the lender from the lawyer saying that the he or she has followed the protocol and and that the mortgage can be funded and the funds disbursed.

In other words, it’s a highly specialized job aid intended for a limited number of practitioners in specific situations.

The Saskatchewan checklist has multiple sections:

  • Searches (e.g., for tax statements or legal property descriptions) – 15 items
  • Preparing documents for purchaser  – 10 items
  • Insurance
  • Trust conditions
  • Document submission – 9 items
  • Certification of compliance by the solicitor

One small feature I like is that each item on the checklist has a box for “not applicable” as well as one for “done” and “reviewed.”

A “not applicable” box reminds the person using the checklist to consider whether the item applies, and to confirm when it does not.