
Job aid design usually starts with an analysis that asks about conditions, steps, signals, responses, the desired accomplishment, and its criteria.
In this post, I’m showing a job aid I created that started from a different point: something I wanted to have, but didn’t.
What’s the problem?
My Building Job Aids workshop is made up of parts I think of as elements. One might be a mini lecture; one might be an activity to produce a decision guide; another, a quick judge-these-examples round I call Best in Show.
Although I have a plan for each session, the actual workshop varies from the plan. I shorten or drop or swap elements based on the skills and interests of the participants (or, sometimes, the relentless ticking of the clock). And after the fact, I go over what took place and decide what I want to do or do differently next time.
This isn’t easy to manage when you’re mainly concerned with running the workshop. What kind of support was I looking for?
- A list of planned elements, with an easy way to see duration and order.
- A list of potential elements that I could add or substitute on the fly.
- A tool to track the elements, duration, and sequence I actually used, including any changes.
- A way to record short notes in passing.
Enter the session scanner
I tried several layouts before deciding that what worked for me was a half-day plan on a single page. (For a full-day, I’ve got a second page with the afternoon hours.) 15 minutes felt like the smallest chunk of time, so it became the basis for a grid. Here’s what the scanner looks like when I’m done planning:

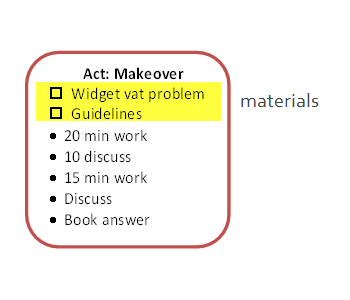
In the Planned column, the shapes represent individual elements, like the Makeover activity scheduled for 11. The height stands for the planned duration. The color around an element doesn’t mean anything; I just find them easier to distinguish when they’re not all the same color.
The Actual column is for tracking what elements I used, and how long they took in the real world.
You can figure out what the Notes column is for. And the Options column in the example lists three elements that I can add or substitute on the fly.
In the element shapes, checkboxes remind me about supporting materials for the particular element. Bullet items summarize of the main steps or stages.

The scanner at work
The next example shows the scanner after I finished the first element: an arrow to indicate elapsed time, and a couple of notes. (“Drafts had lots of ‘why'” would be important to me — suggesting the activity was not making the point that there shouldn’t be much “why” in this job aid.)

Next, the scanner about an hour later. The Analyze element didn’t take as long as planned, so I added the optional Paradigm Demo element.

One more example. The BermCo activity started later than planned, and also ran longer. My notes remind me that there were extra questions during the “check” stage, and that the debrief activity also ran long but didn’t strike me as a problem. (This example also shows the highly innovative “cross it out” method of showing a dropped element.)

So far, so good
If I were faster at digital note-taking on the fly, I might create an electronic version of the scanner and keep it on a tablet. But I’d want to avoid lag from a screen that had blacked out, and I’d need a way to write notes at least as fast and as legibly that I can using pen and paper.
All in all, I’m pleased with the current incarnation of the session scanner. It helps me in preparation, in delivery, and in post-session analysis.