What to include in a job aid

When you’re building a job aid, pay attention to how you present and structure the information. Job aids don’t usually explain why to do something; they guide the performer about when and how to do something.

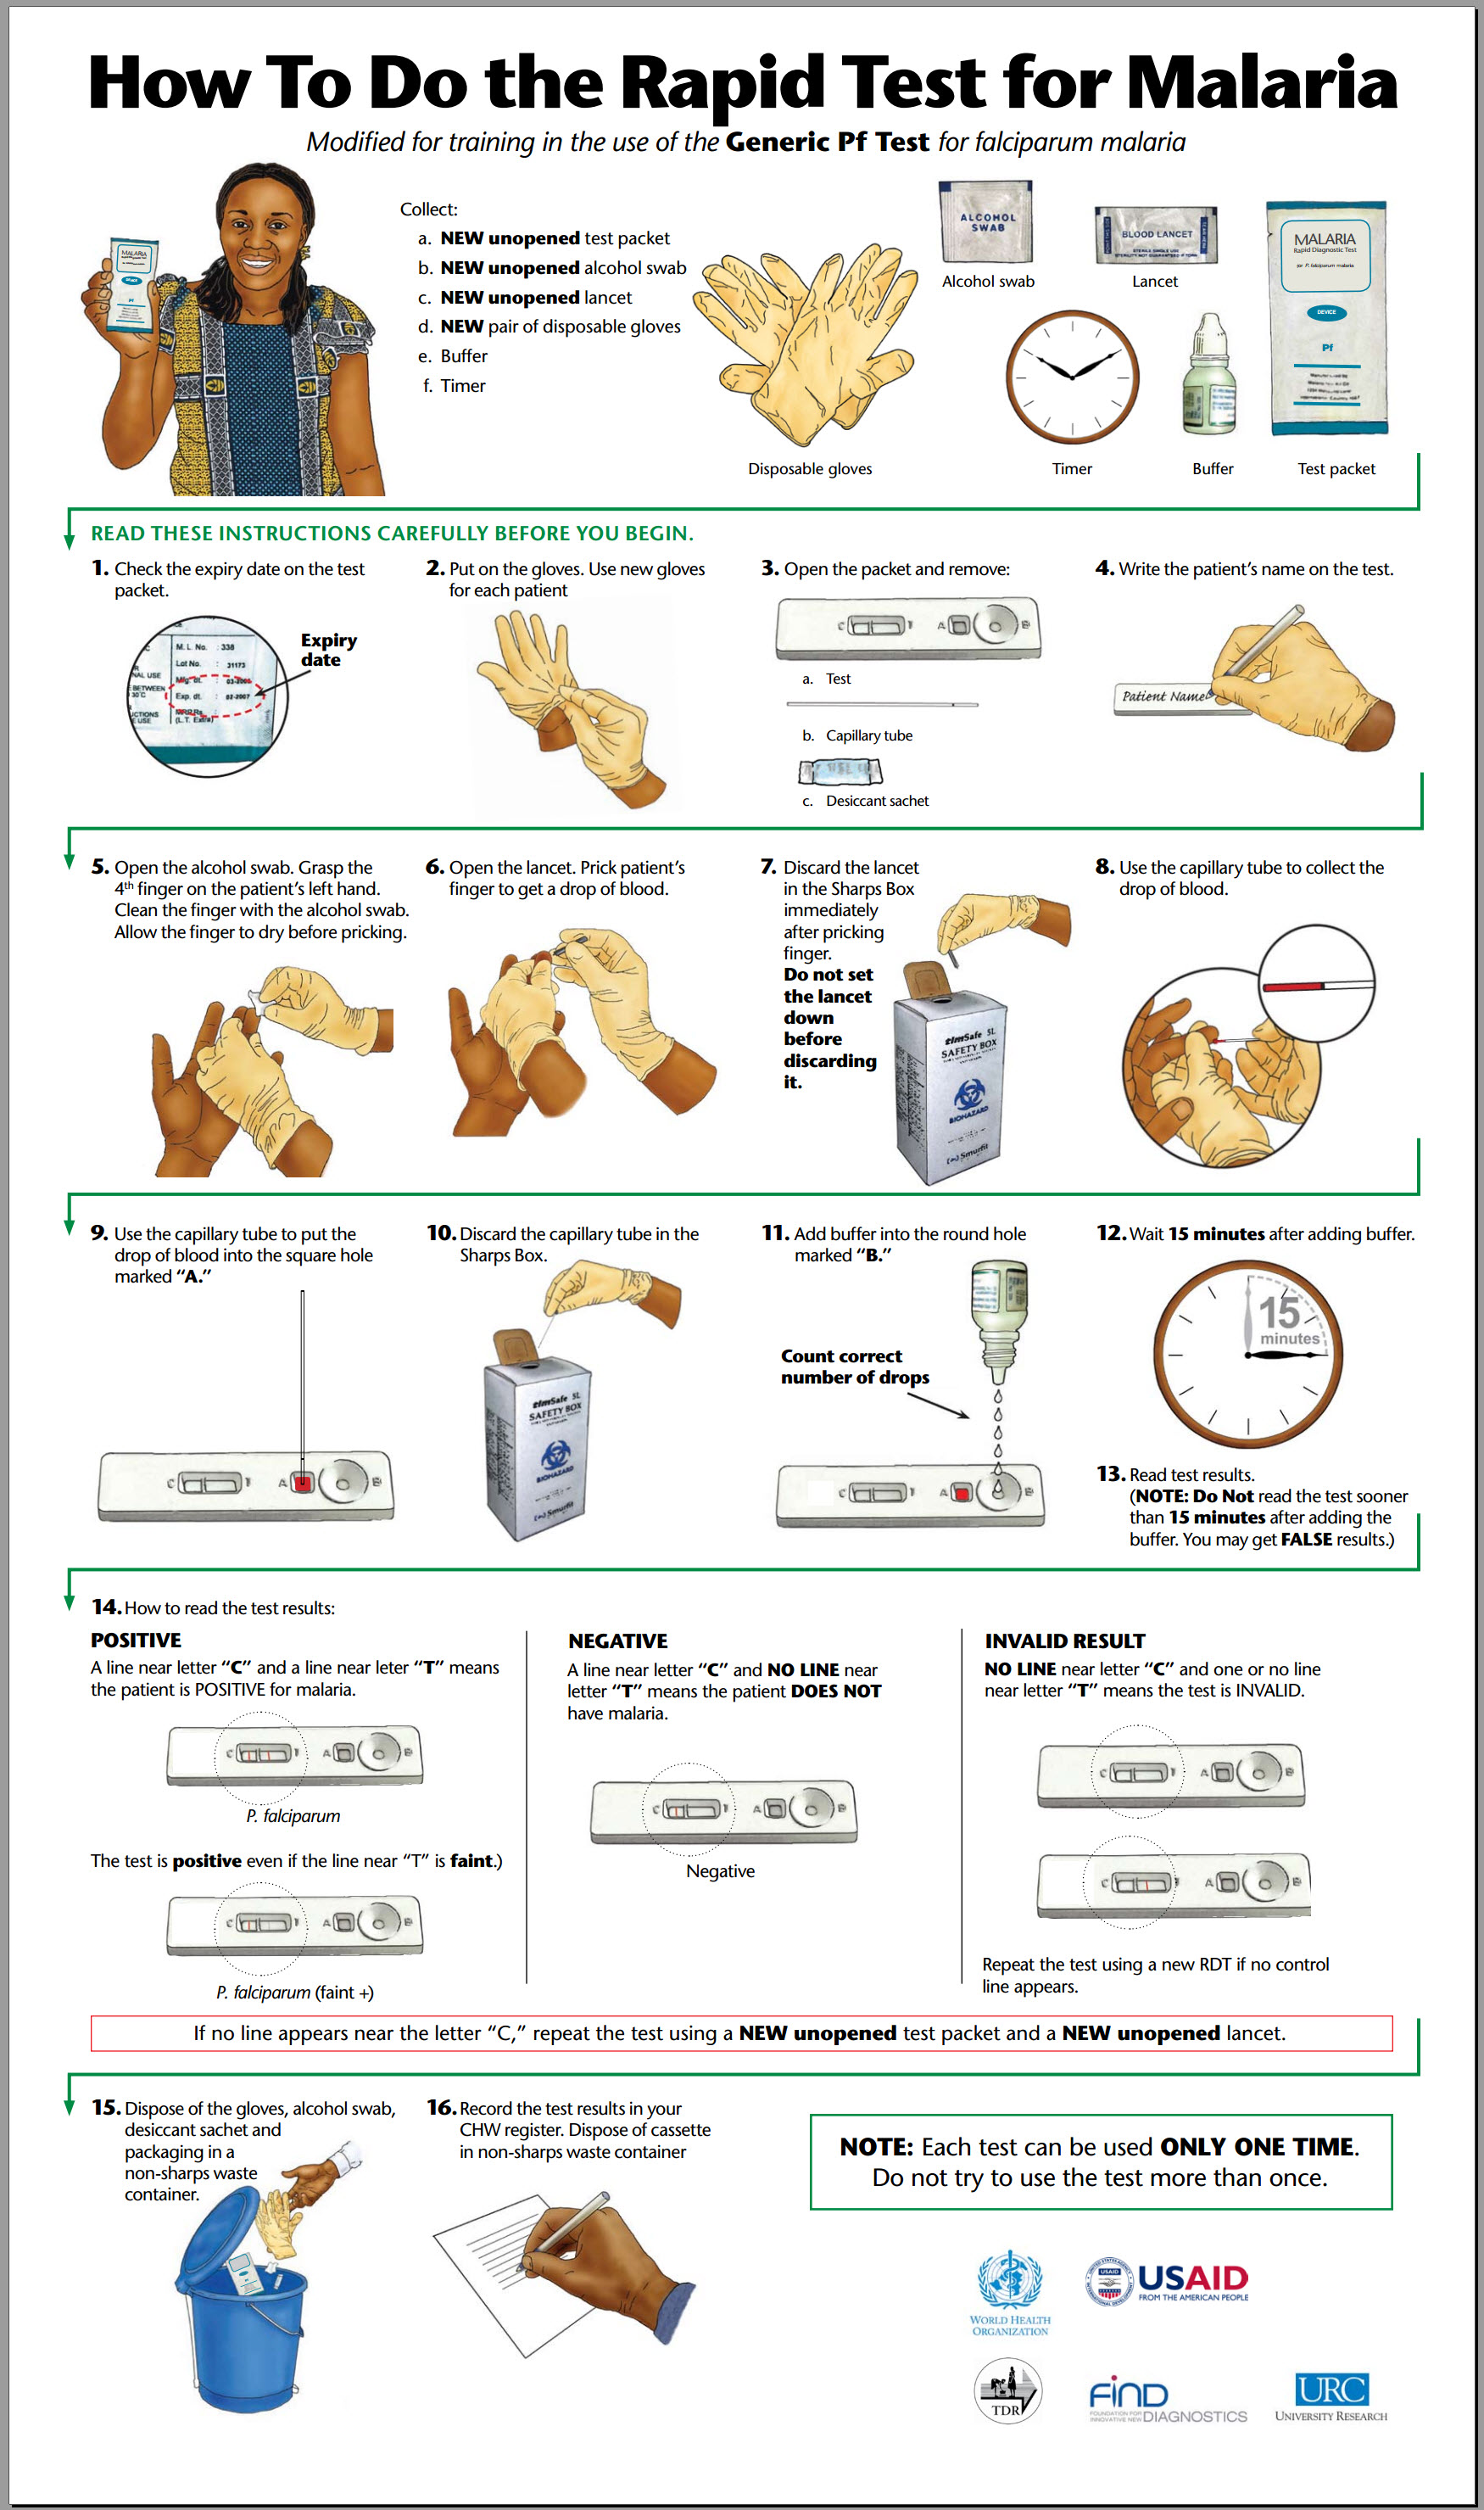
I want to highlight features that nearly every job aid out to have. I’ll use some closeups from a job aid I’ve featured on the Ensampler: How to Do the Rapid Test for Malaria. It guides people as they conduct rapid-diagnostic tests for malaria.

(Although I’m discussing features in general, you can click here to open a copy of the entire job aid in a new window.)

By the way, this is a fairly large job aid; it’s meant to avoid page-turning and could easily be a poster mounted so that the tester can view it while conducting the test. Notice that “avoid page-turning” doesn’t mean “keep to a single 8.5 x 11 page.” Not every job aid has to fit into a 3-ring binder.

♦ ♦ ♦

A clear, task-focused title

rtm01 titleWhat makes this title good? For one thing, it passes the “hey, Dad” test:

Hey, Dad — watch me while I do the rapid test for malaria.

In other words, the title explains the job aid in terms of what the person using it will do. This approach is essential in a job aid guiding some task.  Consider alternatives like:

  • Using the Rapid Test
  • Basics of the Rapid Test
  • Steps in the Rapid Test

None of these has the directness of “how to.”

♦ ♦ ♦

First things first • Consistent emphasis • Graphic cues

rtm02 materials

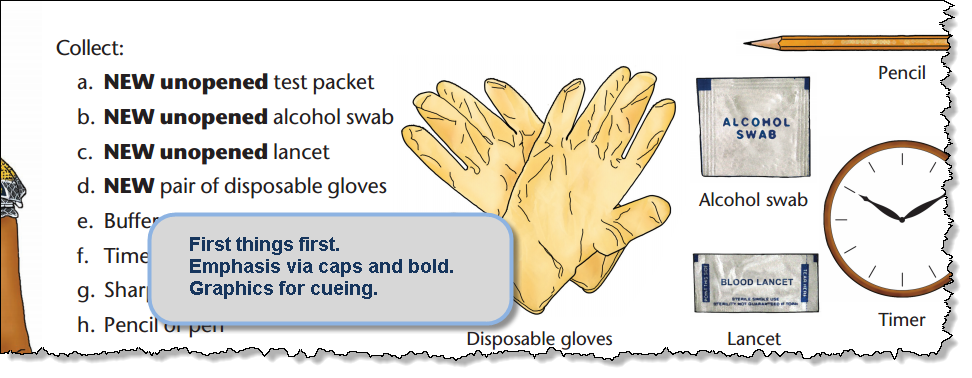
Directly under the title of the job aid, you find a list of supplies needed for the test. This is the equivalent of the list of ingredients at the start of a cooking recipe.

Because the rapid-test job aid deals with a medical topic, it consistently calls attention to words like “new” and “unopened.” “New” is always in bold capitals here; “unopened” is always in bold.

The job aid does not depend on color alone to convey meaning in the text; if you reproduced these steps in black and while, the capitalization and bolding would still convey emphasis.

In addition, the job aid includes graphic illustrations of the materials, in part as a reminder for the community workers who will be conducting the tests. Some may have limited skill in reading, and so the illustrations and labels support their ability to recognize what the test packet is.

Often a drawing rather than a photograph is more effective; line art can retain essential information without bringing in unnecessary detail. It’s much more important for the community worker to recognize an unopened lancet than to be able to read on the job aid the printing on the lancet package.

♦ ♦ ♦

Numbered steps • Separation between steps

rtm03 steps

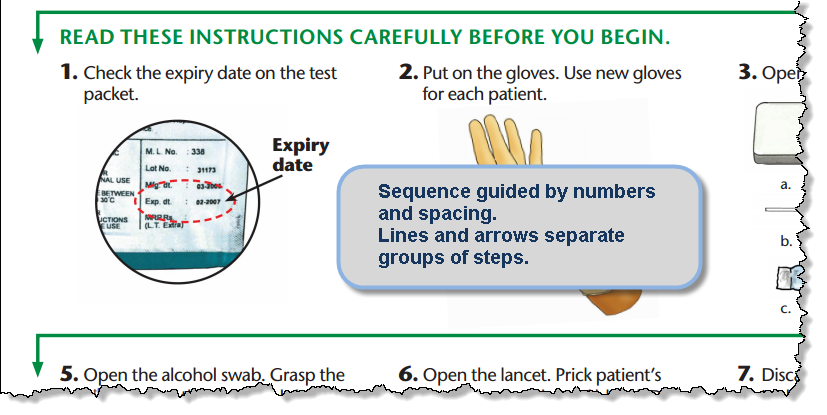
If you need to perform steps in a particular order, you have a sequence. Use numbering for the sequence. In general, a numbered sequence is easier to keep track of than one with letters.

♦ ♦ ♦

Performer’s point of view • Callouts

rtm04 graphics

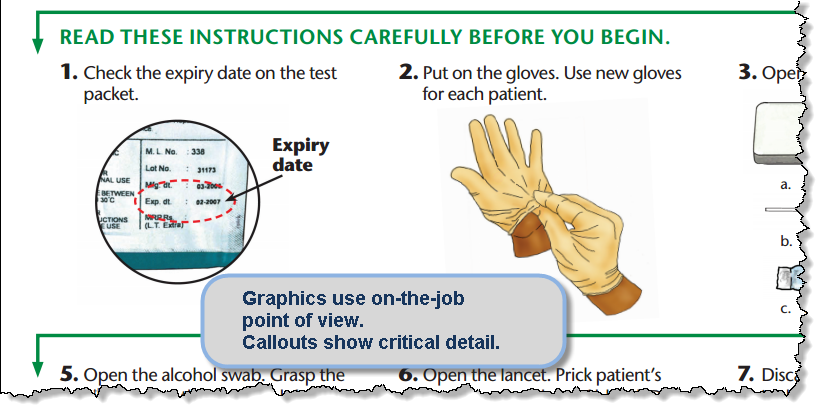
Because the purpose of a job aid is to guide performance on the job, graphics need to show examples or technique from the point of view of someone doing the job.  Note the hands under step 2 in the illustration above: they look the way your hands would if you were putting gloves on.

This job aid makes careful use of callouts — they appear only when they’re important for a particular step.  At the beginning of the job aid, for instance, there’s an image of the test packet but no callout for the expiry date. It makes more sense to check the date right before you’re ready to start.

♦ ♦ ♦

Step size: can be done without rechecking

rtm06 step size

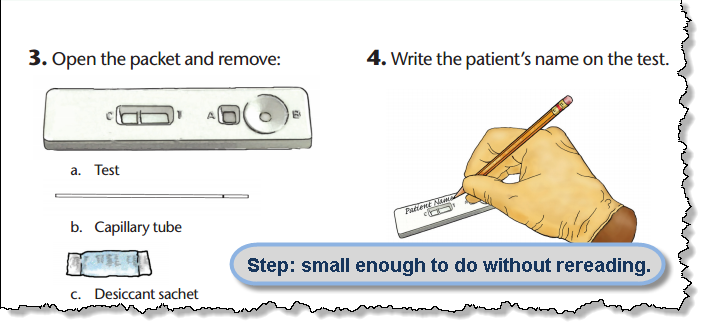
If you’re building a job aid to guide steps in a procedure, a good rule of thumb for any one step is that the performer should be able to complete it without having to refer to the job aid again.

It’s not that he shouldn’t refer to it. The point is to avoid overburdening him.

In this example, step 3 spells out what you’re removing from the test packet. That’s all that it contains. If the instruction read, “Remove everything from the packet,” though, the performer has no idea what the packet should contain.

What if there were no desiccant (say, due to a packaging error)?  Because step 3 tells me I need to remove the test cassette, the capillary tube, and the desiccant, if I don’t find those things, I’m pretty sure something’s wrong.

♦ ♦ ♦

Special emphasis for safety / hazard / high-risk information.

rtm05 safety highlight

This is a special case for the consistent emphasis mentioned earlier. Some procedures have steps that are highly important in the context of carrying them out. In this example, the entire sentence for “don’t set the lancet down” appears in bold.

By the way, preparing community workers to conduct the rapid diagnostic test involves more than the job aid. The training includes actual practice, including use of the lancet. The training would reinforce the importance of proper procedure and correct handling of the lancet and the capillary tube (which also goes into the sharps box).

♦ ♦ ♦

The features mentioned here are not a complete list, and not every one is essential for every job aid. On the whole, though, if a job aid doesn’t include most of these features, it’s likely to be less effective in supporting performance.


How to write instructions (Dana Chisnell’s field guides for voting)

Background:

A few months ago, I came across a series of “field guides” related to voting. These were developed by Dana Chisnell of UsabilityWorks as a result of research she conducted with Ginny Redish for the National Institute of Standards and Technology.

I’m particularly interested in this topic because I worked as an election judge (the Maryland term for a precinct worker) during four elections, including two as a chief judge (one of the two chiefs at my precinct).

I’m pretty sure most voters have no inkling of the multitude of tasks and procedures that precinct workers — almost always volunteers, despite a small stipend for their effort — must try and carry out in order to ensure that people can exercise their right to vote.

The Field Guide series, “essentials that local election officials” can use when trying to apply ballot design guidelines to real life, have been edited by Dana Chisnell of UsabilityWorks. From Civic Design’s site you can download PDFs of four guides:

Designing usable ballots
Writing instructions voters understand
Testing ballots for usability
Effective poll worker materials

I want to highlight some of the recommendations from “Writing Instructions Voters Understand.” These make great sense in most job-aid and performance-support contexts, and the Field Guide provides detailed examples for the individual recommendations.

Layout

You can’t tell easily from the PDF, but in the printed Field Guide, illustrations and examples appear on the left-hand page, and instructions on the right, like this:

example voter instruction field guide pp 8 9

So you see the example in context on the left, and then you get details about it on the right.

At the beginning of the ballot, explain how to change a vote, and that voters may write in a candidate.

I think of this as a “before you begin” instruction. The voter might not be thinking about making errors or changing her mind; having this notice at the outset increases likelihood that she’ll recall it during the voting process.

Put instructions where voters need them.

This advice could sound like “be nice,” but the Field Guide gives specific examples:

  • Break instructions into groups. (No lumbering blocks of text.)
  • On paper ballots, put turn-over instructions at the bottom right-hand corner.
  • On electronic ballots, put instructions for writing in a candidate on the write-in screen.

Include information that will prevent voters from making errors.

Here’s a before-and-after approach that shows the stark contrast between insider focus and customer (or voter) focus:

(Before)

If you tear, or deface, or wrongly mark this ballot, return it and obtain another. Do not attempt to correct mistakes on the ballot by making erasures or cross outs. Erasures or cross outs may invalidate all or part of your ballot. Prior to submitting your ballot, if you make a mistake in completing the ballot or wish to change your ballot choices, you may obtain and complete a new ballot. You have a right to a replacement ballot upon return of the original ballot.

(After)

If you make a mistake, ask a poll worker for another ballot.

Use short, simple everyday words.

While I do enjoy the occasional eyeroll in the director of St. George of Orwell’s prescriptionism, Chisnell’s definitely on the right track.

Particularly with the example: Avoid jargon, such as “over vote,” “under vote,” and “partisan.”

Write in the active voice, where the person doing the action comes before the verb.

Note that this guideline is itself an example of avoiding jargon. The average person isn’t good at providing an example of an active verb as opposed to a passive one.

Write in the positive.

Directly from the guide: Tell voters what to do rather than what not to do.

(Before)

If that oval is not marked, your vote cannot be counted for the candidate.

(After)

You must fill in the oval for your vote to count.

When giving instructions that are more than one step, make each step an item in a numbered list.

It’s a lot harder for people to keep track of where they are in a bulleted list than in a number one.

When steps are a sequence, number the steps. That’s what the numbers are for: showing each item’s place within the sequence.

If sequence is not important, then use bullets.

An everyday example: the ingredients in a recipe appear before the steps. The ingredients are usually listed in the order you’ll use them, but they don’t have to be, because (presumably) the steps in the recipe will tell you when to add the carrots and when to add the vinegar.


My thanks to Dana Chisnell for agreeing to have the Field Guides included in the Ensampler.

Learning with job aids (via Cathy Moore)

There’s this:

Blended learning
“Stir the mixture well / Lest it prove inferior…”

And there’s this:

Blended learning and job aids
“…then put half a drop / Into Lake Superior.”

Even conceding that many of the “blended learning” hits are from formal education (schools, academia), it’s a little depressing that only 3% of them mention job aids. I personally doubt it’s because everyone uses job aids. It’s almost as if developers, yearning to produce ever-more-engrossing courses, are blind to this kind of performance support.

This is closely related to what Cathy Moore says in the opening minute of the following clip:

And here, at 4%… is what is possibly the least expensive and most effective approach [for blended learning]: on-the-job training tasks. Apparently we are still stuck in the mindset that training is a course.

The clip actually covers a lot of territory in six minutes, including realistic tasks, application, relevant examples, and so on, but I want to focus here on the aspect of figuring out how not to train — or, more accurately, how to not train. Cathy demonstrates the use of “a mega job aid” to enable on-the-job learning. This is her term for combining a job aid (which stores information or guidance so you don’t have to remember it) with instruction (which tells you how to apply what’s in the job aid to a specific task).

I asked Cathy for some comments about job aids.

“Before designing formal training, consider whether a job aid is all you need.”

Here, she’s asking what makes you think you need formal training for X?  Is there another way to help people accomplish the desired result?

“If you decide training is necessary, make sure the job aids are top-notch, and consider having the ‘course’ teach people how to use the job aids.”

It’s not a job aid if you don’t use it while you’re performing the task. So if you build a job aid but find that people need to practice using it, that practice should be like on-the-job use.  They’re not going to be doing the real-world task from within the LMS (unless, poor devils, their real-work job is managing the LMS). Embalming a job aid inside a course is like disabling an elevator in hopes that people will learn how to get from the 3rd to the 9th floor without “cheating.”

“Don’t duplicate the job aid info in the course.”

  Part of the decision about whether to build a job aid involves the nature of the task. Among the considerations:

How likely is it that the task will change?

The likelier it is that the task will change (and thus that the steps for accomplishing it will change), the more sense it makes to build a job aid — and the less sense it makes to duplicate the job aid inside a formal course.

Instead, as part of your formal training, use the same job aid people will use on the job. And figure out how to make updates easily available.

No matter what learning management ideology claims, there are only three kinds of people who return to an online course for reference information:

  • People who work for the vendor.
  • Actors appearing in the vendor’s materials.
  • People on the job who are really bored or really desperate.

Because she involves herself with what people actually do on the job, Cathy has some inexpensive yet highly effective ideas about where to get started:

To evaluate and improve job aids, physically visit learners’ work stations and look around. What support materials have people created for themselves? Often someone on the job has already created a good job aid and you just need to “borrow” it.

Even if it’s a less-than-ideal job aid, the fact that someone’s created it and is using it suggests both that the task is important and that people feel the need for support as they’re carrying out the task. That’s one heck of a head start, and you haven’t had to create a single “at the end of this training program” statement.

(Based on Learning: blended, or blinded?
posed at Dave’s Whiteboard on June 28, 2012)