
(Part 2 of 2; here’s Part 1.)
Procedure: so let’s build a desk
…there’s one foolproof method for turning IKEA rage into grudging respect: assembling almost any other brand of furniture…
To adapt Winston Churchill’s famous quip, IKEA may be the worst form of ready-to-assemble product design we have—except for all the others.
John Pavlus
As noted above, page 3 of the Galant instructions is a decision guide — it directs you to one of seven different sets of procedural steps, depending on the type of desk you’re putting together.
I had a left-handed desk with no extensions; that’s the fourth set of instructions, on pages 16 and 17.


You can see those are typical IKEA instructions. They demonstrate a careful, specialized approach to guiding performance:
- No text (a single sentence would have to appear in dozens of languages)
- Minimalist images (what detail you see matters)
- Customer focus (the desk, the frame, the legs appear in standard positions and as the assembler would see the actual parts)
- Call-outs, close-ups, and warnings
Implicit in IKEA instructions are two messages: “You can assemble this item,” and “Here are the details.” Those messages are related: if you don’t attend to the details, you’ll have trouble assembling the item.
You are here.
Here’s the top of page 16:

The diagram is meant to confirm that you want the instructions for a right-hand desk (top row) or a left-hand one (bottom row), whether you’re using five angled legs (left column) or three T-legs (right column).
Each configuration appears both upright (because that’s your goal) and upside down (because that’s how it’ll look as you work on it).
A complex two-step
If you study pages 16 and 17, you’ll see that there are two main steps: attach the legs to the frame, and attach the frame to the desk. IKEA marks those with a big 1 and 2.
The biggest drawback to IKEA’s wordless style is that there can be a lot of detail in a step. Here’s the main part of step 1 (page 16) to which I’ve added some callouts for commentary.
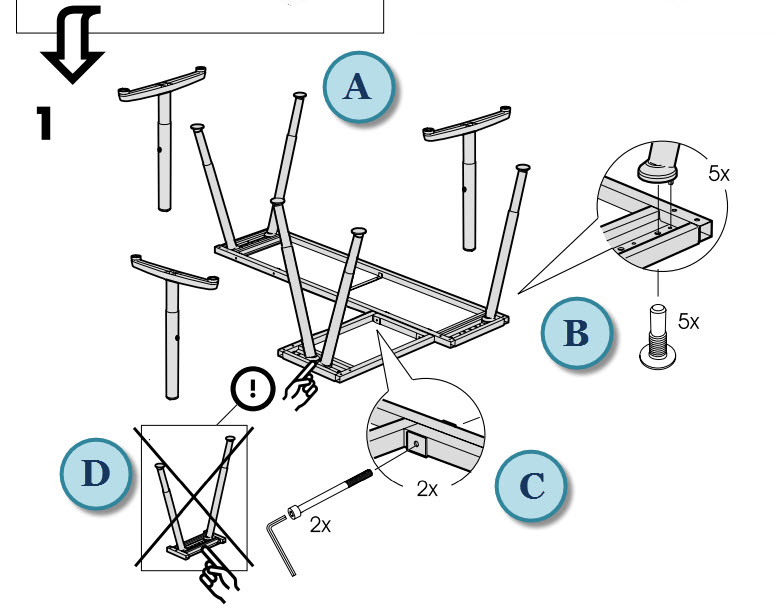
A: attaching legs to the frame
The diagram shows both kinds of legs so you’ll see how to position them: for the angle legs, one in the corner of the desk and two at each of the remaining ends. For the T-legs, orientation matters, with the two on the long side of the desk parallel to teach other.
B: details for attaching angle legs
A bolt goes through the frame into the angle leg. Note the closeup: there’s a small tab on the top of the leg that fits onto a hole on the frame. Also, the 5X is a reminder that you have five angle legs to attach.
(I’ll get to the details for T-legs later in this post.)
C: attaching the extension to the frame
Some Galant desks are ordinary rectangles, but the right- and left-handed desks need support for their extensions. The closeup at C shows where two hex-head bolts attach the frame extension to the main frame.
Details matter: if you look closely, you’ll see that the end of the extension that the legs attach to looks different from the end that attached to the main frame. (If you don’t look closely, eventually you’ll discover that the leg end doesn’t have any holes for you to attach it to the main frame.)
D: attaching angle legs to the extension
A pointing hand draws attention to the closeness of the legs for the extension. (Compare them with the two legs at the far end of the main section.) There’s even an X-ed out “not this way” diagram to reinforce the point.
The short version:
- Position each angle leg and bolt it to the frame.
- Position the frame extension and bolt it to the main frame.
At the bottom of page 16, you find two boxed items; each directs you elsewhere for a specific sub-procedure.

The left-hand diagram sends you to page 40 to see how to adjust the height of your desk, regardless of type of leg. Personally, I might have put this particular procedure on page 17, after you’ve attached the frame to the desk.
The right-hand diagram sends you to page 5. That has the steps for assembling the T-legs and for attaching them to the frame.
Attaching the frame
Attaching the frame to the desk is straightforward: eight screws, as indicated on the diagram.
The less-obvious part of this step involves putting plastic caps over the open ends of the metal frames: four on the main frame, two on the extension.
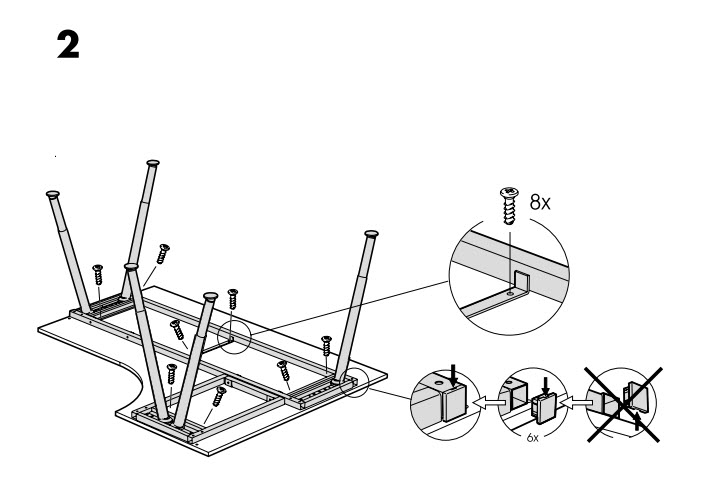 Here, too, callouts and a don’t-do-this diagram to show there’s a right way to attach the caps. (The small arrow, in the middle of the three circles, shows a little notch you can slip a screwdriver into to easily remove the cap.)
Desk work
Why spend so much time analyzing a set of IKEA instructions?
I think the Galant guide is a highly effective approach to supporting detailed accomplishments. IKEA’s worldwide market necessitates a wordless approach to such support. That has its drawbacks–I know I’ve misread IKEA instructions more than once. Almost always, though, I can back up, undo the error, and get things right.
What’s more, the IKEA format is kind of do-it-yourself cultural artifact, and once you’ve put together a couple of IKEA items, you’ve learned through experience to pay attention to details like hole size, spacing, and position of part.
By the way, there’s also a thriving culture of IKEA hacks–people going far beyond the instruction guide. Here are over a dozen hacks just for the Galant, including someone’s megadesk that’s 25 feet long, not including 12 extra feet of shelving made from yet more Galant parts.
(This was Part 2 of 2; here’s Part 1.)
Do you gave page 40 that discusses the height adjustment steps for the legs? I just bought the desk but no manual. This was very helpful by the way
Francine:
Here’s a link to the entire PDF: https://www.ikea.com/us/en/assembly_instructions/galant-table__2_Q112_PUB.PDF. Page 40 is included. My own desk had the T legs, and you need a small hex wrench to loosen and tighten a screw that’s about halfway up the upper part of the leg.
If your desk uses the A-frame style legs, it appears you twist the lower part of the leg to loosen or tighten it.
In both cases, the lower legs have markings on them to help you figure the right amount to adjust.