Wine Folly’s “Different Types of Wine”

About this job aid

This chart, created by Wine Folly, is presented as an infographic. That’s mostly a matter of format. I’m happy to include it here on the Ensampler as a less-typical tool that guides a person in choosing a wine suited to his taste. Or, as Wine Folly says, it “organizes almost 200 types of wine by taste so you can easily discover new wines based on your preferences.”

(Click for original at the Wine Folly site)

What’s the accomplishment?

Identification of a type of wine based on factors like overall type of grape and preferences regarding taste.

Related to that, here’s how Madeline Puckette of Wine Folly describes her goal:

Wine is all about taste, and as a sommelier, my job is to lead customers into wine they want to drink. Most do not know what they like; they just know they want red wine or white wine.

This novice level need is how I built the first level of the flowchart.

[ Red, white, rosé, sparkling, fortified–and of course more of the wine appears in the first two categories–DF]

Beyond the first level is all about flavor affinities… For instance, if you like black coffee, you’ll probably like a bold wine with high tannin. If you prefer a latte, you might lean more towards a round and lush syrah.

Who’s the performer?

Presumably a customer choosing wine. Although the example that Puckette gives above is in a restaurant setting, her level of skill would enable her to guide the customer from memory, so it’s not likely a job aid for a sommelier.

I can see at least two types of people who’d make use of such a chart:

  • A customer curious about or considering a wine, either in a store or online. 
  • Restaurant wait staff, possibly practicing with a subset of the information, in order to increase their ability to guide patrons in the absence of a sommelier.

Comments

I’m usually not a fan of the infographic format, especially if presented as a job aid, because most such graphics by virtue of their size are impossible to use on the job. Wine Folly’s chart, though, isn’t meant to be the final word on wine selection. From Madeline Puckette’s point of view, it’s a way to help people toward an enjoyable experience with wine.

For the purposes of the Ensampler, it’s a highly concentrated way to organize a great deal of information with the goal of a satisfactory outcome.

Someone who knows wine understands the differences between a Rhône and a Pomerol, even though both are in the red / savory / black pepper cluster on the chart. At the same time, that person would probably agree the two are closer to each other than either is to a Médoc. He’d also likely agree that if you say you enjoy the taste of black pepper but don’t care for things that are too spicy, a Rhône rather than a Bardolino isn’t a bad choice.

Underlying the design of the chart is the basic when/then type of consideration that goes into building a flowchart or a decision table. Here’s a sample of what I mean–a portion of the “savory red” section of the chart. For simplicity, I’ve included only four wines in each category.

savory red grid

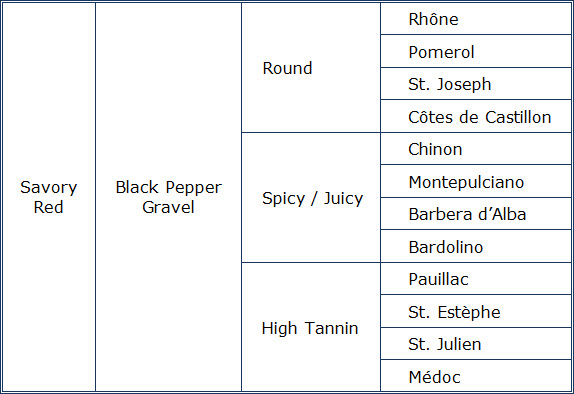
Turning the entire Wine Folly chart into a decision table would produce one lengthy, complicated table. That’s due to the multiple factors: grape/ overall type (like sparkling); what I’ll call ‘style family’ for a grape (like sweet, savory, or fruity for red); flavor characteristics within that family (the small red circles in the Wine Folly chart); and finally characteristics like tannin versus spice versus roundness.

I’m very grateful to Madeline Puckette for sharing the thinking behind her chart, which I’ve tagged both as decision table and flowchart.

Online guide to Canadian citizenship

An online job aid?

Sure–the essence of a job aid is not the form it takes, but that it provides guidance to someone who’s completing a particular task.

In that sense, many software wizards and widgets are job aids: they enable accomplishment that would be difficult or impossible without them.

I see this online guide from Citizenship and Immigration Canada (CIC) as a kind of decision table. (You might see it as a flowchart; the two formats are siblings.)

Most decision tables lead to a specific action–file this form, start that process. This one takes a different route. In a way, it’s a quick substitute for a conversation with a CIC official, the person who’d be making a decision about your status based on your answers to the question.

That’s one reason I’m putting it in the Ensampler: it shows that you can use the job aid approach to help the clients of an organization, as well as its employees.

About this job aid

As with most countries, citizenship in Canada can be complicated. On its website, CIC has information about applying for, getting proof of, and resuming citizenship. One part of the eligibility section is “See if you may already be a citizen.” That pace includes a tool–essentially, an online decision table “to determine if you are a citizen under Canada’s citizenship laws.”

canadian citizenship tool

Note that there’s a legal disclaimer on the page: the tool “is intended solely for general guidance and reference purposes.” In other words, even if the tool says you might be a Canadian citizen, some nuance or technicality can crop up.

What’s the accomplishment?

Determining whether you’re already a Canadian citizen. This could lead to additional actions, such as deciding to apply for a certificate of citizenship or a passport.

Who’s the performer?

A person who believes he or she might be a Canadian citizen–for example, someone like myself who was born in Canada but lost Canadian citizenship as a child when his parents became naturalized citizens of another country.

An example

Because the online tool is informational, you can try it out for yourself, but I’ll demonstrate the process using my own case. For example, this is the first question:

Have you ever renounced your Canadian citizenship with Canadian authorities?


canadian citizenship Q1


Typically a job aid doesn’t explain why a step is performed. In this case, however, the online tool provides explanation for a technical term (renunciation) to help a person answer correctly.

In my case, the answer was “no.” That led to this sequence of questions (for which I won’t show all the screens; they’re like the example above):

Was your Canadian citizenship ever revoked for fraud?

No.

Where were you born?

In Canada.

When were you born?

Between January 1st, 1947, and February 14, 1977.
(These dates mark a period covered by the 1946 Canadian Citizenship Act.)

At the time of your birth, was either parent employed by a foreign government in Canada with diplomatic status?

No.

And the result:

Based on your answers, you are likely a Canadian citizen.

For a formal assessment of your citizenship status, you have the option of applying for proof of Canadian citizenship.

As CIC points out, for people who were born in Canada, an official birth certificate from their province or territory is often sufficient to prove citizenship. Those individuals, as well as people born outside of Canada, can also apply for a citizenship certificate.

Comments / critique

Citizenship is a complex issue. This online tool, which I see as a form of decision guide (though not strictly speaking a decision table), restricts itself to a single, easily-understood question: am I a Canadian citizen? What’s more, because of the many factors that may pertain, the best answer it produces is “likely so.”

When I answered some of the questions differently, this was the result:

Based on the information you provided, it appears that you are not a Canadian citizen.

That was followed by a list of seven possible reasons (e.g., “you are in the second or subsequent generation born outside Canada to a Canadian parent on or after April 17, 2009”).

So regardless of your citizenship status, the tool doesn’t pretend to give the ultimate decision; it simply explains what’s likely to be the case.

Shoreline assessment job aid

The National Oceanic and Atmospheric Administration (NOAA) has an Emergency Response Division concerned with the release of oil or chemicals into the environment, such as after an oil spill or natural disaster. An early step in the response is a shoreline assessment to determine facts about the contamination and to “support decision making for shoreline cleanup.”

As a visual guide to such assessment, NOAA developed its Shoreline Assessment Job Aid (PDF). Most of the job aid consists of photos illustrating such things as:

  • Amount of coverage by surface oil
  • Thickness of surface oil
  • Type of surface oil
  • Type of subsurface oil
  • Types of sediment
  • Types of shoreline

Here’s an example: photos showing amounts of coverage by surface oil.

From the Shoreline Assessment job aid; click to enlarge.

There’s also material related to beach profile (e.g., elements of a gravel beach versus a sand beach) and to more than a dozen different clean-up methods.

Since it’s made up mostly of examples and descriptions, I consider this a reference job aid.

What’s the accomplishment?

The purpose of the job aid is to have assessment team members produce consistent, accurate descriptions about the amount of contamination in a shoreline habitat.

As the job aid says, cleanup methods depend on field data about the type and degree of contamination.

Who’s the performer?

The assessment team can include the federal on-scene coordinator, NOAA scientific support staff, state on-scene coordinators, federal and state resource managers, representatives of the responsible party, landowners, and others.

Comments 

Members of an assessment team need to be in reasonable agreement as they carry out their assessment. To aid that, the job aid includes guidance to help people estimate the relative percentage of coverage.  I’ve combined two charts into one for this illustration; the square examples in the upper portion are for “oil band situations.”  The circular examples below are for “discrete oil deposits such as tarballs.”

percent cover estimate chart

Notice also the practical advice, just above the examples:

Do not spend time trying to get a precise measure of percent cover; the four ranges listed [sporadic, patchy, broken, continuous] are usually sufficient.

The back cover of the job aid includes a 15-centimeter ruler:

back coverA similar ruler appears in several examples in the job aid:

tarball exampleFurther information

Along with the job aid, NOAA has a Shoreline Assessment Manual that outlines the SCAT system (Shoreline Cleanup and Assessment Technique). That includes a description of team members, roles, and responsibilities; the SCAT method and process; and information about cleanup decisions based on the findings of the assessment.

Screencast.com’s Getting Started Guide

About this job aid

Screencast is an online service that lets people “manage and share videos, images, documents, or anything else online.” In its Help Center, Screencast has more than a dozen how-to guides, including  a succinct Getting Started Guide.

(You don’t need an account to access this PDF, which is nine pages long–including the cover and the table of contents.)

What’s the accomplishment?

The Getting Started Guide helps you do two things:

  • Create a Screencast account (which you need in order to put your content on Screencast)
  • Upload content to a folder so you can share that content online

Who’s the performer?

Anyone who has video. images, documents, PowerPoint presentations, and similar material that they want to share online.

A job aid strategy: letting people decide what help they need

The Guide takes a useful approach to the task of uploading and sharing content on Screencast: two versions of the same job aid. For people who don’t need a lot of explanation, there’s the short version. (You can click the examples below to enlarge the images, which are taken from the downloadable PDF.)

In a hurry? Four steps to sharing.

That’s it–the basics, on a single page.

For people who prefer more detail, there’s a four-page version for the same task. Here’s how it begins:

The first of four pages in the “more detailed” job aid

One aspect of the detailed how-to is the way it handles screen shots. That example you just saw of the first page includes an image of the full-screen library on the left, then a closeup of the Edit Folder window. In other words, they’ve cropped unnecessary detail out of that second image.

They continue in this leave-things-out mode. For example, to help you decide how you’ll share, they crop to only the Privacy section of the Edit Folder. My take is that they’re focusing your attention on just that section, and omitting anything you don’t need to see while you’re deciding on the level of privacy for the content in this folder.

Some people might find this a bit harder to follow than full-screen images, but I think such images are often hard to follow in themselves. They’re small (in order to fit on the page), and typically they’re needlessly cluttered with detail that doesn’t directly relate to the step I’m performing.

Careful weeding of detail is a way to rely on the performer’s intelligence and his interest in accomplishing the task.

Other features of the Guide

The Guide is really a collection of several job aids, and the way it’s laid out is useful for the newcomer. Here’s the overview at the top of page 1, for example:

Screencast.com is a TechSmith solution for business and academic professionals looking to manage and share  videos, images, documents, or anything else online. Whether you have a Free Account or a Pro Account, this Getting  Started Guide will help you get up to speed fast. In this guide, you will find the following topics: Create a Screencast.com Account on page 3. Give Me the Short “How To” on page 4. Give Me the More Detailed “How To” on page 5

A two-sentence overview followed by a three-line summary, and you can figure out what’s in the Guide. The bullet points of that summary do double duty; you can see them as a miniature decision table, helping you decide which part of the Guide you need to use.

The page has a table of nine “terms you should know” — content, embed, library, and so on — that relate directly to uploading and sharing via Screencast.

As a job aid, that table falls into the reference category; you’d use it to learn or remind yourself what “breadcrumb” or “RSS” means in the context of Screencast. Overall, though, I’d put the Getting Started Guide into the procedure category of job aids.

Finally, still one page 1, there’s a box listing other resources, like the Help Center, two other guides (one with “end-to-end workflow” for using Screencast, and an “example case study“).

More about Screencast

Screencast is a TechSmith product, as are SnagIt [for screen captures] and Camtasia [for screen recording and video editing). Screencast comes in two flavors: you can get a free account (2 GB of storage space and 2 GB of monthly uploads), or a pro account with much more space and several additional features.

I’m grateful to TechSmith and to Natalie Ebig Scott, their Global Public Relations Manager, for agreeing to have the Getting Started Guide appear here in the Ensampler.

Installing WordPress

If you go to WordPress.org, you’ll see this explanation:

WordPress is web software you can use to create a beautiful website or blog.

And so it is. If you don’t have your own domain, you can set up a blog at the companion site, WordPress.com, but many people use a hosting service (a third party on whose computers you store the files for your website) to establish or host their blog. Part of that process involves installing the WordPress software.

The online guide to that installation is an example of a complex but mainly procedural job aid. Given its length, I haven’t put the entire guide into this post. I do have links to the original, along with a couple of close-ups

What’s the accomplishment? WordPress is set up and ready to run on your website.

Who’s the performer? Someone with some technical knowledge about websites–or someone with  technical curiosity and a lot of patience.

What are the prerequisites? You need to have a domain (like daveswhiteboard.com). You need a web hosting service. You need access to that service (e.g., via FTP or the service’s control panel). Here’s the preview from WordPress.com:

WordPress installation preview

If you click the download link in item 2, here’s part of the message you’ll see:

wp install download message

The one-click install mentioned in that message is yet another way to accomplish the task: several web hosting companies have a wizard-like feature to install the WordPress software for you.

For the purpose of this job aid ensample, though, let’s look at the do-it-yourself support from WordPress.com. This is the next paragraph:

wp install myself

I’ve linked that “what’s next” box to the page on Installing WordPress.

wp install page table of contents
(Click to view the “Installing WordPress” page in a new window)

As you can see from the table of contents, that’s one highly detailed page.

In terms of a job aid for a procedure, notice that prerequisites come first: Section 1 of the page tells you things you need to know before installing.

For example, you need access to your web server (the computer at the hosting service where your files are). And you need an FTP client, software to help transfer files between your computer and the server.

The installation guide uses hyperlinks to take you to another level of detail. If you’re not sure what an FTP client is, clicking a link takes you to a page explaining what they are, suggesting one to use (like FileZilla for Windows computers or Cyberduck for Macs), and guiding you through setting it up.

Next there’s an explanation of what you need to do in order to install WordPress (item 1.1 in the contents)–like download and unzip the software, and the all-important “print this page out so you have it handy during the installation.”

Item 2 in the contents is the “Famous 5-Minute Install.” It’s a minimal job aid intended “for those that are already comfortable with performing such installations.”

When I set up my first blog, nearly 7 years ago, I was totally confused. I’d actually used an FTP client before, but I had never had my own website. I wasn’t a good candidate for the 5-minute install at the time.

Now that I’m familiar with WordPress, the 5-minute guide is all I need. I use it, even though I’m pretty sure what it says, because I don’t want to overlook an important step like renaming a particular file or entering the database details.

The details on those details are another example of good job aid layout. Here’s a section with a few of my comments:

wp config file details
(Click image to enlarge.)

Among the points to notice:

  • Warnings are very clear; they’re separated from the rest of the text, and have emphasis elements like bold text and boxes.
  • The use of white space helps makes individual elements clear.  In the actual file being discussed, there’s no need to have blank lines, but in this image the extra space helps to focus your attention.
  • The actual page with this information in the WordPress Codex works like a wiki page, which means that anyone in the WordPress community could edit it. Thus the final box: don’t change the details here by editing the page in the Codex–edit the corresponding page on your own server.

There are many small conditions and decisions included in the WordPress installation guide, like those for creating the WordPress database using the control panel called cPanel.

If your hosting provider supplies the cPanel hosting control panel [as mine does], you may follow these simple instructions to create your WordPress username and database. A more complete set of instructions for using cPanel to create the database and user can be found in Using cPanel., for the most part it’s a straightforward series of steps.

[This is followed by six short steps.]

For the most part, though, installing WordPress is a straightforward if lengthy sequence of steps, which is why I’ve tagged it as a procedure-style job aid.

Determining flood-insurance premiums

Background: I created this decision table based on information from FEMA’s National Flood Insurance Program. The purpose of my table was to demonstrate, in a presentation on using job aids, how this arrangement can guide people through a series of decisions and have them arrive at an appropriate answer.

Rating (figuring out premiums) is chapter 5 of the NFIP Flood Insurance Manual  and comes to more than 60 pages in the most recent edition. Even so, an insurance agent who wants to calculate the correct premium can make use of tables to determine (a) the property’s flood zone, (b) the specific type of property, (c) the coverage [desired amount of insurance], and finally (d) the premium based on the actual coverage.

I’m pointing this out to emphasize that you shouldn’t use my table to figure out what your flood insurance might cost. You can use it as a simplified example of a decision table, though.

Decision table for flood insurance coverage
Just an example, not an actual rate quote.

What’s the accomplishment?  A quotation for the annual premium for flood insurance, accurate based on the type of property, the desired amount of coverage, and the overall limits for coverage.

Who’s the performer?  An insurance agent writing a flood insurance policy under the National Flood Insurance Program.

More about this job aid:

  • As noted above, this is a simplified example used in a discussion about types of job aids. It’s not meant as an exhaustive guide to determining flood insurance premiums.
  • The decision regarding premium involves three main sets of conditions, represented by the first three columns on the left:
    • What type of property is this?
    • What level of coverage is the client seeking?  (The NFIP has two levels: basic coverage, up to a given amount, and additional coverage beyond that. Additional coverage requires you to have the maximum amount under basic coverage.)
    • Given the type of coverage, what’s the maximum amount sought? (Both basic and additional coverage have upper limits. The total possible coverage for a given type of property would be the maximum amount under basic coverage plus the maximum amount under additional.)

During my recent presentation at the CSTD conference in Toronto, a volunteer using this job aid was able to describe correctly how she’d calculate the insurance premium for $150,000 of coverage on two-family duplex ($445 for the first $50,000, according to the table, and $0.30 per $100 for the additional $100,000).

Even if she’d been incorrect, just a little feedback on how to compute the premium would have been sufficient for her and for all the other participants to calculate any amount covered by the chart. In fact, when I asked if I could get $750,000 in coverage for an office building, several participants immediately said no, because the maximum coverage for commercial property is $500,000.

That’s a pretty good example of how a job aid improves the effectiveness of training.

Baby-feeding checklist

Gareth Saunders and his wife Jane had a challenge. Two of them, named Reuben and Joshua. As Gareth described things in an email, when the twins were born, the couple used Double Duty, a “care diary” where parents can track feedings, medication, and so on.

We got into a daily rhythm of creating feeding bottles for the day, and laying them out on a tray… For the first couple of weeks of doing this we’d get muddled. How much do I fill the bottles? (They sometimes took different amounts depending on the time of the feed.) Which bottles have been used already?…

Looking at this as a job aid:

What’s the accomplishment?  Twins who are fed on schedule with the desired amount of formula.

Who are the performers? Mainly Gareth and Jane, the parents, though sometimes the task was delegated to, let’s say, temporary staff.

Sometimes you need more than one job aid. The parents were trying to accomplish a number of different tasks, and some, like the feedings, occur many times a day. High frequency is usually an argument against using a job aid. In this circumstance, though, the on-the-job environment, with its conflicting demands, divided attention, and fatigue, hindered success.  Which means a checklist, a job aid to support accuracy and completeness, made a lot of sense.

A fulfilling checklist

You can see the care diary at the top of the photo. Gareth and Jane already had this type of job aid–a worksheet–to guide their child care. Worksheets help you collect pertinent information to support a subsequent action or to provide a record of what you’d been doing.

The baby-feeding cycle and its “performance requirements,” however, meant that sometimes the worksheet just didn’t get completed. The couple began using the ready-to-fill bottles, arranged on Gareth’s homemade forms, as a three-dimensional checklist.

The rule was that you returned the bottle to the space you took it from [so that you knew from the used bottle that a feeding had occurred]… The tray just sat outside their room on a bookcase until the morning when all the bottles were washed…

This method was really great, particularly when folks came in to help…

In other words, the checklist made it possible for “untrained workers” to produce the accomplishment (babies fed proper amounts according to schedule)  while maintaining the used-bottle audit trail.

Some of the reasons I find this such a useful example:

  • The parents were already using a job aid but found they weren’t always accomplishing their goal. In other words, they saw the need for improvement and set out to achieve that.
  • Gareth experimented with the format, using pen-and-ink versions and “adjusting the info on the sheets until we were happy with it.”
  • On-the-job testing led to further changes, like indicators for the amounts for each bottle, a space for an extra feeding, and an area with a different shape for medication.
  • Over eight months, the couple produced six versions of the checklist to match job requirements (the amounts and the number of feedings changes as the twins got older).

I’m especially grateful to Gareth, who is an information architect at the University of St. Andrews, for permission to share his photo and the background information he so cheerfully provided.

CC licensed photo by Gareth J. M. Saunders

Construction summary worksheet for new-housing tax rebate

Here’s an example of a lengthy job aid: Canada Revenue’s form  GST191-WS, the Construction Summary Worksheet.

Who uses this job aid?

Canada Revenue has a process through which which certain homeowners can claim tax rebates for new construction, substantial renovation, and similar activity. Claims for owner-built homes (as opposed to homes purchased from a builder) use form GST 191. In order to submit the claim, the homeowner needs to complete this worksheet.

What’s this job aid for?

To receive a tax rebate, the applicant needs to document facts about the project, including the location of the construction, the construction period, and the fair market value of the property at the end of the project. In addition, the worksheet has six pages for documenting the various vendors, invoices, amounts paid, and amounts of GST (goods and services tax) paid.

Here’s page 2 as a sample. (Or, view the entire worksheet from the Revenue Canada site.)

Page two of Revenue Canada form GST 191 WS
(Click to enlarge this sample.)

Most projects, of course, will not have all of the 90-odd items listed (like flooring, built-in appliances, septic system, and land purchase). As a job aid, the worksheet is supporting two kinds of tasks: it prompts the applicant to consider an extensive list of possible expenses, and it guides the application through the processes needed to complete the actual application.

That’s why the final section of the GST191-WS worksheet includes a number of calculations based on data in the preceding seven pages: there are six important totals that the applicant will transfer to GST 191, the rebate application.

Section D from Canada Revenue form GST 191 WS
(Click to enlarge this sample.)

Comments

I haven’t read the instructions (which a sensible applicant would do), but I found some of the guidance in Section D confusing.  I think it’s because the section uses digits to refer both to particular boxes (fields) for information, and for page numbers, and for labels within the section.

As an example, see the circled information:

After I enter the amount from box 4 on page 7, what do I do? Multiply it by the amount in box 5? Or multiply it by 5?

And then do I add the amount in box 12, or simply add 12?

I think in both cases the answer is “the amount in the box,” but the worksheet could say so explicitly:

Total amount in box 4 on page 7: ____
Multiply that answer by the amount in box 5: ____
Divide that answer by the amount in box 12: ____

That number 1, on the right, is apparently a label for this calculation–or for the result of this calculation. You can see in the sample of Section D that there are similar labels for the next two calculations, followed by the instruction to add the three together.

This part of the worksheet has nearly half a page of blank space. It’d be a good idea to test two versions of this summary on typical performers to see if clearly labeling helps to reduce errors.

Conveyance-of-property checklist

Often people think of checklists as short, uncomplicated forms. I found a lengthy exception in the field of real estate law in Canada.

The Western Conveyancing Protocol created a standard form for solicitor opinions related to certain real estate transactions in Manitoba, Saskatchewan, Alberta, and British Columbia. The law society in each provide developed a guide for lawyers in that province that would among other things:

  • Provide lenders with a standardize form for the solicitor’s opinion
  • Allow the release of mortgage funds on the date of closing
  • Encourage due diligence by purchasers 

As part of its work, the Law Society of Saskatchewan developed a protocol checklist (2-page PDF) based on the requirements of the protocol. The image below is a portion of that check list; click the image to view the entire checklist (a PDF on the Law Society’s website).

A portion of the Saskatchewan conveyancing protocol

Who uses this job aid?

Solicitors (lawyers) working on certain real estate transactions (mainly transfers or refinancings for existing residential properties).

What’s this job aid for?

As the Law Society of Manitoba says, each society’s protocol is a “practice guide” to help produce a solicitor’s opinion. To greatly oversimplify (I am not a solicitor, I don’t live in either Saskatchewan or Manitoba), the opinion is formal notice to the lender from the lawyer saying that the he or she has followed the protocol and and that the mortgage can be funded and the funds disbursed.

In other words, it’s a highly specialized job aid intended for a limited number of practitioners in specific situations.

The Saskatchewan checklist has multiple sections:

  • Searches (e.g., for tax statements or legal property descriptions) – 15 items
  • Preparing documents for purchaser  – 10 items
  • Insurance
  • Trust conditions
  • Document submission – 9 items
  • Certification of compliance by the solicitor

One small feature I like is that each item on the checklist has a box for “not applicable” as well as one for “done” and “reviewed.”

A “not applicable” box reminds the person using the checklist to consider whether the item applies, and to confirm when it does not.

Verb2Verbe – online conjugation

Verb2Verbe is a website for checking the conjugations of verbs in French or in English. When you reach the site, you can enter any conjugation of a verb in French or in English (spokes, she speaks, elles parlaient).

The result is a display with a conjugation for each person, tense, and mood of the verb.

(Click the image below  to see the actual display for the French verb connaître.)

This powerful example of a reference job aid has a number of useful features:

  • The title of the results page includes links to conjugations of the verb’s equivalents in the other language.
    • For example, the page for the English verb to know will have links to two French verbs: savoir (which usually means to know things) and  connaître (to know or be acquainted with people).
  • You can click the round icon with a T beside each group of conjugations to get an item-by-item translation in the other language.
  • An input form allows you to input a new verb in either language.

Reference job aids usually don’t support one specific task. Instead, they tend to organize and present interrelated pieces of information in a way that reduces the time required for someone to remember or research it.