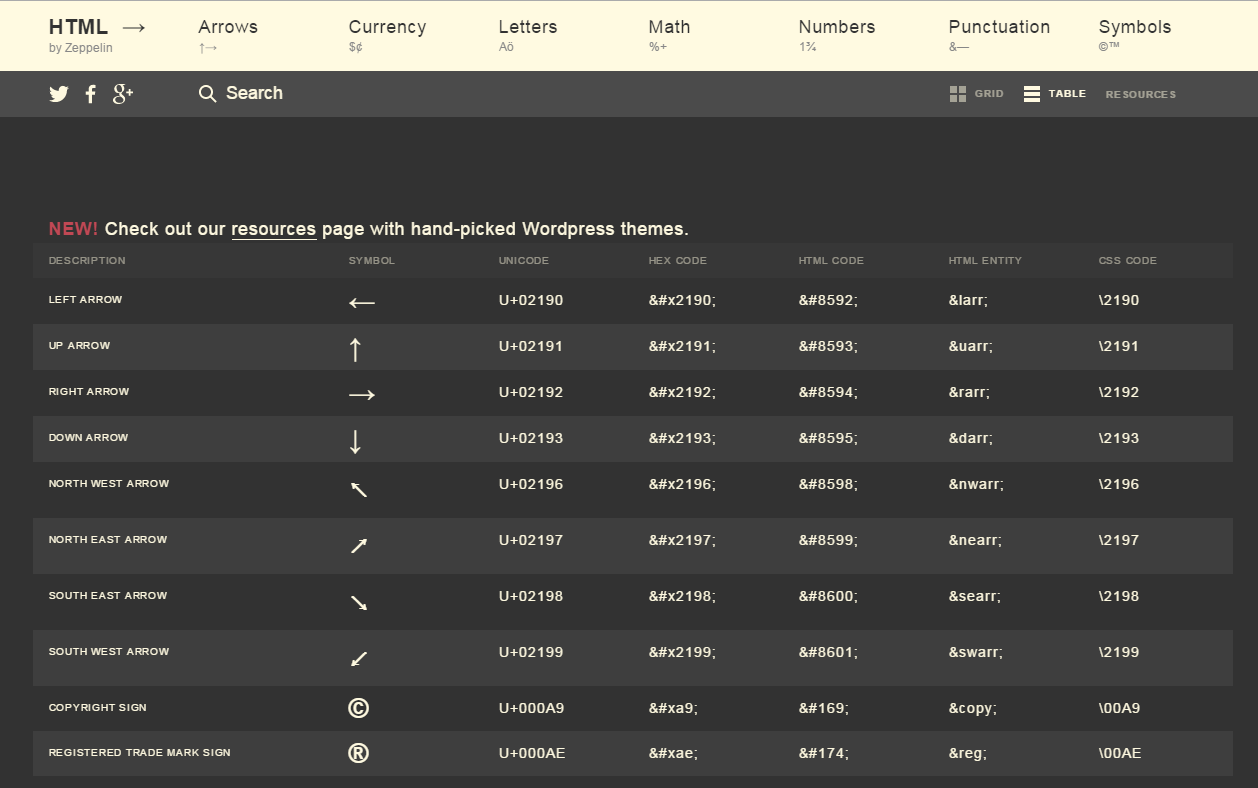
HTML Arrows is a multifaceted reference tool created by Zeppelin.io. The quick summary: it presents codes for displaying symbols in a number of different formats. In the screen shot above, on the left, you see the left-arrow symbol ( ← ). Beneath it are the formats for unicode, hex (or hexadecimal) code, and HTML code and entity.
At the top of the screen is a menu to take you to subsets of symbols: arrows, currency, letters, mathematical symbols, numbers, punctuation, and other symbols.
In the row just below that menu, there’s a search function and controls to switch from grid style (what you see above) to table style (below).
References job aids don’t guide a specific task; they’re not a procedure like a recipe, and they’re not helping you make a particular decision. The goal of a reference job aid is to organize information that the intended audience can use in a number of ways.
I see two main categories of reference job aids:
Recall: these references present clusters of information (like the Articulate keyboard shortcuts), or indexes (like dictionaries or tables of codes).
Callout: these references either decode information (the fields on a form, the parts of an engine) or organize information spatially (like a you-are-here diagram or a geographic map)
I’d put HTML Arrows in the recall camp. In fact, though, calling it a list is like calling a 777 a vehicle.
Who’s the performer?
Someone needing to know the code for a particular format (“What’s the HTML for the capital cedilla [ Ç ] ?”). And, likely, someone browsing a category to see whether there’s a symbol (like for the Thai bhat).
Background
Alexander Dixon, one of the creators HTML Arrows kindly shared some background. He and his friend, in their web design roles, often needed some of these codes. “We thought it would be a fun design challenge to quickly build our own version; the highly typographic nature of the content was exciting — which surprisingly none of the sites we had found really embraced.”
The table layout, he says, delivers a conventional list that might be faster for advanced users; the grid is very easy to navigate visually.
The feedback so far has been really positive, most suggestions are for additional symbol sets on the homepage or main sub-pages.
The value we believe the site brings is in the focus on typography and color to create clear visual hierarchies for both navigation and page elements, the structure of which we derived from the HTML character sets and symbols themselves.
…We’re excited people have found the site helpful, and it’s very cool to see that it can be useful in ways other than simply as a character reference.
My comments
As I told Dixon, this is an stellar example of a job aid. I’m especially glad to talk about it here since it dispells the job-aids-must-be-small myth.
Beyond that, it shows how powerful and appropriate a digital job aid can be. I’m not opposed to paper (you should see my workspace as I write this). 50 years ago, in fact, if you’d wanted an index of symbols (so you’d know what § was called, say), you’d have needed a pretty heft manual and been happy to find it.
Zeppelin has harnessed the power of code to deliver lots of functionality, almost effortlessly:
Swap between grid format and table format.
Choose subcategories via the main menu (arrows, currency, letters, and so on)
A search function (“…a final element we wished existed on more of the sites we used…”)
In addition, you can click an individual symbol for a close-up that includes (in this case) an HTML example and a CSS example.
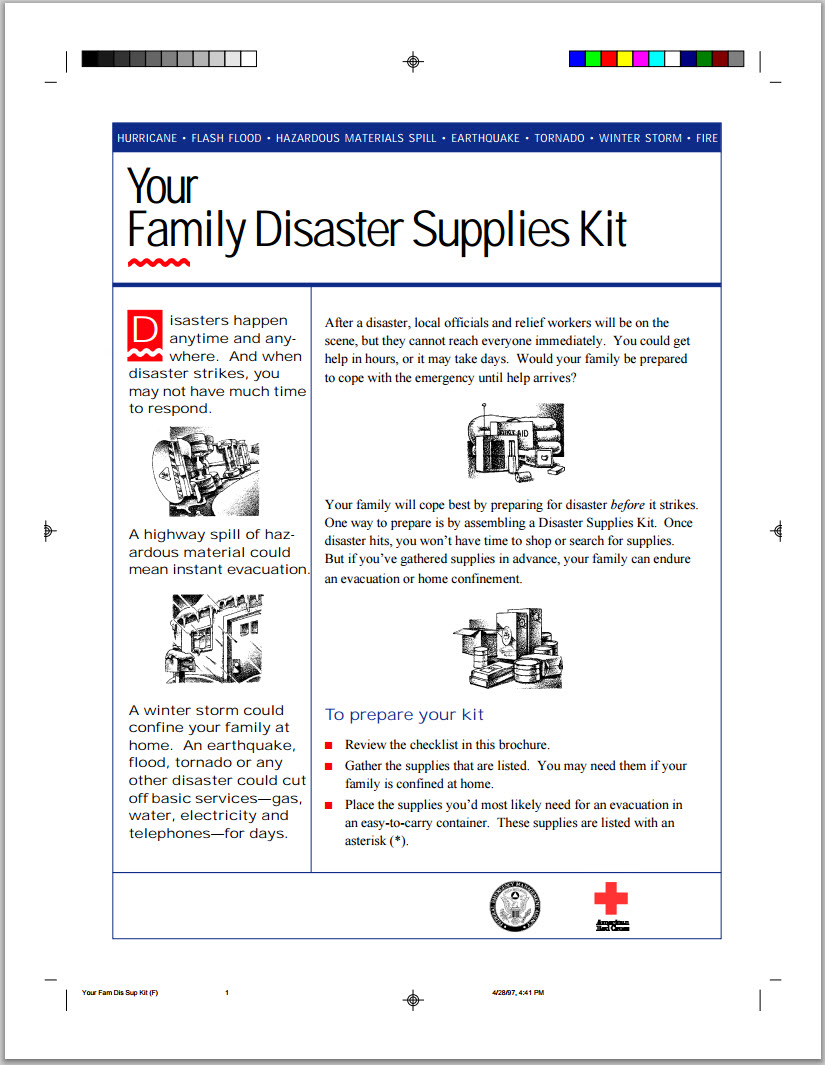
FEMA and the American Red Cross produce a wealth of safety- and hazard-related documents. I’ve found Your Family Disaster Supplies Kit in multiple locations; the one here is from the University of North Carolina Wilmington’s emergency and safety information page.
This is page one of four, each about 5 x 7 (click to view at full size). The idea seems to be to print them on both sides of an 8.5 x 11 sheet, then cut and fold into a brochure.
The brochure’s purpose is to organize information to help with advance planning (“…one way to prepare is by assembling a Disaster Supplies Kit…”). There are two main parts:
A supplies checklist covering items like food, water, clothing, and tools (pages 2 and 3).
A guide to creating a family disaster plan (page 4).
Who’s the performer?
An individual would use this checklist to choose and organize supplies for a disaster such as a storm, an earthquake, or a spill of hazardous material. While the information is useful in many situations, the job aid is concerned with individuals and their personal safety, rather than with, say, a company’s employees at the workplace.
What’s the accomplishment?
Unlike procedures or decision tables, checklists don’t have a specific outcome. However, a good checklist helps a person to assess whether his planning or preparation is complete compared with the checklist’s elements.
Checks and chunks
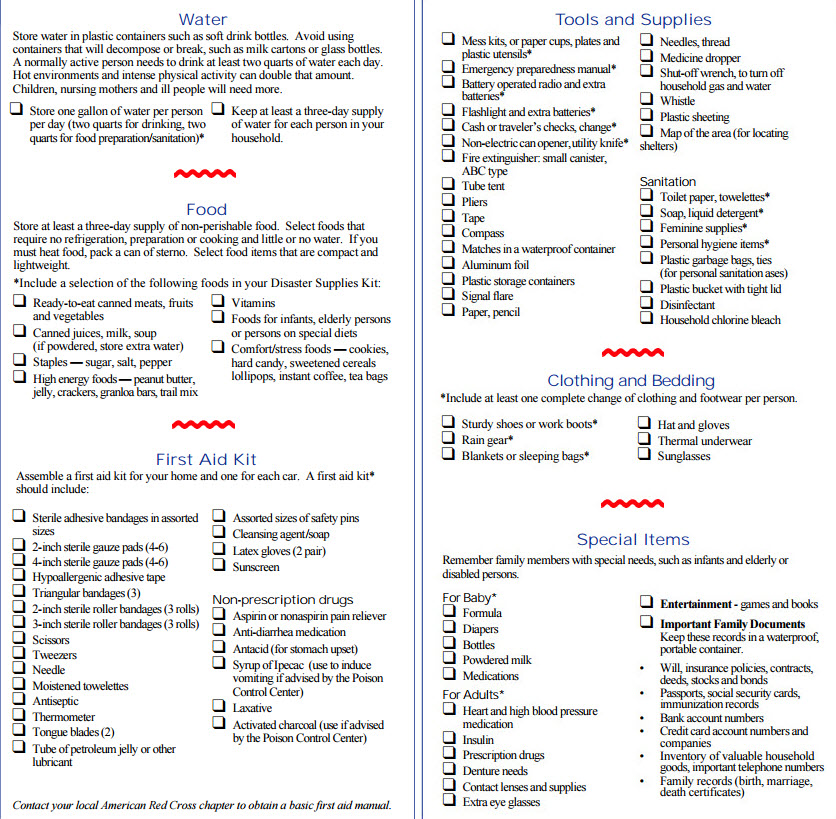
Pages 2 and 3 of the brochure provide a checklist of possible supplies to stock. In all, there are more than 80 items set off with squares. I can hardly resist calling them checkboxes, and particularly for a planning guide like this, I think blank boxes are a better choice than, say, filled-in circles.
At the same time, the checklist is not particularly cluttered, as you can see from this cropped image. (I’ve removed the gutter space between the two pages. You can click to enlarge the image.)
Disaster supplies arranged in six categories
The designers have chunked information into six categories: water, food, first aid, tools and supplies, clothing and bedding, and special items. Some sections begin with general advice (“Water: avoid containers that will decompose or break”); there are a few logical subsections, like the four under special items.
In addition to the chunking, the checklist is remarkably detailed for something that measures 6 by 7 inches. For example, I’ve lived in areas with severe weather, and so I always have a radio and a flashlight that I can charge with a hand crank. Not until I moved to an earthquake zone, though, had I considered the value of a whistle. (If you’re trapped by debris, you can signal your presence with much less effort and over a greater distance with a whistle than with your voice.)
One size – fits most?
I found many different forms of disaster-preparation guides, even when I limited my search to earthquake preparation. The topic is so big that you could fill dozens of pager with detailed information.
To me, that’s a reminder: there’s no one right way to create this sort of guide. FEMA and the American Red Cross have done well to label it a disaster supplies kit. Page 4, Create a family disaster plan, is pretty sketchy — but FEMA has many other resources for planning.
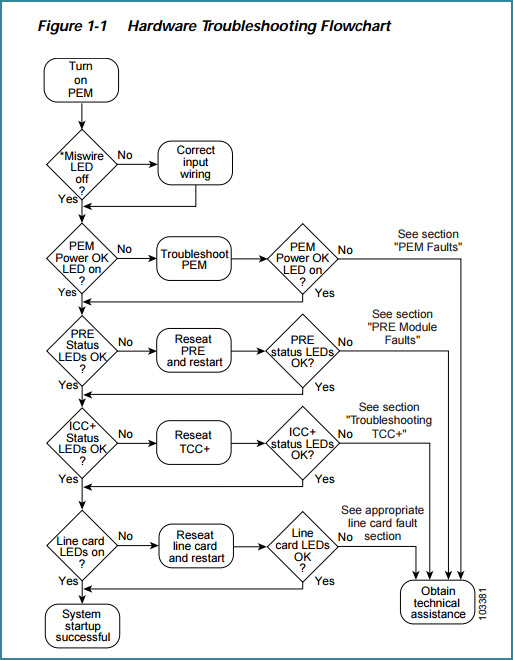
Cisco has an online guide to troubleshooting its uBR10012 Universal Broadband Router. Downloaded in PDF form, the guide comes to 86 pages. Chapter 1, which is six pages long, deals with basic troubleshooting tasks, and one tool in that chapter is this flowchart:
As with any troubleshooting, there can be a couple of accomplishments. Using the flowchart may enable a technician to fix a simple situation that prevents the router from working properly. It may lead to a more detailed set of actions to diagnose and possibly resolve a more complicated problem. Or it may confirm that resolution requires a greater level of technical support.
Who’s the performer?
Cisco says that to benefit from the troubleshooting guide, “you must be experienced using Cisco IOS” and have “some responsibility for installing, configuring, or operating” their router.
That’s not me, and I’m unqualified to discuss the technical accuracy of the Cisco troubleshooting guide. I’m featuring the flowchart here because it’s an effective use of the format, and because with the rest of the guide it demonstrates multiple levels of on-the-job support.
Flowchart – a good choice for the task and the audience
A flowchart like this represents a series of decisions. You could represent the same information in a table. One argument against using a single table is that there are multiple conditions here, and each condition would be an additional column in a decision table. A decision table with five columns (four for conditions, one for the actions) gets wide and thus unwieldy.
You can get around that by creating multiple tables. For Cisco’s intended audience, though, the flowchart format probably works well. They’re presumably skilled technicians, accustomed to the flow of such diagrams.
The flowchart is concise to the point of terseness. You can’t use this job aid if you don’t know what a PEM is or what the ICC+ status is — but if that’s the case, you probably shouldn’t be messing around with the uBR10012 router, which can provide broadband for up to 64,000 subscribers.
In context, for someone who does mess around with these routers, the flowchart’s likely an effective and methodical starting point. After the first decision (is the miswire light off?), the remaining eight come in pairs of decisions like this:
Is the PEM Power OK LED on?
If not, troubleshoot the PEM.
When that’s done, see if the PEM Power OK LED is on now.
If not, see the section (chapter) on PEM faults.
Sounds obvious, but one point of a job aid is to reduce the need for memorization. Follow these steps, and you’ll cover everything you should cover.
Another point, perhaps less obvious, is that a technical job aid aims to overcome tunnel vision. Notice the four round-corner boxes running down the center: Sometimes you reseat a device; sometimes you reseat and restart. I have no idea why, but I’m pretty sure there’s a difference that matters. In the process of troubleshooting, the technical who follows the guide doesn’t waste time restarting when that’s not required.
Troubleshooting: lots more where this came from
Despite a lack of visual appeal, the flowchart and the guide it comes from represent an effective way to guide troubleshooting performance.
The flowchart itself is a summary aimed at a performer who understands its laconic style. It’s a memory jogger.
But: if the PRE status LED won’t come on, the flowchart send you to chapter 3, with its 19 pages of PRE-specific troubleshooting. Those pages include what I call procedures (sets of numbered steps, like the one for resolving console port connection problems); mini-procedures (short sets, with bullets instead of numbers); decision tables (“fault indications and recommended actions”); and different types of references (like a diagram of the PRE-1 faceplate and its indicator lights).
In other words, the Cisco uBR10012 Universal Broadband Router Troubleshooting Guide is at one level a single job aid (the job: troubleshooting the router), and at another level a collection of dozens of specialized job aids. None of this fit-it-all-onto-one-laminated-sheet silliness: if you need two pages to guide a technician through TCC+ card faults, that’s what you use.
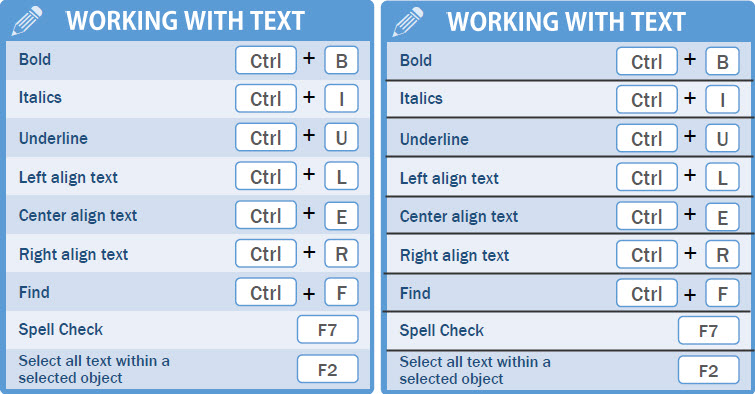
Mike Taylor (@tmiket) recently shared a link to a collection of shortcuts for Articulate Storyline. (You can register as a member of the Articulate community at no charge and then download the shortcuts.)
I liked the look of the guide to keyboard shortcuts and asked Mike if I could include it in the collection here.
About this job aid
I see this as a reference job aid — one intended to organize information rather than to guide someone through a particular task.
What’s the accomplishment?
Since it’s not designed with a specific task in mind, a reference job aid’s accomplishment is aiding recall. In my opinion, that recall is contextual: I’m trying to remember how to work with text in Storyline–or even more specifically, how to right-align text. Or I want to work with the slide master.
The challenge in creating a reference job aid is to figure out the most useful contexts and group the individual elements accordingly.
Who’s the performer?
Given the general nature of a reference job aid, this collection of keyboard shortcuts is useful for anyone already familiar with Storyline. It might also be useful for someone who’d used similar products like Captivate or Lectora: if I know how to preview my project in Captivate, can I do something like that with Storyline, and if so, how?
Comments / critique
I talked with Mike Taylor a bit via Twitter and email. He said his inspiration “was basically a make over of list of shortcuts that didn’t have any type or logical organization. I tried to group them into categories based on what type of tasks they were related to.”
Notice that the colored groupings don’t depend solely on color for their meaning. Each grouping has a title and a separate icon.
A small but helpful detail: the alternating colored background in each group of shortcuts. Within a group, the individual elements are all single-line items: a description of a function, followed by its key combination. The line-by-line change in shading helps to emphasize individual items, and I think does so less obtrusively than black dividing lines (borders) would.
See if you agree:
Other stuff
I use a lot of keyboard shortcuts. When I first saw the Storyline job aid, I immediately thought of a somewhat older example that’s been in my collection for years: a quick-reference guide for Borland Sidekick (and probably a lot of other Borland products as well).
In the upper portion of this example, the designer is using what was once called the WordStar diamond. On a QWERTY keyboard, the letters E, D, X, and S form a slightly slanted diamond. Back before people used mice, some power users preferred to keep their fingers on the typing keys rather than the cursor arrows, and so the Ctrl-xx combinations were a way to change the cursor position.
The “outer diamond” was like a turbo boost: Ctrl-D shifted you one character to the right; Ctrl-F shifted you one word.
Notice also the block commands in the lower right, which harken back to MicroPro’s WordStar and probably to programs before that. It seems clear to me that Ctrl-K-C (“copy the currently marked block”) and Ctrl-K-V (“move the currently marked block to where the cursor is”) are direct ancestors of Ctrl-C and Ctrl-V today, though Ctrl-K-Y (“delete”) became Ctrl-X.
I’m grateful to Mike for sharing this job aid. He’s generous with his time and his ideas, as you’ll see at his blog and at Work Smarter, Not Harder, his collection of tips.
If you know certain details about a task, you can decide whether it makes sense to build a job aid.
Part 1 of the decision considers whether you have to build a job aid, even if it doesn’t make much sense, and whether certain characteristics tell you that a job aid won’t work.
“Is a job aid required?” isn’t as daft as it might seem. If your organization mandates a job aid for some task, then you’re stuck. Unless you convince the right people to reverse the policy, somebody’s going to be building a job aid. If that’s you, you might as well get started, and you don’t need to read the rest of this piece; your decision has been made.
Assuming that a job aid isn’t mandatory, the next question is whether speedor rateis a critical factor in performing the task. The short answer is that if speed matters, a job aid isn’t going to work.
Many jobs call for you to apply knowledge and skill in quickly, even if not predictably. Think about safely driving a car through a tricky situation, much less an emergency. You don’t have the opportunity to consult a job aid. If a kid on a bike suddenly pulls out in front of you, you can’t look up what to do.
Anyone who’s helped train a new driver knows what it’s like when the novice is trying to decide if it’s safe to turn into traffic. We experienced drivers have internalized all sorts of data to help us decide without thinking, “Yes, there’s plenty of time before that bus gets here; I can make the left turn.”
The newcomer lacks that fluency. She’ll acquire it with practice, but not via a job aid. The need for speedy performance gets in the way.
Likewise for rate–a sustained performance over time. Routinely high-volume work like factory production or air-traffic control doesn’t allow time to consult a job aid. Success depend on learning–on committing skill and knowledge to memory, and on retrieving and applying those things appropriately.
I’m a fast typist (80 – 85 words per minute if I’ve been writing a lot), but the moment I glance down at the keyboard, my rate drops. The visual signal interferes with the virtually automatic process I normally use at a keyboard.
Part 2 of the job aid decision looks at the characteristics of the task at hand. Factors like complexity and risk of error help you make the decision, which is why I call this step:
Use what you know about the task to figure out whether building a job aid makes sense. You can go about this in many ways, but the following questions quickly cover a lot of the territory.
♦ ♦ ♦
How often does someone perform the task?
“Often” is a relative term–in fact, most of the questions in Ask the Task are relative. That doesn’t mean they’re not pertinent. Asking “how frequent is frequent?” turns your attention to the context of the task and the people who typically carry it out.
Frequency isn’t the same thing as regularity. Some tasks are frequent and predictable, like a weekly status update. Some are more random, like handling a payment by money order. And some are much more rare, like a bank teller in Vermont handling a money transfer from Indonesia.
Whether you end up building a job aid, designing training, or just tossing people into the deep end of the performance pool, you need some idea of how frequent “frequent” is, and where the specific task might fall along a job-relevant frequency scale.
Think about what frequency might tell you about whether to build a job aid. (Yes, now. I’ll have the mini-lecture later on, but we both know you ought to do some thinking on your own. Just like we know certain other people are going to breeze past without doing that thinking.)
♦ ♦ ♦
How many steps does the task have?
Some tasks don’t really seem to have steps. Or they have very few: look up the arguments for the HTML <br> tag. And some tasks have so many that it might make sense to break them up into logical subgroups: setting up the thermoformer. Testing the thermoformer. Troubleshooting problems after the test.
So, think of “step” as the lowest level of activity that produces a result that makes sense to the performer. If I’m familiar with creating websites, then “create a new domain and assign it to a folder in the \public_html directory” might be two steps, or maybe only one). If I’m not familiar with creating websites, I’m going to need a lot more steps.
That makes sense, because a job aid is meant to guide a particular group of performers, and the presumption is that they share some background. If the performers have widely differing backgrounds, you may need two versions of a job aid–see the Famous 5-Minute Install for WordPress and its companion, a set of far more detailed instructions. Essentially, that’s two job aids: the 5-Minute Install for experienced people, and the lengthier details for newcomers.
As with frequency, you need to think about how many steps in the tasks are few or many, relatively speaking.
♦ ♦ ♦
How difficult are the steps?
For someone who writes a lot and who has solid, basic word processing skills, writing a 25-page report has plenty of steps, but few of them are difficult (other than getting reviewers to finish their work on time).
In the same way, a task can have relatively few steps, but many of them can be quite difficult.
That’s the reason for two step-related considerations in Ask the Task: are there a lot of steps? Are the steps hard?
Pause for a moment and think which way you’d lean: if the steps in a task are difficult, does that mean “job aid might work,” or does that mean “people need to learn this?”
♦ ♦ ♦
What happens if they do it wrong?
This question focuses on the consequences of performing the task incorrectly. Whether a person has a job aid or not is immaterial–if you don’t perform correctly, what happens? Personal injury? Costly waste or rework? Half an hour spent re-entering the set-up tolerances? Or simply “re-enter the password?”
As with the other questions, you need to think about the impart of error in terms of the specific job. And, if you haven’t guessed already, about the relationship between that impact and the value of building a job aid.
♦ ♦ ♦
Is the task likely to change?
We’re not talking about whether the job aid will change, because we still haven’t figured out if we’re going to build one. We’re talking about the task: What are the odds it’s going to change? “Change” here could include new steps, new standards, new equipment, a new product, and so on.
♦ ♦ ♦
You’ve probably detected a pattern to the questions. So the big secret is this:
The more your answers tend to the right, the stronger the case for a job aid.
What follows is the 90-second version of why. (As your read the lines, just add “all other things being equal” to each of them.)
The less frequently someone performs a task, the likelier it is that he’ll forget how to do it. If you’re an independent insurance agent whose practice mostly involves homeowner’s and driver’s insurance, and you write six flood insurance policies a year, you could probably use some task-related support. Job aids don’t forget.
The more steps involved in the task, the more challenging it will be for someone to retain all those steps correctly in memory and apply them at the right time. Job aids: good at retention.
The more difficult the steps are, the harder the performer will find it to complete each step appropriately. A job aid can remind the performer of criteria and considerations, and can provide examples.
The higher the impact of error, the more important it is for the performer to do the task correctly. You certainly can train people to respond in circumstances like air traffic control, emergency medical response, or power-line maintenance. You do that when the on-the-jb situation (up on a utility pole) or the time-to-perform justify the expense of learning. Otherwise, a well-designed job aid is a good way to help the performer avoid high-cost error.
The more changeable the task, the less sense it makes to train to memory. That’s because when the change occurs, you’ll have to redo or otherwise work at altering how people perform. If instead you support the likely-to-change task with job aids, you’re avoiding the additional cost of full training, and you mainly need to replace the outdated job aid with the new one.
♦ ♦ ♦
A recap of those questions:
The first two parts of the decision ask:
Is a job aid mandatory? If not, does speed or rate make a job aid unlikely?
Do the tasks’s characteristics suggest that a job aid makes sense?
Getting this far, you might want to leap right into design. But people don’t perform a task within an environment.
Part 3 of your decision is to ask if that environment will hamper the use of a job aid.
You could ask these question in either order, but physical barriers are sometimes easier to address than social ones.
Often people have to work in settings where a job aid might be a hindrance or even a danger. Someone rewiring an electrical panel, for example. Or someone assembling freight trains at a classification yard:
As the narrator points out around the 4:00 mark, in the 19th century a railroader would have to ride each car as gravity moved it down a manmade hill (the hump), applying the brake by hand to keep the car below about 4 miles an hour. It would have been impossible to give the brakeman a job aid for slowing the car, so his training (formal or otherwise) would have required lots of practice and feedback about judging speed.
Remember, the goal is not to have people use job aids; the goal is to produce better on-the-job results.
Modern railroads rely mainly on computers and sensors to control speed when assembling freight trains, rather than either job aids or training to memory.
Amarillo by morning…
Another way to overcome physical obstacles to the use of a job aid is by changing the form. No law requires a job aid to be on an 8 1/2 by 11 inch laminated piece of paper. Nor on the formerly ubiquitous, multifolded paper of a highway map.
A road map can support different kinds of tasks. You can use it at a table to plan where you’re going to go, to learn about the routes. No barriers to such use.
If you’re driving by yourself, though, a paper road map is at best sub-optimal. It’s hard to use the map safely while you’re driving.
Deep in the heart of Oslo
Real-time support for the driver now includes geosynchronous satellites, wireless technology, a constantly updated computer display–and a voice.
That voice is transformative: it’s a job aid you don’t have to read. Because the GPS gives timely, audible directions, there’s no need to take your eyes off the road and decipher the screen.
Other examples of overcoming physical barriers: attach the job aid to equipment. Use visual cues, like a change of color as movement or adjustment gets closer to specification. Combine audio with voice-response technology (“If the relay is intact, say ‘okay.’ If the relay is damaged, say ‘damaged.'”)
But he had to look it up!
Overcoming physical barriers is one thing. Overcoming social barriers is…a whole bunch of things. Your job aid will fail if the intended performer won’t use it.
Popular culture places a great value on appearing to know things. When someone turns to an external reference, we sometimes have an irrational feeling that she doesn’t know what she’s doing–and that she should. In part, I think we confuse retention of isolated facts with deep knowledge, and we think (reasonably enough) that deep knowledge is good.
At its worst, though, this becomes the workplace equivalent of Trivial Pursuit. A railroading example might be someone who can tell you not only the trains but the kinds of locomotive that ran on a certain line decades ago–but who can’t issue you a ticket in a prompt, accurate, courteous manner.
This bias toward recall may come from the performer herself–she may think it’s better not to “have to” use a job aid.
Or coworkers may have that bias–only a rookie need to look things up. Managers and even clients may prefer not to see the performer using a job aid.
One path to overcoming is bias is to embed the job aid in a tool or application, such that the performer is merely applying one feature. That’s essentially what a software wizard does. Watch me turn this data into a chart: I just choose what I want as I go along.
(And doesn’t “choose what I want” sound much more on top of things than “look stuff up?”)
Joe Harless, from whom I learned a great deal about job aids, gave the example of an injection gun used for immunizations in third-world settings, healthcare workers occasionally had to make adjustments to clear jams and similar equipment glitches.
Senior workers did not want to seem to need outside help to maintain their equipment, but couldn’t retain all the steps. (Remember in Part 2? Number of steps in task, complexity of steps?) So the clearing instructions were attached to the equipment in such a way that the worker could follow the job aid while clearing the gun.
♦ ♦ ♦
The considerations here aren’t meant as either exhaustive or exclusive. They are, however, important stops to make, a kind of reality check before you hit the on-ramp to job aid design. The reason for building a job aid is to guide performance on the job while reducing the need for memorization, in order to achieve a worthwhile result. If the performer can’t use it because of physical obstacles, or won’t use it because of social ones, the result will be… no result.
The Office of Federal Student Aid is part of the U.S. Office of Education. Part of its mission is to inform students and families about federal student aid programs.
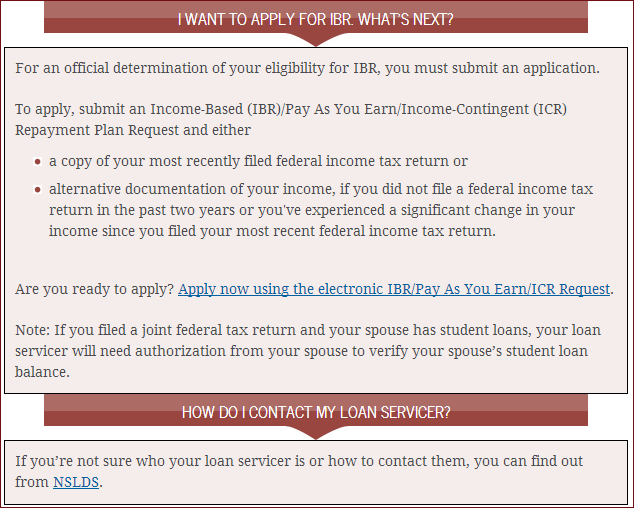
Students with certain federal loans who are experiencing financial hardships may be eligible for the Income-Based Repayment plan. An IBR can lower the required monthly payment, though it can extend the payment period and thus increase the total interest paid.
As part of its information about load replayment, the Office of Federal Student Aid has an online calculator to determine the likely monthly payment under an IBR.
The IBR calculator
This is a calculator job aid–based on information entered, it performs calculations and produces an answer. In this case, the answer is an estimated loan payment.
What’s the accomplishment?
Determining the monthly payment for a student load under an Income-Based Repayment plan.
Who uses this job aid?
Anyone trying to determine this figure; most likely someone with a student loan who’s having trouble making the payments.
Using the calculator
Preliminary information:
There are many kinds of student loans, and not all are eligible for an IBR plan. On the same page as the calculator, Federal Student Aid states:
Your loan servicer will determine your eligibility for IBR, but check this calculator to see whether you might qualify and what your estimated payment could be.
In addition, there’s a link to the National Student Loan Data System so that a person with a student loan can determine which type of loans he has, along with the current amount of principle and interest.
Finally, the page suggests having on hand income information like your most recent federal income tax return.
The calculations:
As the first step, I entered marital status, family size, and location, using an example in the FSA FAQs (single, living alone, in Maryland).
Single, living alone, not in AL or HI
Next, I enter details about my current loans:
Current loans
After that, I enter income data based on my (hypothetical) tax return.
Income data
Based on the data I provided, the calculator says I may qualify for a monthly payment of $309.
The calculator then provides information about the next part of the process:
Next steps
Comments / critique
Adaptive approach
When you see the calculator, it looks like the first image in this post: just the space for marital status, family size, and location. Only after you enter that data does it expand to ask for income data, and only after you enter that data does information appear for the estimated monthly payment and for the next steps to take.
Considering the complexity of the subject, that’s a good approach for the calculator to take. It’s less intimidating at the outset.
Embedded help–less than helpful?
I did find it a little confusing to read “I owe [amount] in federal student loans” and “I originally borrowed [amount] in federal student loans.” When I clicked the icon for more information, at first I thought I had a problem with my browser. It took me a while to realize the information appeared further down the screen than I expected:
Help’s down there
That image is 570 pixels high, and on some computers might not be obvious.
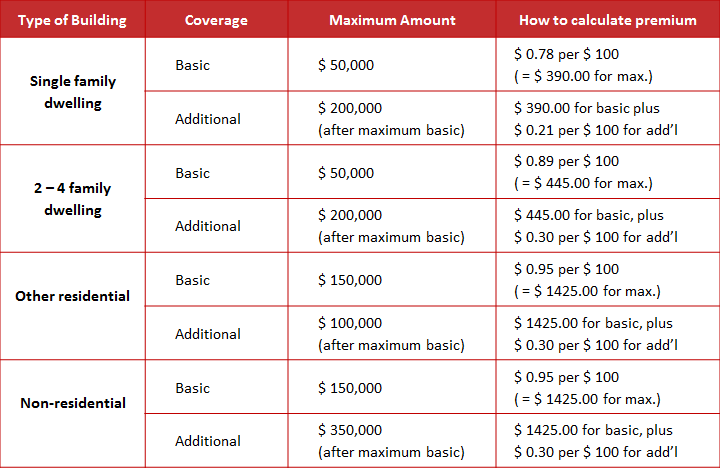
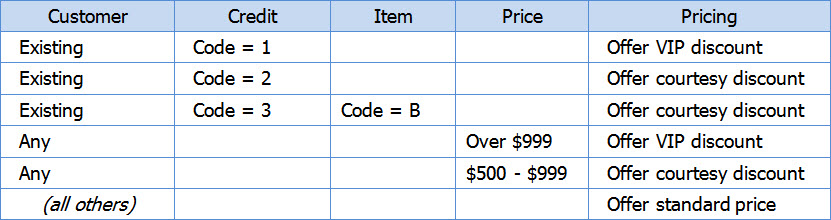
A decision table organizes information to guide someone through a decision. The two main categories of information are the conditions (“if you have this…”) and the decisions — the actions to take (“…then do this”). Often there are multiple categories of conditions, as in this example, a decision table for calculating flood insurance premiums:
Just an example, not an actual rate quote.
There are three categories of conditions: the type of building, the nature of the coverage, and the maximum amount of coverage. A set is my term for the combination of conditions that leads to a specific action. In the table above, “other residential,” “additional,” and “maximum $100,000” is a set that leads to a particular premium calculation ($ 1,425 plus $0.30 per $100 for coverage over $150,000).
This post will show you one technique for identifying conditions, grouping them into sets, and arranging that information into a useful decision table.
The goal
We want to build a decision table help our sales staff know what price to offer customers. You’ll notice that for this exercise it doesn’t matter what the products are, or even what the business is, as long as we can identify the conditions and the actions.
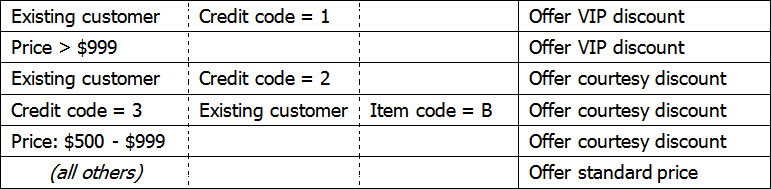
Step 1: List all the possible decisions.
The individual decisions are all the possible actions or outcomes for offering a price. There are three: the VIP discount, the courtesy discount, and the standard price.
You can start your analysis with conditions if you like, but in my experience it’s a lot easier to get agreement on the actions.
By the way, this job aid doesn’t deal with what the discounts are, just when to offer them. You can decide which price to offer without knowing how to compute that price–which underscores the need to think about the task you’re guiding. Maybe you have one job aid for a complex task (choosing and calculating the price), or maybe you have two (how to choose, and then how to calculate).
We’ll stick with a simple example.
Step 2: For each decision, list each set of conditions that applies.
A set is a list of the specific conditions that lead to a particular decision (When the person is already a customer and when his credit code is 1, then offer the VIP discount).
As you analyze the task, each set gets its own row, even if it leads to the same decision as another set.
Each condition in a set has its own column, with the decision in the rightmost column.
The example has three sets of conditions under which you offer the courtesy discount. Each set gets its own row. Repeating the decision this way highlights the different routes to reaching that decision.
Also, in a given set, all the conditions must be satisfied in order to trigger the decision. Being an existing customer is not by itself enough to justify the VIP discount; a price over $999 is.
The company’s procedures didn’t spell out “all others” as a specific type of customer; we derived that from what to do if a customer didn’t meet the conditions for either of the two discounts.
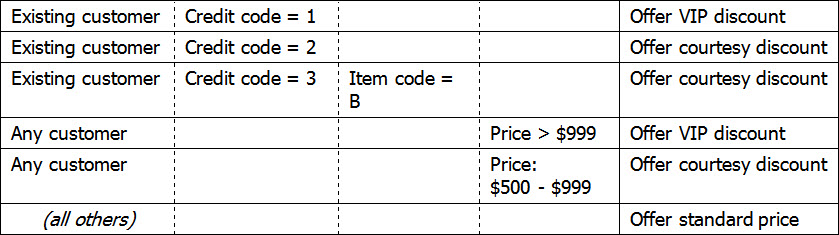
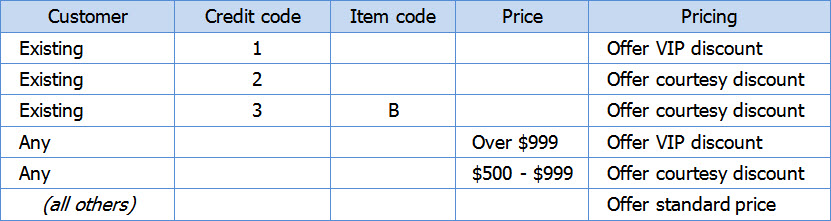
Step 3: Arrange similar conditions into columns.
The information in this table is the same as in Step 2. The difference is that we’ve moved related conditions so they’re grouped in columns. Each column is a category–often pretty loose, at first, as you figure out what the various conditions are.
Step 4: Reorganize the conditions.
Some ways to do this:
Study the columns to see if one stands out as a first cut. If so, move it to the leftmost position. (In the example, Customer seemed like a good start, so it stayed on the left.)
Rearrange rows so identical conditions adjoin one another in that leftmost column.
Move to the next column. Again, consider rearranging the order of columns. You’re now filtering from a particular condition in the leftmost column. (In the example, there are three possible sets of conditions that apply to existing customers; two sets that apply to any customer.)
If you have more than four categories of conditions (more than four when columns), consider using multiple tables. If that were the case here, I might have two decision tables, one for existing customers and one for new ones.
Step 5: Add headings that make sense on the job.
You might have had headings in the previous step–they’re a good way to guide analysis and tease out what a category is really about. Here, we’re moving from analysis to job aid, and so we want headings that help a person on the job.
It’s good to eliminate repetition, so we’re trying Customer and Credit as headings.
Here’s the next version: it pulls the word “code” out of four cells, making them easier to read.
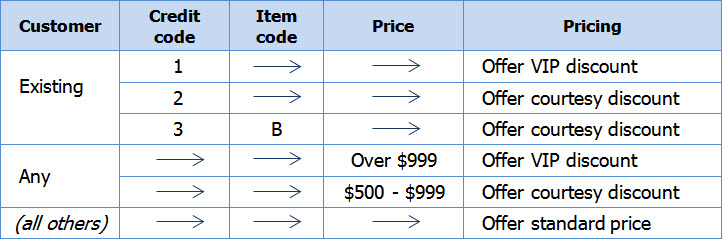
Step 6: Simplify the table.
In the leftmost column, we’ve merged identical conditions. As a person consults this job aid, she’ll decide whether she’s dealing with an existing customer. If she’s not, she can ignore the three sub-paths.
Use dashes, arrows, shading, or similar formatting to make clear that certain conditions don’t apply.
Note that the example specifically did not merge the adjoining “courtesy discount” cells in the decision column. In many cases, I think it’s worth giving each set of conditions its own actions.
By the way, here’s the same decision table with the customer conditions switched:
The logic here is that for any customer, you can offer discounts based on price, and for an existing customer, you can also offer discounts based on other conditions. To facilitate this, I moved Price to the second column; it was the category most closely related to the first Customer condition (‘any’).
Those are the basics. Some thoughts about this approach:
It’s a great analytic tool, especially when collaborating with others. Agreeing on the outcomes (Step 1) and working out sets of conditions (Step 2) can be frustrating and highly iterative, but progress is easy to spot.
It’s a tool, not a law of physics. You can combine Step 2 (identifying sets) and Step 3 (organizing conditions into columns). If you’re doing this electronically, with a word processor or even a spreadsheet, it’s not much work to move things around as circumstances demand.
It’s a great confirmation tool. Once you’ve got a working draft, a skilled performer or a subject-matter expert can try it out. Misunderstandings, omissions, and new sets of conditions emerge quickly.
When you’re building a job aid, pay attention to how you present and structure the information. Job aids don’t usually explain why to do something; they guide the performer about when and how to do something.
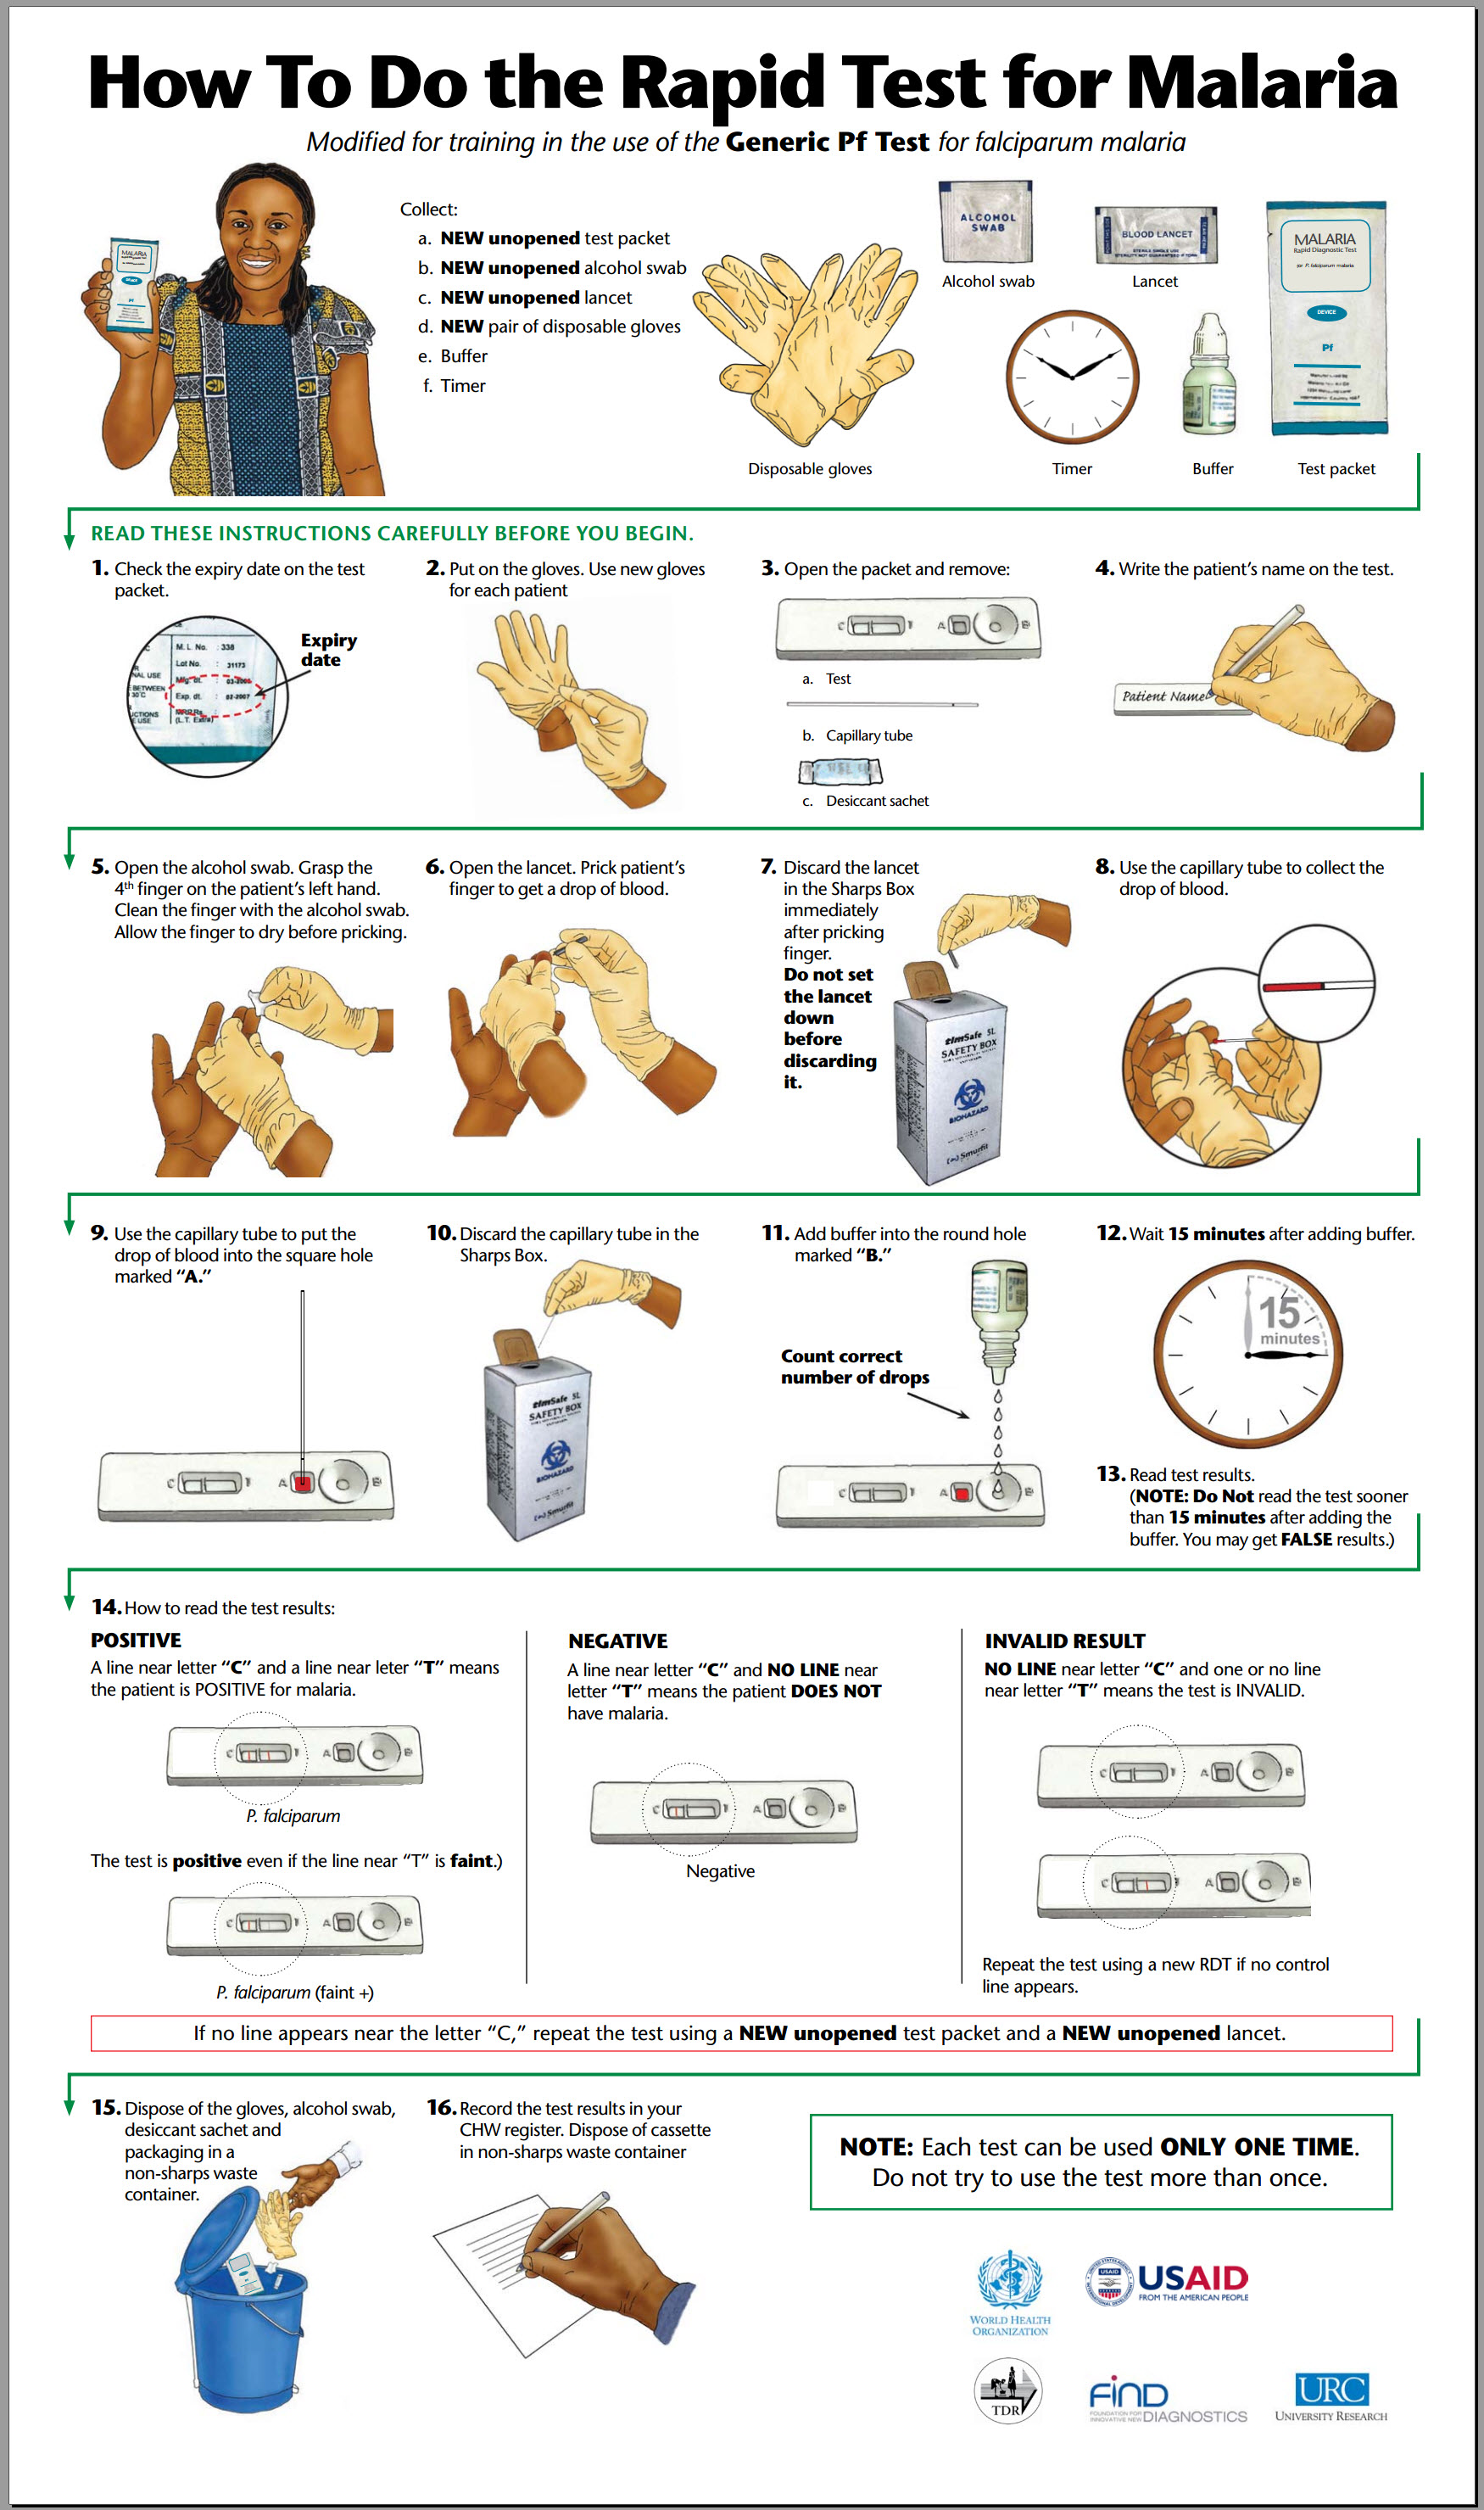
I want to highlight features that nearly every job aid out to have. I’ll use some closeups from a job aid I’ve featured on the Ensampler: How to Do the Rapid Test for Malaria. It guides people as they conduct rapid-diagnostic tests for malaria.
(Although I’m discussing features in general, you can click here to open a copy of the entire job aid in a new window.)
By the way, this is a fairly large job aid; it’s meant to avoid page-turning and could easily be a poster mounted so that the tester can view it while conducting the test. Notice that “avoid page-turning” doesn’t mean “keep to a single 8.5 x 11 page.” Not every job aid has to fit into a 3-ring binder.
♦ ♦ ♦
A clear, task-focused title
What makes this title good? For one thing, it passes the “hey, Dad” test:
Hey, Dad — watch me while I do the rapid test for malaria.
In other words, the title explains the job aid in terms of what the person using it will do. This approach is essential in a job aid guiding some task. Consider alternatives like:
Using the Rapid Test
Basics of the Rapid Test
Steps in the Rapid Test
None of these has the directness of “how to.”
♦ ♦ ♦
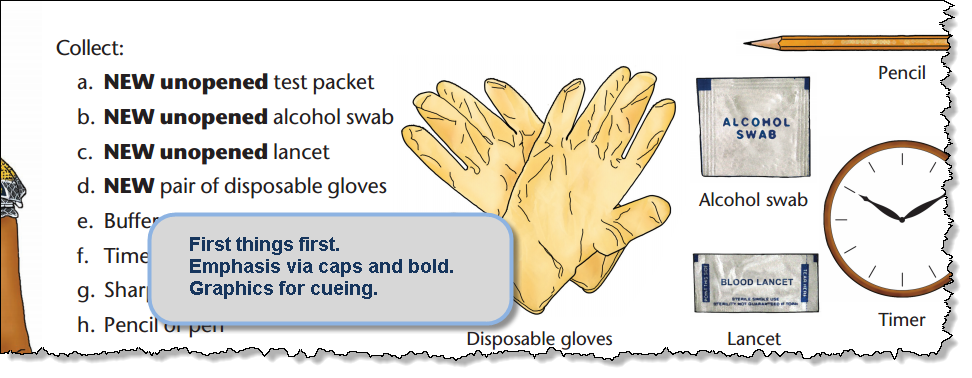
First things first • Consistent emphasis • Graphic cues
Directly under the title of the job aid, you find a list of supplies needed for the test. This is the equivalent of the list of ingredients at the start of a cooking recipe.
Because the rapid-test job aid deals with a medical topic, it consistently calls attention to words like “new” and “unopened.” “New” is always in bold capitals here; “unopened” is always in bold.
The job aid does not depend on color alone to convey meaning in the text; if you reproduced these steps in black and while, the capitalization and bolding would still convey emphasis.
In addition, the job aid includes graphic illustrations of the materials, in part as a reminder for the community workers who will be conducting the tests. Some may have limited skill in reading, and so the illustrations and labels support their ability to recognize what the test packet is.
Often a drawing rather than a photograph is more effective; line art can retain essential information without bringing in unnecessary detail. It’s much more important for the community worker to recognize an unopened lancet than to be able to read on the job aid the printing on the lancet package.
♦ ♦ ♦
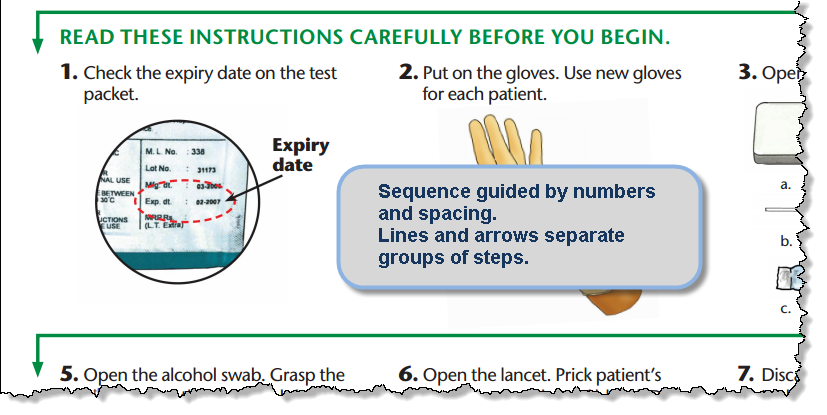
Numbered steps • Separation between steps
If you need to perform steps in a particular order, you have a sequence. Use numbering for the sequence. In general, a numbered sequence is easier to keep track of than one with letters.
♦ ♦ ♦
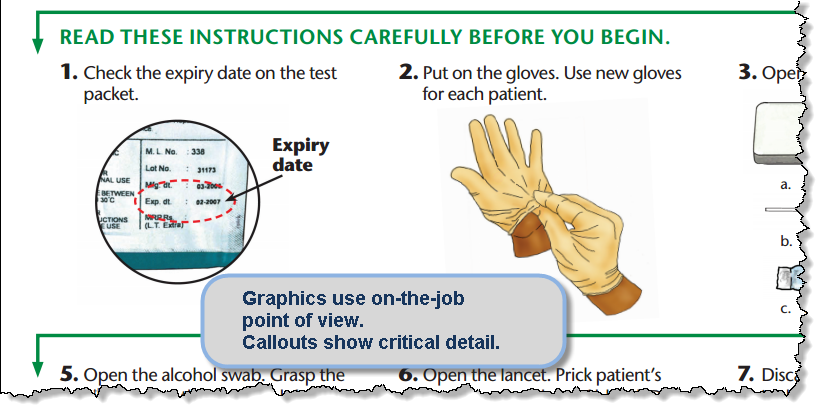
Performer’s point of view • Callouts
Because the purpose of a job aid is to guide performance on the job, graphics need to show examples or technique from the point of view of someone doing the job. Note the hands under step 2 in the illustration above: they look the way your hands would if you were putting gloves on.
This job aid makes careful use of callouts — they appear only when they’re important for a particular step. At the beginning of the job aid, for instance, there’s an image of the test packet but no callout for the expiry date. It makes more sense to check the date right before you’re ready to start.
♦ ♦ ♦
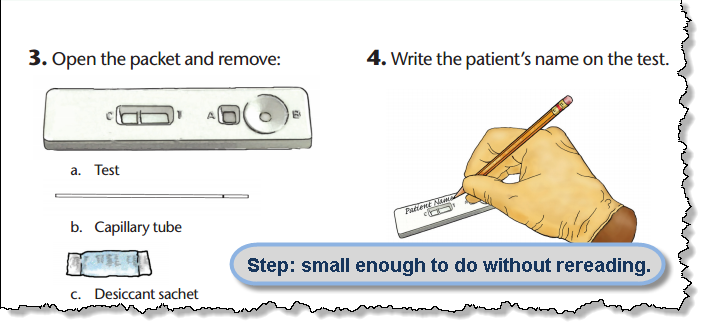
Step size: can be done without rechecking
If you’re building a job aid to guide steps in a procedure, a good rule of thumb for any one step is that the performer should be able to complete it without having to refer to the job aid again.
It’s not that he shouldn’t refer to it. The point is to avoid overburdening him.
In this example, step 3 spells out what you’re removing from the test packet. That’s all that it contains. If the instruction read, “Remove everything from the packet,” though, the performer has no idea what the packet should contain.
What if there were no desiccant (say, due to a packaging error)? Because step 3 tells me I need to remove the test cassette, the capillary tube, and the desiccant, if I don’t find those things, I’m pretty sure something’s wrong.
♦ ♦ ♦
Special emphasis for safety / hazard / high-risk information.
This is a special case for the consistent emphasis mentioned earlier. Some procedures have steps that are highly important in the context of carrying them out. In this example, the entire sentence for “don’t set the lancet down” appears in bold.
By the way, preparing community workers to conduct the rapid diagnostic test involves more than the job aid. The training includes actual practice, including use of the lancet. The training would reinforce the importance of proper procedure and correct handling of the lancet and the capillary tube (which also goes into the sharps box).
♦ ♦ ♦
The features mentioned here are not a complete list, and not every one is essential for every job aid. On the whole, though, if a job aid doesn’t include most of these features, it’s likely to be less effective in supporting performance.
Malaria is transmitted to humans through the bites of infected mosquitos. WHO (the World Health Organization) estimates 219 million cases of malaria, and 660,000 deaths, in 2010 alone (last page in this summary).
Rapid diagnostic tests (RDTs) provide a quick alternative to clinical-based diagnosis, testing for specific proteins produced by malaria parasites. Different tests have different capabilities; some can detect only only species of parasite, such as Plasmodium falciparum (hence “Pf test”). These tests are often conducted by local-community health workers.
A key reason for the RDT is to shorten the time between the onset of symptoms and the beginning of treatment. This WHO job aid is a guide to performing such tests.
Click the image to view in a separate window. Based on training materials at the Malaria Rapid Diagnostic Tests website.
What’s the accomplishment?
Correctly performing the generic Pf test for malaria. This involves using the materials in a medically correct and safe manner, as well as correctly interpreting the results to determine whether the test is positive (indicates malaria), negative (no malaria), or invalid (need to repeat the test).
Who’s the performer?
Health workers, often “in rural areas with limited access to health and laboratory facilities.” These workers may have low literacy and little formal training in the use of the RDT. They may also have minimal supervision in the field.
Comments / critique
Note that this job aid is a model; it would be modified to fit the local language, culture, and the specific RDT test. Thus in step 11, a callout reads “count correct number of drops” (of a buffer solution). In the field, location-specific job aids would presumably give the actual number of drops.
I haven’t seen other examples, though. It may be that the buffer bottle spells out the number of drops clearly, and that the training stresses checking that number.
Size: this is a large job aid. It wouldn’t fit on a typical letter-size or A4 sheet of paper. Instead, it seems intended as a poster, and could be mounted on a wall where the health worker conducts the testing.
You’ll often see arguments that a job aid should be brief. That’s a relative term and often misleading. The essential characteristic of a job aid is that it successfully guides performance by specific kinds of performers. If they can’t succeed with a five-step job aid, maybe you need more steps. If you can’t fit the steps into a given size, then maybe that’s not the right size for that bunch of steps.
Consider: two pages, a larger page, a reframing of a big job aid into three smaller ones (How to Set Up the Widget Modifier; How to Modify a Widget; How to Check Modified Widgets).
A combination job aid: How to Do the RDT is mainly a procedure. Step 14, however, takes up 20% of the space, and supports the key accomplishment: a decision in the form of a diagnosis. That’s why, for the Ensampler, I’ve tagged this job aid under both categories.
Step 14 provides specific examples for the two kinds of positive results (the line near T can be strong or can be faint), and for the two kinds of invalid results (no line at C and no line at T; no line at C and a line at T). Showing these examples is more useful in the context of this job aid than relying solely on “and / or” language in the text.
One quibble about terminology: step 3 of the job aid refers to the test, not the cassette or the test cassette. The only place cassette appears is in step 16.
(Note: with the following point, I’m musing about job aid design in general. I am not trying to second-guess the developers of this particular job aid.)
I might have made different choices for steps 15 and 16.
Those steps seem to involve three chunks of behavior:
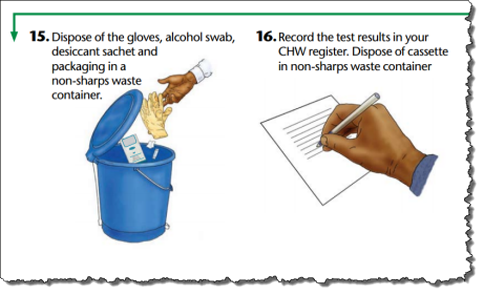
Discard the gloves, swab, desiccant, and packaging (step 15).
Record the test results (first part of step 16).
After recording, discard the cassette (second part of step 16).
I assume that good practice says “write down the results before you discard the test cassette.” If that’s the case, it might make sense to underscore discard-write-discard with a new step 17. It would look like step 15 but with an image of the cassette.
Other resources
The home page for the Malaria Rapid Diagnostic Tests.
A field report on developing and testing a job aid for RDTs, prepared by the Quality Assurance Project in collaboration with the World Health Organization (2004).
A few months ago, I came across a series of “field guides” related to voting. These were developed by Dana Chisnell of UsabilityWorks as a result of research she conducted with Ginny Redish for the National Institute of Standards and Technology.
I’m particularly interested in this topic because I worked as an election judge (the Maryland term for a precinct worker) during four elections, including two as a chief judge (one of the two chiefs at my precinct).
I’m pretty sure most voters have no inkling of the multitude of tasks and procedures that precinct workers — almost always volunteers, despite a small stipend for their effort — must try and carry out in order to ensure that people can exercise their right to vote.
The Field Guide series, “essentials that local election officials” can use when trying to apply ballot design guidelines to real life, have been edited by Dana Chisnell of UsabilityWorks. From Civic Design’s site you can download PDFs of four guides:
I want to highlight some of the recommendations from “Writing Instructions Voters Understand.” These make great sense in most job-aid and performance-support contexts, and the Field Guide provides detailed examples for the individual recommendations.
Layout
You can’t tell easily from the PDF, but in the printed Field Guide, illustrations and examples appear on the left-hand page, and instructions on the right, like this:
So you see the example in context on the left, and then you get details about it on the right.
At the beginning of the ballot, explain how to change a vote, and that voters may write in a candidate.
I think of this as a “before you begin” instruction. The voter might not be thinking about making errors or changing her mind; having this notice at the outset increases likelihood that she’ll recall it during the voting process.
Put instructions where voters need them.
This advice could sound like “be nice,” but the Field Guide gives specific examples:
Break instructions into groups. (No lumbering blocks of text.)
On paper ballots, put turn-over instructions at the bottom right-hand corner.
On electronic ballots, put instructions for writing in a candidate on the write-in screen.
Include information that will prevent voters from making errors.
Here’s a before-and-after approach that shows the stark contrast between insider focus and customer (or voter) focus:
(Before)
If you tear, or deface, or wrongly mark this ballot, return it and obtain another. Do not attempt to correct mistakes on the ballot by making erasures or cross outs. Erasures or cross outs may invalidate all or part of your ballot. Prior to submitting your ballot, if you make a mistake in completing the ballot or wish to change your ballot choices, you may obtain and complete a new ballot. You have a right to a replacement ballot upon return of the original ballot.
(After)
If you make a mistake, ask a poll worker for another ballot.
Use short, simple everyday words.
While I do enjoy the occasional eyeroll in the director of St. George of Orwell’s prescriptionism, Chisnell’s definitely on the right track.
Particularly with the example: Avoid jargon, such as “over vote,” “under vote,” and “partisan.”
Write in the active voice, where the person doing the action comes before the verb.
Note that this guideline is itself an example of avoiding jargon. The average person isn’t good at providing an example of an active verb as opposed to a passive one.
Write in the positive.
Directly from the guide: Tell voters what to do rather than what not to do.
(Before)
If that oval is not marked, your vote cannot be counted for the candidate.
(After)
You must fill in the oval for your vote to count.
When giving instructions that are more than one step, make each step an item in a numbered list.
It’s a lot harder for people to keep track of where they are in a bulleted list than in a number one.
When steps are a sequence, number the steps. That’s what the numbers are for: showing each item’s place within the sequence.
If sequence is not important, then use bullets.
An everyday example: the ingredients in a recipe appear before the steps. The ingredients are usually listed in the order you’ll use them, but they don’t have to be, because (presumably) the steps in the recipe will tell you when to add the carrots and when to add the vinegar.
My thanks to Dana Chisnell for agreeing to have the Field Guides included in the Ensampler.


?")